Showing posts with label 1. Show all posts
Showing posts with label 1. Show all posts
Monday, December 26, 2016
Z3X EasyJtag Release v2 2 0 1 Big Update Lot of phones and changes!!!
Z3X EasyJtag Release v2 2 0 1 Big Update Lot of phones and changes!!!
EasyJtag Release v2.2.0.1. Very big Update. Lot of phones and changes!!!
Software changes:
- Added EasySupporter to help easy search and download support files without shell
- Added CMD42 Set MMC Password functionality for SD/eMMC. User can set and lock the User Area Partition
- Added Erase MMC Password to force erase Locked User Area Partition and reset device lock/unlock password
- Improved/fixed software Region options to write selected regions into eMMC
- Added send crash report option to help Easy-Jtag team improve software
Added via ISP( direct EMMC) :
- support LG D280N (ISP Pinout, Dumps)
- support LG D285 (ISP Pinout, Dumps)
- support LG D320N (ISP Pinout, Dumps)
- support LG D325 (ISP Pinout, Dumps)
- support LG LS885 (ISP Pinout, Dumps)
- support LG LS991 (ISP Pinout, Dumps)
- support LG D605 (ISP Pinout, Dumps)
- support LG D625 (ISP Pinout, Dumps)
- support LG D631 (ISP Pinout, Dumps)
- support LG D821 (ISP Pinout, Dumps)
- support LG E980 (ISP Pinout, Dumps)
- support LG F100S (ISP Pinout, Dumps)
- support LG H345 (ISP Pinout, Dumps)
- support LG H443 (ISP Pinout, Dumps)
- support LG H525N (ISP Pinout, Dumps)
- support LG H631 (ISP Pinout, Dumps)
- support LG H635 (ISP Pinout, Dumps)
- support LG H811 (ISP Pinout, Dumps)
- support LG H815 (ISP Pinout, Dumps)
- support LG D160 (ISP Pinout)
- support LG H818P (ISP Pinout)
- support LG LS660 (ISP Pinout)
- support LG D838 (ISP Pinout)
- support LG D335 (ISP Pinout)
- support LG H618 (ISP Pinout)
- support SAMSUNG SM-A300 (ISP Pinout, Dumps)
- support SAMSUNG SM-G355M (ISP Pinout, Dumps)
- support SAMSUNG SM-G360M (ISP Pinout, Dumps)
- support SAMSUNG SCH-I545 (ISP Pinout)
- support SAMSUNG SGH-I747 (ISP Pinout)
- support SAMSUNG GT-I9506 (ISP Pinout)
- support SAMSUNG GT-S7275 (ISP Pinout)
- support ?OTOROLA MOTO XT1022 (ISP Pinout, Dumps)
Discuss here
Go to link download
Friday, December 23, 2016
Installing Custom Recovery TWRP v2 8 6 1 on Lenovo S580
Installing Custom Recovery TWRP v2 8 6 1 on Lenovo S580
Installing Custom Recovery TWRP v2.8.6.1 on Lenovo S580 - Thank to user SevenMaxs now user with Lenovo S580 device can enjoy custom recovery with material design view, using this guide i will try to show you how to install custom recovery TWRP v2.8.6.1 on Lenovo S580.
This guide is will modified your original recovery to custom, i will warm you that once you replace it you cannot restore it back without having any backup, so please make backup first before starting following this guide. Following this guide also will remove your Lenovo S580 warranty because it will change or modified system file that not allowed.
This guide will not computer so there will be several driver that need to install before you can continued reading the guide, installation driver will be place on requirement section.
Disclaimer :
This guide for educational purpose only, We not responsible if your device bricked after following this tutorial. (DWYOR)

Recovery already can managed :
- full support for SELinux
- mounting two flash drives - internal and removable SDcard PC mode MTP
- mount removable SDcard PC mode MassStorage
- Choice of FS (ext2, ext3, ext4, f2fs, exFAT, FAT32) for the formatted partition ..
- removal of screenshots by clamping power + Volume down (stored / sdcard / Pictures / Screenshots)
- support for OTA
- full functionality ADB
- operation charge battery
- Added ability to set img-files (for this transition to Install and in the top pane to switch from Install Zip on the Install Image )
Screen Shots :


Downloads :
- TWRP v2.8.6.1 ? File custom recovery that can be install using bat command
- ADB Interface Driver ? Android Debug Bridge, install this and your computer will be able to communicate with your android phone.
- miror : TWRP_S580_TWRP_v2.8.6.1 ? Install using any custom recovery, or install through recovery mode
Requirements :
- Must use windows operating system, because need to run bat file that only can run on windows
- Enable USB Debugging on your Lenovo S580 first and make sure it active when connect to computer.
- Install ADB Interface driver first before continue to the next step, will return error on bat file when not install first.
Installing Custom Recovery TWRP v2.8.6.1 on Lenovo S580
- Download TWRP v2.8.6.1 and extract it on the root of any drive.
- After enable USB debugging connect your device to computer using usb cable, on device manager must be exist Lenovo Composite ADB Interface.
- Now just run Flash-TWRP_S580.bat, wait until it finish. Log that show maybe in russian language and will return weird symbols on your computer so it normal
- Process to install maybe just need 5-10 second and your device will reboot automatically after finish installation.
- Wait until boot normally and now you can disconnect your device.
- Done, confirm that TWRP v2.8.6.1 already install on your device by boot to recovery mode.
Congratulations, You already successful to install custom recovery TWRP v2.8.6.1 on Lenovo S580, please leave any comments if you found problems or broken links regarding this guide, Thank You
Go to link download
Wednesday, December 21, 2016
iOS 9 3 1 IPSW Firmware Download Links
iOS 9 3 1 IPSW Firmware Download Links
iOS 9.3.1 IPSW Firmware Download Links
Direct download links to iOS 9.3.1 in IPSW firmware format are available from Apple servers below, using IPSW to update is generally considered advanced but is not too complicated.
iOS 9.3.1 Release Notes
The brief release notes attached to iOS 9.3.1 state the update “Fixes an issue that caused apps to be unresponsive after tapping on links in Safari and other apps”.
To be perfectly clear, installing iOS 9.3.1 completely fixes the link crashing bug, so if you have Safari crashing or freezing when links are clicked, or if other strange URL behavior is noted, install this update to fix the problem. Because the update fixes the problem
Another option is to update to iOS 9.3.1 through iTunes using a Mac or Windows PC. This necessitates connecting the device to a computer, launching iTunes, and choosing the “Update” button within iTunes.
iPhone 6s
iPhone 6s Plus
iPhone 6
iPhone 6 Plus
iPhone SE
iPhone 5c CDMA
iPhone 5c GSM
iPhone 5s CDMA
iPhone 5s GSM
iPhone 5 CDMA
iPhone 5 GSM
iPhone 4s
iPad Pro 12 inch Wi-Fi model
iPad Pro 12 inch Cellular model
iPad Pro 9 inch Wi-Fi model
iPad Pro 9 inch Cellular model
iPad Air 2 Wi-Fi model
iPad Air 2 Cellular model
iPad Air Cellular model
iPad Air Wi-Fi model
iPad Air China model
iPad 4th gen CDMA
iPad 4th gen GSM
iPad 4th gen Wi-Fi model
iPad 3 Wi-Fi 3rd gen
iPad 3 Wi-Fi + Cellular model GSM
iPad 3 Wi-Fi + Cellular model CDMA
iPad 2 Wi-Fi (2,4) revised
iPad 2 Wi-Fi (2,1) original
iPad 2 Wi-Fi + 3G GSM
iPad 2 Wi-Fi + 3G CDMA
iPad Mini CDMA
iPad Mini GSM
iPad Mini Wi-Fi model
iPad Mini 2 Cellular model
iPad Mini 2 Wi-Fi model
iPad Mini 2 China
iPad Mini 3 China
iPad Mini 3 Wi-Fi model
iPad Mini 3 Cellular model
iPad Mini 4 Wi-Fi model
iPad Mini 4 Cellular model
iPod touch 5th gen 5,1
iPod touch 6th gen (7,1
Go to link download
Monday, December 19, 2016
Sony Xperia J ST26i Jelly Bean 4 1 2 Tested Firmware
Sony Xperia J ST26i Jelly Bean 4 1 2 Tested Firmware
You can use the firmware for flash or reset screen lock 100% tested.
Mobile : Xperia J
Model : ST26i
System Version : Jelly Bean 4.1.2
Baseband : 11.2.?.0.33

Mobile : Xperia J
Model : ST26i
System Version : Jelly Bean 4.1.2
Baseband : 11.2.?.0.33
download link:
ST26i_11.2.?.0.33_Arabic--www.SamSony.net--.ftf - 386.52 MB
flash tool:
https://mega.nz/#!z4sSTaQZ!BVO7GSmoTrTwuuJAhadVCO6LQqLXMF543teobwpDG-I
download mode (power off device volume down+plug usb)
Go to link download
Friday, December 16, 2016
Sony Xperia M2 Aqua D2403 Lollipop 5 1 1 Tested Firmware
Sony Xperia M2 Aqua D2403 Lollipop 5 1 1 Tested Firmware
You can use the firmware for flash or reset screen lock 100% tested.
Mobile : Xperia M2 Aqua
Model : D2403
System Version : Lollipop 5.1.1
Baseband : 18.6.A.0.175 Customized MEA

Mobile : Xperia M2 Aqua
Model : D2403
System Version : Lollipop 5.1.1
Baseband : 18.6.A.0.175 Customized MEA
download link:
https://docs.google.com/uc?id=0ByxbVOOPbJaka3k1TmhKVFZlM0k&export=download
flash tool:
https://mega.nz/#!z4sSTaQZ!BVO7GSmoTrTwuuJAhadVCO6LQqLXMF543teobwpDG-I
download mode (power off device volume down+plug usb)
how to flash:
Go to link download
Wednesday, December 14, 2016
KingRoot 4 8 1 Release root Almost All Mobile Last Updated 03 03 2016
KingRoot 4 8 1 Release root Almost All Mobile Last Updated 03 03 2016
KingRoot 4.8.1 Release , root Almost All Mobile [Last Updated 03/03/2016]

Kingroot 4.8.2 APK Released with Full Compatibility Fixes (Updated February 03, 2016)
The best rooting tool for Android device released by Kingroot Developers, now you can root almost compatible device with Kingroot Android APk. Time to time Kingroot developers releases various updates regarding compatiblity and fast rooting to satisfy the neeed of client. For more details @ Kingroot. For to root your Android Mobile device just Download the original APK file and install in your device.
Kingroot 4.8.2 New features:
1. Focus more attention on keep your device safe after root
2. New function to increase system running speed with one click
3. Enhance quality of app, new user interface and new experience
4. Fix some bugs]
https://drive.google.com/file/d/0Bxt...p=docslist_api
Go to link download
How to Update TWRP v2 7 1 1 on Lenovo S930 ROW KitKat ROM
How to Update TWRP v2 7 1 1 on Lenovo S930 ROW KitKat ROM
How to Update TWRP v2.7.1.1 on Lenovo S930 ROW KitKat ROM - Custom recovery is the first think that you wanna install on your device when you wanna modified it, with this custom recovery you can :
- Backup / Restore current working ROM
- Installing custom ROM on your device.
- Rooting your device
- Factory Reset / Wipe data
- etc
Therefore custom recovery is the most important modified that needed to do first. On Lenovo the most famous custom recovery is TWRP (Team Win Recovery Project) but it also need to be modified from it official so it can work for MTK devices, thank to javum.
So today guide is about how to installing or upgrading (if you already have TWRP installed on your system) TWRP v2.7.1.1 on your devices, anyway this is the latest version TWRP for Lenovo S930. This guide is only for Lenovo S930 running Android 4.4.2 KitKat dont attempt try it for lower Android version, even this guide is for Lenovo S930 it has possibility to brick your device, erase your data so please make your own backup preparations.

Disclaimer :
This guide for educational purpose only, We not responsible if your device bricked after following this tutorial. For Android 4.4.2 KitKat Only (DWYOR)
Downloads :
Downloads :
- TWRP_v2.7.1.1_S930_ROW_KK ? 6.0Mb, this file contains recovery.img and Android scatter files for used in flash tool
- USB VCOM Driver ? Install this driver first on your computer, Turn off your device and remove the battery, using USB cable connect your device while look at My Computer ? Manage ? Device Manager there will be MTK65xx Preloader Devices show up for 5 second than disappeared, before disappeared right click on it and select Update Driver Software point it to USB VCOM Driver extracted folder. When it finish disconnect and connect again there will be Mediatek PreLoader USB VCOM Port on your device manager.

- SP Flash Tool v3.1324 ? flash tool needed to flash the recovery file to your device, version is recommended but if you use the latest and it work i will glad to known it.
How to Update TWRP v2.7.1.1 on Lenovo S930 ROW KitKat ROM
- Download all files on your computer, because we wanna to install custom recovery using flash tool so you need to make sure that USB VCOM driver is completely installed on your computer before continued to the next step.
- Extract twrp and flash tool on the same folder, for easy organize it. Go to flash tool extracted folder and run flash_tool.exe if you are using windows 7 or later please run it using administrator privilege to avoid permission error.
- On the flash tool check DA DL All with Checksum option and press Scatter-Loading button, point it to twrp extracted folder and select MT6582_Android_scatter.txt, this action will automatically load recovery.img to flash tool.

- When everything is set, just press Download button or hit F9, this will pop up a warning box that tell not all images loaded correctly, just press Yes button and flash tool will begin stand by and ready to make connection with your device.

- Now turn off your device and remove the battery, when you ready connect your device to computer, flash tool will recognize it and begin to start flashing process. Flashing process just take 5-10 seconds to finish and when you see GREEN CIRCLE in the middle of flash tool it means flashing process already finish.

- Done, wait for second before disconnect your device, it will be on charging mode. Disconnect your device and try to boot on recovery mode, press and hold Power button
+ Volume Up + Volume Down button release until you can see TWRP main menu.
Congratulations, you already successful Installing TWRP v2.7.1.1 if you devices already ROOTED it recommend to use MobileUncle method because it less risk. Please leave a comments if you found broken link or problems regarding this guide. Thank You
Go to link download
Tuesday, December 13, 2016
Install TWRP v2 7 1 1 for P780 ROW KitKat on Firmware ROW S220 140722
Install TWRP v2 7 1 1 for P780 ROW KitKat on Firmware ROW S220 140722
Install TWRP v2.7.1.1 for P780 ROW KitKat on Firmware ROW_S220_140722 - This guide is for using on Lenovo P780 with firmware version ROW_S220_140722, this is a KitKat rom. Custom recovery needed when you want to modified your current firmware, like rooting your phone, and install custom ROM on your device. Before you getting deeper in this guide and start messing your device i must warn you even this guide is already tested but this also has potential to brick your device.
Disclaimer :
This guide for educational purpose only, We not responsible if your device bricked after following this tutorial. Even this guide is already tested but it has possibility to brick your phone, (DWYOR)

Note TWRP v2.7.1.1 :
- TWRP v2.7.1.1 will not recognize backup made by TWRP v2.6.3.0
- Installation process is different from TWRP v2.6.3.3
- RED Button must be press before flashing the recovery.
- All function work great, Backup, Restore and Install work without any problem
- Once you install this you cannot go back to your old recovery, backup the old one.
Downloads :
- TWRP_v2.7.1.1_ROW_KK ? 6.1 MB, Recovery zip file contains recovery.img, scatter file for MT6589 and script for installation from recovery mdoe.
- SP Flash Tool v3.1304 ? Flash Tool needed to install custom recovery to your device, if you often modified your device than you must have this tool.
- USB VCOM Driver ? Install this driver first on your computer, Turn off your device and remove the battery, using USB cable connect your device while look at My Computer ? Manage ? Device Manager there will be MTK65xx Preloader Devices show up for 5 second than disappeared, before disappeared right click on it and select Update Driver Software point it to USB VCOM Driver extracted folder. When it finish disconnect and connect again there will be Mediatek PreLoader USB VCOM Port on your device manager.
Install TWRP v2.7.1.1 for P780 ROW KitKat on Firmware ROW_S220_140722
- Download all required files on your computer, this files need to one folder for easy organize it and easy to loaded on Flash Tool. Before continue to next step please make sure that USB VCOM driver already completely installed on your computer.
- Extract TWRP_v2.7.1.1_ROW_KK and SP Flash Tool v3.1304 on the same folder, now go to SP Flash Tool v3.1304 extracted folder and run Flash Tool.exe if you are using windows 7 please run it with administrator privilege.
- On the Flash Tool, check DA DL All with Checksum option. If you dont check this option you will get DL Error when you do first boot on your device. Click on Scatter-Loading button and point it to TWRP_v2.7.1.1_ROW_KK extracted folder and select MT6589_Android_scatter_emmc.txt, this action will automatic load recovery.img to it place.

- When everything set, press Download button (4) or you can hit F9, this will make Flash Tool ready to connect with your device
- Now please turn off your device and remove the battery. Connect your device to computer, Flash Tool will recognize your device and begin to start flashing process, This process will just take 10-15 seconds to finish. When you see Green Circle in the middle Flash Tool that mean you can disconnect your device from computer.

- Done, disconnect the device from your computer. Try to turn it on and go to recovery mode, press and hold Power Button + Volume Up + Volume Down button and release it until you can see TWRP main menu.
Congratulations, You already success modified your Lenovo P780 with install TWRP v2.7.1.1, now you can freely modified your current ROM and install custom ROM, and please try backup and restore function from TWRP.
Please leave comments if you got any problem regarding this guide, and thank you for reading and visiting.
Go to link download
BBM Material Design v 290 0 1 217 Beta
BBM Material Design v 290 0 1 217 Beta
 Hai semua,,
[UPDATE 27/06/2015] Cek disini BBM versi terbaru
Kali ini ane mau share aplikasi BBM versi terbaru. Untuk BBM versi terbaru ini, tampilannya benar-benar berbeda dari versi sebelumnya karena sudah menggunakan interface Material Design seperti standarnya Android Lollipop. Kalau kalian mau tau apa itu "Material Design", coba search di google atau Wikipedia deh, ane sendiri masih bingung mau jelasinnya :D. Tapi gampang nya sih material design ini standar interface aplikasi terbaru yang dikeluarkan oleh google.
Bisa dibilang BBM yg ini penyegaran tampilan deh dari versi sebelumnya, tampilannya benar-benar beda dan serba baru!!! Tapi ane pribadi sih , ngeliatnya malah jadi mirip tampilan BBM di Windows Phone
Ane kasi info juga nih beberapa fitur terbaru di BBM v2.9 ini:
- Private Chat. Ane masih bingung jelasin fitur yg ini, nanti kalian coba aja yah :D
- Edit pesan. Ini fitur cukup berguna menurut ane, jadi kalau kalian melakukan typo (kesalahan ketik) dan pesannya uda terkirim, masi bisa di edit lagi pesannya selagi belum di Read yah
- BBM Feed. Bisa dibilang ini fitur update status kayak di facebook (CMIIW)
Sekian basabasi nya, silahkan download langsung aja
Download Link:
Download New BBM Material Design Beta V.2.9 (Direct Link)
Download New BBM Material Design Beta V.2.9 (Mirror)
Cara Instal di Android kalian:
- Hapus / Uninstall dulu BBM kalian yg versi lama. Dari Pengaturan/Setelan (Settings) > Aplikasi/Apl (Apps) > Pilih BBM , terus pilih Copot Pemasangan / Uninstall
- Lalu buka Pengaturan/Setelan (Settings) > Keamanan (Security) > Sumber Tak Dikenal (Unknown Source) , beri ceklis pada bagian ini
- Setelah ini lalu buka file apk yang sudah di download tadi dan lakukan instal BBM nya seperti biasa
Go to link download
Monday, December 12, 2016
Lenovo A536 How to Installing Custom Recovery TWRP v2 7 1 0
Lenovo A536 How to Installing Custom Recovery TWRP v2 7 1 0
Lenovo A536, How to Installing Custom Recovery TWRP v2.7.1.0 - After installing ROW version firmware for Lenovo A536, now let modified recovery file with custom recovery. Changing recovery file to custom is something that must to do,for modified your current ROM, with custom recovery you can backup & restore your current running ROM, installing custom ROM, wipe data or factory reset and etc.
Changing standard recovery to custom also have disadvantage one of you cannot install official update that obtain from OTA. Today guide is we gone change Lenovo A536 standard recovery with custom recovery TWRP v2.7.1.0, this guide is using flash tool method but if you have ROOTED device you can also use MobileUncle. Do you own backup preparation before start following this guide, bricking your device is not our responsible.
Disclaimer :
This guide for educational purpose only, We not responsible if your device bricked after following this tutorial. Even this guide is already tested but it has possibility to brick your phone, (DWYOR)

- A536_TWRP_2.6.30 ? contains custom recovery TWRP v2.6.30 and an android scatter file, earlier version more stable but have bug and less option.
- A536_TWRP_2.7.10 ? contains custom recovery TWRP v2.7.10 and an android scatter files, latest version, already improve for internal memory option and more option can be select.
- SP Flash Tool v5.1352 ? tool that use to installing custom recovery to your device, it very recommended to use only this version.
- USB VCOM Driver ? Install this driver first on your computer, Turn off your device and remove the battery, using USB cable connect your device while look at My Computer ? Manage ? Device Manager there will be MTK65xx Preloader Devices show up for 5 second than disappeared, before disappeared right click on it and select Update Driver Software point it to USB VCOM Driver extracted folder. When it finish disconnect and connect again there will be Mediatek PreLoader USB VCOM Port on your device manager.
Lenovo A536, How to Installing Custom Recovery TWRP v2.7.1.0
- Download all required files to your computer, this guide is using flash tool method for flashing custom recovery to your device so please make sure that you already install USB VCOM driver to your computer before continued to the next step. Un complete installation will make flash tool cannot recognize your device and progress bar still on 0%.
- Extract custom recovery and flash tool on the same folder, go to flash tool extracted folder and then run flash_tool.exe. If you are using windows 7 or later please run this program using administrator privilege to avoid any permission error.
- On the flash tool go to Options ? Option ? Download and please make sure that DA DL All with Checksum option is already checked, this is must do step so please dont forget it.

Caution : this option must be checked to avoid bricking your device - Close the options window and back to flash tool, click on the Scatter-Loading button browse it to custom recovery extracted folder and the select MT6582_Android_scatter.txt (1). This action will also automatically load recovery.img (3) to flash tool.

- Download option on Download Only (2), then press Download button or hit CRTL+D. Flash tool will stand by waiting your device to be connected.
- Turn off your device and remove the battery, when you ready just connect your device to computer using USB cable, flash tool will recognize and begin to start flashing process. This will only take 5-10 second to finish, if you can see the GREEN CIRCLE on the middle flash tool than the flashing process is finish.

- Done. Wait 5-10 second before disconnect your device, put back the battery and turn it on and go to recovery mode by pressing and holding Power Button + Volume Up + Volume Down and release when you can see TWRP main menu.
Congratulations, You already success change or modified your standard recovery with TWRP custom recovery, please leave any comments when you found problems or broken links regrading this guide, Thank You
Go to link download
Saturday, December 10, 2016
Install Custom Recovery TWRP v2 7 1 0 on Lenovo S860 2Gb RAM
Install Custom Recovery TWRP v2 7 1 0 on Lenovo S860 2Gb RAM
Install Custom Recovery TWRP v2.7.1.0 on Lenovo S860 2Gb RAM - Not long ago i am write a guide how to install Vibe UI 2.0 china firmware on Lenovo S860 with 2 Gb RAM, on this guide it need to use TWRP v2.7.1.0 for the installation but i dont have guide how to install TWRP v2.7.1.0 for Lenovo S860 2 Gb RAM, so today i will try to write how to install TWRP v2.7.1.0 for Lenovo S860 2Gb RAM.
This guide is only for european or international Lenovo S860 with 2 Gb RAM and will not work with china Lenovo S860 which has 1Gb RAM it will only brick your device. This guide also for KitKat International firmware only and has enable OTG on recovery mode, this guide using flash tool method to install custom recovery on your device so there is some driver that need to install on your computer before you can start following this guide
Disclaimer :
This guide for educational purpose only, We not responsible if your device bricked after following this tutorial. (DWYOR)

Requirement :
- Because this guide is using flash tool, then you must make sure that USB VCOM driver is completely installed on your computer, how to install USB VCOM driver :
- turn off your device and remove the battery, If you device using non removable make sure that your device is completely turn off
- open device manager on your computer
- connect your device using USB cable
- there will be MTK65xx Preloader Devices show on your device manager, PORT section for 5 second or less and then disappear
- disconnect and connect your device again, right click on MTK65xx Preloader Devices before it disappear, select Update Driver Software
- point it USB VCOM extracted folder, and install the driver from there.
- disconnect and connect your device again, there will be Mediatek PreLoader USB VCOM Port on your device manager PORT section.
- SP Flash Tool v3.1324 ? this is flash tool, too to flash custom recovery or ROM to your device using this tool you can flash or backup you ROM. Recommended to use this version only.
- USB VCOM driver ? without this driver flash tool will not recognize your device, install it first before start following the guide.
- TWRP_v2.7.1.0_S860_ROW_KK ? custom recovery image
Install Custom Recovery TWRP v2.7.1.0 on Lenovo S860 2Gb RAM
- Download all required files, first thing to do is install the USB VCOM driver on your computer, so please follow requirement section, make sure it completely finish and show Mediatek PreLoader USB VCOM Port on your device manager PORT section.
- Extract flash tool and custom recovery files on the same folder, open flash tool extracted folder and run flash_tool.exe, if you are using windows 7 or later please run it using administraotr privileges to avoid any permission error.
- On the flash tool, check DA DL All with Checksum and the click Scatter-Loading button browse it to custom recovery extracted folder and then select MT6582_Android_scatter.txt, click open.
- It will automatically load recovery.img to flash tool

- Now, you just need to press Download button on flash tool, it will trigger warning that said not all images correctly loaded. Just press Yes button and flash tool will become standby waiting connection with your device. (with all button disable, only stop button enable)
- Turn off your device, remove the battery or if your device use non removable battery just make sure that it completely turn off (wait for 2-3 minutes after power off it). Connect your device to flash tool, if USB VCOM driver is completely install the flash tool will recognize your device and begin to flash the custom recovery, it will take 10-15 second to finish and will show GREEN CIRCLE in the middle of flash tool
- Done
Congratulations, you have successful install custom recovery TWRP v2.7.1.0 on Lenovo S860 with 2 Gb RAM, to check it just boot to recovery mode press Power button + Volume Up + Volume Down button and release when you see TWRP main menu. Leave any comments if you got problems or broken link regarding this guide, Thank You
Go to link download
How to Root Sony Xperia L C2104 C2105 on Jelly Bean 4 2 2 Build 15 3 A 1 12
How to Root Sony Xperia L C2104 C2105 on Jelly Bean 4 2 2 Build 15 3 A 1 12
Sony Released A new update to Xperia L , it is still 4.2.2 , just few bug fixes. The new build is 15.3.A.1.12. Thanks to CUBEANDCUBE for the Root.
.png)
So here is the tutroial how to Root Xperia L running Jelly Bean 4.2.2 Build 15.3.A.1.12
Disclaimer : I am not responsible if you brick your phone or if u make any other damage to your phone
So Lets Start :
1. First make sure you are running Jelly Bean 4.2.2 Build 15.3.A.1.12. Go to Settings > About to verify this.

2. Download this File - Root Xperia L Tool and exctract it completely using WinRAR or WinZip.
3. Enable USB Debugging , Go to Settings > About phone and tap 7 times on Build number to enable Developer options, now Go to Settings > Developer options to enable Enable USB debugging mode.
4. Enable Unknown Sources. Go to Settings > Security and check Unknown sources.
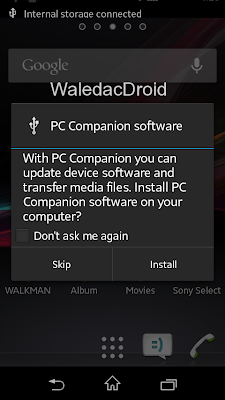
5. Connect USB Cable to phone , then connect it to your Computer. On your phone Skip the PC Companion Companion prompt (if it appears), see screenshot below.
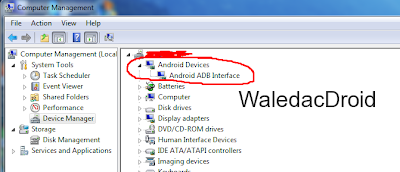
6. Right Click on My Computer > Manage , now goto Device Manager , and see if Android is listed like the below screenshot , to verify your device is properly connected. If yes move on to the next step.
7. Now go to the Folder where you extracted the downloaded file from Step 2, and execute "install.bat" .
Note :- If your device is not properly connected or ADB drivers are not installed , you will be stuck on daemon started successfully .

8. The Rooting Process will start , wait for some time , your phone will automatically reboot, wait for some more time :P
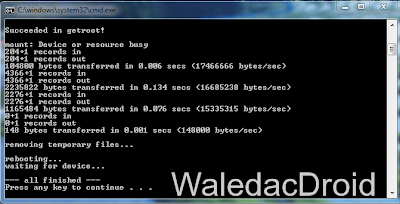
9. When the Rooting Process is completed , the Screen will show --all finished--. Press Any Key to Continue.
THATS IT YOUR PHONE IS NOW ROOTED.
Note : This method works on both locked and unlocked bootloader devices!!!
If you have any problems feel free to comment :)
So here is the tutroial how to Root Xperia L running Jelly Bean 4.2.2 Build 15.3.A.1.12
Disclaimer : I am not responsible if you brick your phone or if u make any other damage to your phone
So Lets Start :
1. First make sure you are running Jelly Bean 4.2.2 Build 15.3.A.1.12. Go to Settings > About to verify this.
2. Download this File - Root Xperia L Tool and exctract it completely using WinRAR or WinZip.
3. Enable USB Debugging , Go to Settings > About phone and tap 7 times on Build number to enable Developer options, now Go to Settings > Developer options to enable Enable USB debugging mode.
4. Enable Unknown Sources. Go to Settings > Security and check Unknown sources.
5. Connect USB Cable to phone , then connect it to your Computer. On your phone Skip the PC Companion Companion prompt (if it appears), see screenshot below.
6. Right Click on My Computer > Manage , now goto Device Manager , and see if Android is listed like the below screenshot , to verify your device is properly connected. If yes move on to the next step.
7. Now go to the Folder where you extracted the downloaded file from Step 2, and execute "install.bat" .
Note :- If your device is not properly connected or ADB drivers are not installed , you will be stuck on daemon started successfully .
8. The Rooting Process will start , wait for some time , your phone will automatically reboot, wait for some more time :P
9. When the Rooting Process is completed , the Screen will show --all finished--. Press Any Key to Continue.
THATS IT YOUR PHONE IS NOW ROOTED.
Note : This method works on both locked and unlocked bootloader devices!!!
If you have any problems feel free to comment :)
Go to link download
Wednesday, November 30, 2016
Lenovo S939 installing custom recovery TWRP v2 8 1 0 with Android 5 0 UI
Lenovo S939 installing custom recovery TWRP v2 8 1 0 with Android 5 0 UI
Lenovo S939 installing custom recovery TWRP v2.8.1.0 with Android 5.0 UI - Found on some Lenovo forum, custom recovery TWRP v2.8.1.0 for Lenovo S939. Today guide will share how to install custom recovery TWRP v2.8.1.0 on your Lenovo S939, the guide also helping you prepare your computer for installing custom recovery and do modification on Lenovo S939.
The file on this guide also can be use using Mobile Uncle application, but for the guide i will use flash tool to install the recovery file to Lenovo S939.
Remember modified system file on Lenovo devices always have risk, so please make backup preparation first before following the guide. The guide and file on this guide is only for Lenovo S939, do not use it for any other devices.
Disclaimer :
This guide for educational purpose only, We not responsible if your device bricked after following this tutorial. (DWYOR)
Modified Lenovo S939 always have a risk, please prepare your self before following the guide

Download :
Lenovo S939 installing custom recovery TWRP v2.8.1.0 with Android 5.0 UI
PS :
- TWRP_v2.8.1.0_S939 ? custom recovery files, can be use with mobile uncle application also.
- USB VCom driver ? this driver must be install on you computer first before can be use.
- SP Flash Tool v3.1328 ? tool that can be use to install custom recovery file to your device, recommended using this version.
Before can start to follow the guide, first you must install USB Vcom driver to your computer without this driver flash tool will not recognize your device when it attach to the computer, to install just follow below instruction :
- turn off your device and remove the battery, If you device using non removable make sure that your device is completely turn off
- open device manager on your computer
- connect your device using USB cable
- there will be MTK65xx Preloader Devices show on your device manager, PORT section for 5 second or less and then disappear
- disconnect and connect your device again, right click on MTK65xx Preloader Devices before it disappear, select Update Driver Software
- point it USB VCOM extracted folder, and install the driver from there.
- disconnect and connect your device again, there will be Mediatek PreLoader USB VCOM Port on your device manager PORT section.
Lenovo S939 installing custom recovery TWRP v2.8.1.0 with Android 5.0 UI
- When you reach this step i assume that you already successful installing USB VCom driver on your computer. Download all required files above and extract on the same folder.
- Open flash tool extracted folder and run flash_tool.exe, if you are using windows 7 or later please run it using administrator privileges to avoid any permission error.
- On the flash tool, check DA DL All with Checksum and the click Scatter-Loading button browse it to custom recovery extracted folder and then select MT6592_Android_scatter.txt, click open.
- It will automatically load recovery.img to flash tool
- Now, you just need to press Download button on flash tool, it will trigger warning that said not all images correctly loaded. Just press Yes button and flash tool will become standby waiting connection with your device. (with all button disable, only stop button enable)
- Turn off your device, remove the battery or if your device use non removable battery just make sure that it completely turn off (wait for 2-3 minutes after power off it). Connect your device to flash tool, if USB VCOM driver is completely install the flash tool will recognize your device and begin to flash the custom recovery, it will take 10-15 second to finish and will show GREEN CIRCLE in the middle of flash tool
- Done
If you got error code 8038 after connect Lenovo SS939 to computer, then you must use mobile uncle to install this recovery. The error mean your partition table is not same with the recovery. (PMT Changed, must be downloaded)
Congratulations, Please confirm that custom recovery already installed on your Lenovo S939. Reboot your device while press and hold Power button + Volume Up + Volume Down button, this will make your device boot to recovery mode.
Please leave comments if you found any problem or broken link regarding this guide, and thank you
Go to link download
Monday, November 28, 2016
Tutorial Recovery TWRP UMI Hammer Lollipop 5 1
Tutorial Recovery TWRP UMI Hammer Lollipop 5 1
UMI TWRP Recovery Hammer (Lollipop 5.1) (Installation using Flash Tool)
At last we have a Recovery with which to restore our nandroid copies and leave the terminal as it had before it any "adventure".
This recovery we have to thank the people of Cinafoniaci and we can download it from here: UMI Hammer TWRP 2.8.7.0: http://www.needrom.com/download/umi-hammer-twrp-2-8-7-0/
VSP also need to download the Flash Tool v5.1516.00 tool: http://www.needrom.com/wp-content/uploads/2015/04/SP_Flash_Tool_Windows_v5.1516.00.zip
The two downloads will leave them for example on the desktop, to make it easier to search and unpack.
Installation is simple verdaderamnte. Once downloaded VSP Flash Tool (or if we already had before) we open the cartpeta and you look at the putting green icon putting flash_tool, open it with a double click
")
We will notice if this is the first time we open, we give OK and continue
")
After opening the program window, if we had not already in our PC we will show the almost empty window, if you have already used before we will leave it as is, in both cases pincharemos in Scatter-loading
")
Now we will get a search window where we have to locate the folder where you have unzipped the Recovery. Click in it or Open
")
In it we will see the text file we want, the MT6732_Android_scatter, select it and double click it or click in sobr open
")
Now we see that Flash Tool window has changed and now they are selected only two squares, recovery and logo. The logo is to Cinafoniaci guys, is that we see every time we turn our terminal, out of respect for his work I would leave, it costs nothing ... Now we click the top left where it says Download.
Once we click on Download will see that it gets greyish, now we connect the USB cable to our PC and our terminal Hammer and simultaneously press VOL. + And while POWER (Volume Up and On)
")
If we do it right we see first down will get a red progress bar first, then yellow ...
")
Finally it ends with a window in the center confirming that everything went OK
")
And we will have our TWRP Recovery for Lollipop
Well, for now Ill leave the rest to Hammer eMax calls me ... but Im not going away, Im on the right.
Go to link download
Sunday, November 27, 2016
How to Root Sony Xperia M C1904 C1905 Jelly Bean 4 1 2 Build 15 1 A 1 9 15 1 C 1 17
How to Root Sony Xperia M C1904 C1905 Jelly Bean 4 1 2 Build 15 1 A 1 9 15 1 C 1 17
Root your Xperia M [C1904/C1905] running Jelly Bean 4.1.2 Build 15.1.C.1.17 or 15.1.A.1.9. To know what is root and what are its benefits / losses of rooting your device you can google that , dont ask me about that :P , I will post the tutorial on rooting Xperia M , if you face with any problem while feel free to comment. The files used in this tutorial are not mine.
You can also root by vRoot - Here is the link of the tutorial the screenshots are of Xperia M dual but it will work on Xperia M also :) - LINK
Read And Follow all the steps.
Step 1 - Rooting your Xperia M using Framaroot.apk
- Download Framaroot.apk from here - LINK , copy it to your phone.
- Install it like a normal app.
- Open Framaroot from the App Drawer.
- Now Select Install SuperSU.
- Select Gandalf exploit and then wait for few seconds for a pop up message that says Success.
- Now your phone will automatically reboot, after reboot you will SuperSU app in the app drawer , that means your Xperia M is rooted , hold on it is not finished yet :P
Step 2 - Installing BusyBox
- Download and Install BusyBox from the playstore or from here - LINK
- Open BusyBox , wait for few seconds untill it asks SuperSU access, Grant SuperSU access
- Now have patience and wait for some time to let it initialize , after initialization completes , you will see a Install button on bottom left corner , click Install then Select Normal
- Wait till the Installation process is complete , when the process is completed you will see a pop up that says Success.
- Installation of BusyBox is now complete :)
Step 3 - Reboot Fix (System Read/Write)
- Download reboot fix.rar from here - LINK , Extract it on your PC.
- Turn USB Debugging Mode On on your mobile from Settings>Developer Options. (Also Maker sure you have ADB Drivers installed , if you install Sony PC Companion and connect your phone with USB Debugging Mode on ADB Drivers will be installed)
- Make sure no ADB related program is running now like Sony PC Companion or Flashtool
- Run supersu.bat
- Follow the On Screen Instructions
Now your phone is successfully rooted , if you have any problems feel free to comment. :)
Source - XDA
Go to link download
Monday, November 21, 2016
How to eradicate Android 5 1 1 Nexus 5 Lollipop LMY48B Guide
How to eradicate Android 5 1 1 Nexus 5 Lollipop LMY48B Guide
How to eradicate Android 5.1.1 Nexus 5 Lollipop (LMY48B) [Guide] - Once you have updated the Nexus 5 to the last image of Android 5.1.1 factory LMY48B Lollipop, you will need to obtain root access it again from the image of factory waste clean. Ill show how you can eradicate the Nexus 5 Lollipop LMY48B Android 5.1.1 firmware build number.
![How to eradicate Android 5.1.1 Nexus 5 Lollipop (LMY48B) [Guide]](https://blogger.googleusercontent.com/img/b/R29vZ2xl/AVvXsEg3N94FSG5AnGAf3KHvf0xgDxQbVTB5VZpESfr9lyGf1_mLXcsEHhZK2YTXR_Vb4LbEJ8IEFr7Fie15Ye__5lo9RDzzOpPTEbbUEQE-_E4aCBXraxVb2JcVQLUWcVBy0PC1rbjxojo0nYlI/s320/11083981874_5384da07e6_z.jpg "How to eradicate Android 5.1.1 Nexus 5 Lollipop (LMY48B) [Guide]")
REQUIREMENTS
You want to install the factory image LMY48B if you already have root access, because the official OTA update can brick your device. Once this is done, follow this guide to get root access back.
Just follow this guide to the Google Nexus 5 and any other device Google Nexus.
Before starting
You make void the warranty following the guidance Nexus.
You must enable USB debugging mode. First, open the Options Developer, go to Settings> About device> tap the build number 7 times. Now you can find options Scheduler configuration now and USB debugging is within Developer options.
Download Google USB drivers to the Windows computer. If you find the guide does not work, try restarting your computer to get the drivers to work and return to the directory.
You must unlock the Nexus 5 bootloader before starting this guide. No way to do it with a locked bootloader.
AS ROOT Android 5.1.1 Nexus 5 image factory LOLLIPOP
- Download and install the Android SDK from the official web site developers.
- You can configure Windows ADB and Fastboot following our guide. If you already have, there is no need to do it again.
- Download SuperSU you want to have Chain of Fire.
- SuperSU transfer the file to the internal SD card storage device in the Nexus 5.
- Download ClockworkMod Recovery want. CWM transfer the file to the same folder with the Asian Development Bank.
- Completely off the Nexus 5 by holding the power button.
- Start the Nexus 5 in Fastboot mode by pressing the volume and power buttons together and hold them firmly clamped until the menu appears.
- Open the folder where you have ADB and CWM and click the mouse while holding down the Shift key and choose to open the windows command here since the new menu.
- Now type this command: fastboot flash recovery recovery-clock-touch-6.0.4.5-hammerhead.img
- Now look at the new menu in changing device and select the recovery option. Now you are entering recovery mode.
- Choose the "flash zip from SD card" option, followed choose zip from sdcard ".
- Locate the file has been transferred SuperSU prior to the root of storage and confirm to increase.
- Once complete, go to the main recovery menu and choose to reboot.
Congratulations! Now you have gained root access recovery inside thanks to the SuperSU and you can flash a custom ROM again.
Go to link download
Miracle Falcon Box Fire HTC PACK 1 2 19th June 2016 World Cup Update Again Free 4u
Miracle Falcon Box Fire HTC PACK 1 2 19th June 2016 World Cup Update Again Free 4u

Go to link download
Sunday, November 20, 2016
Sony Xperia Z5 E6653 Lollipop 5 1 1 Tested Firmware
Sony Xperia Z5 E6653 Lollipop 5 1 1 Tested Firmware
Download Sony Xperia Z5 E6653 Lollipop 5.1.1 Tested Firmware
Mobile : Xperia Z5
Model : E6653
System Version : Lollipop 5.1.1
Baseband : 32.0.A.4.11 Customized-ZA

Mobile : Xperia Z5
Model : E6653
System Version : Lollipop 5.1.1
Baseband : 32.0.A.4.11 Customized-ZA
download link:
https://docs.google.com/uc?id=0ByxbVOOPbJakWm1nUnV0YTZBbFk&export=download
Go to link download
CARA FLASH MEIZU NOT 1 2 3 DAN CARA ROOT
CARA FLASH MEIZU NOT 1 2 3 DAN CARA ROOT
CARA FLASH MEIZU NOT 1-2-3 DAN CARA ROOT

1 Aktifkan akar dengan menekan pada Settings-> Accounts-> My Flyme-> Pengaturan pribadi (opsi pertama) -> hak Sistem dan mengaturnya untuk membuka - menerima disclaimer dan konfirmasi.
instal firmware disini
2. Download dan salin chmod benar. sh berkas ke telepon Anda (copy ke root perangkat Anda).
1. Aktifkan akar
Aktifkan akar dengan menekan pada Settings-> Accounts-> My Flyme-> Pengaturan pribadi (opsi pertama) -> hak Sistem dan mengaturnya untuk membuka - menerima disclaimer dan konfirmasi.
2. Download dan berhasil menginstal Busybox (dari Google Play atau melihat APK di bawah ini)
3. Download dan menginstal Terminal Emulator (dari Google Play atau melihat apk bawah)
4. Ambil yang benar dan yang diinginkan internasional (i) ROM / firmware (update.zip) untuk perangkat Anda
Klik di sini untuk men-download converter pertama
Copy system.new.dat dan system.transfer.list (dari update.zip) untuk folder "di" (lihat folder converter)
Kemudian memulai proses konversi dengan memulai Sistem-conVERTER.cmd dan menekan opsi 1 [enter]
Jika berhasil dikonversi Anda dapat menemukan sistem-i.img di folder keluar .
6. Salin dikonversi sistem-img dari luar ke memori internal perangkat Meizu Anda
7. Pergi ke Settings-> Display-> Sleep dan set ke setidaknya 10 menit
8. Mulai Terminal Emulator dan run (ketik) perintah super user
Sebuah izin popup akan datang; memberikan izin dengan menekan memungkinkan (selalu memungkinkan).
9. Sekarang jalankan (tipe) perintah untuk menginstal sistem-img.
dd if = / sdcard / system.img of = / dev / block / platform / XXXXXXX / by-nama / sistem
Ganti XXXXXXX dengan sistem partisi yang benar untuk perangkat Anda
Mx4 Pro = 15540000.dwmmc0
M2 catatan = mtk-msdc.0
Mx4 = mtk-msdc.0 (OR mmcblk0p6)
MX5 = mtk-msdc.0 (OR mmcblk0p18)
Pro 5 = 15570000.ufs
Contoh untuk MX5: dd if = / sdcard / system.img of = / dev / block / platform / mtk-msdc.0 / by-nama / sistemCatatan: Pro5 mungkin memerlukan: dd if = / penyimpanan / ditiru / 0 / system.img bukan / sdcard /
10. Proses instalasi akan dimulai setelah dd jika perintah, tetapi harap dicatat ...
... Mungkin tampak bahwa menyalin / proses TIDAK memulai karena Anda tidak menyadarinya, tetapi DID mulai.
TIDAK ketik perintah baru atau apapun, hanya ...
... Bersabar dan memberikan perangkat Anda 5-10 menit untuk memproses.
11. Ketika proses ini selesai Anda akan melihat # di akhir
Perangkat Anda harus responsif sekarang - ini adalah normal
12. Sekarang hanya mematikan telepon (hold tombol power) dan reboot
13. Setelah berhasil boot perangkat Anda harus menjalankan I-rom
Setelah di Flyme lagi adalah bijaksana - tetapi tidak perlu - menyetel ulang telepon Anda. Pergi ke Settings-> tentang telepon-> memori-> data pabrik reset-> centang kedua kotak dan klik mulai membersihkan (ini bisa mengambil 5-10minutes). Selalu backup barang-barang Anda jika diperlukan.
1 Aktifkan akar dengan menekan pada Settings-> Accounts-> My Flyme-> Pengaturan pribadi (opsi pertama) -> hak Sistem dan mengaturnya untuk membuka - menerima disclaimer dan konfirmasi.
instal firmware disini
2. Download dan salin chmod benar. sh berkas ke telepon Anda (copy ke root perangkat Anda).
- Click to download file for M2 Note and MX5
- Click to download file for M2 (mini)
- Click to download file for M1 Note
1. Aktifkan akar
Aktifkan akar dengan menekan pada Settings-> Accounts-> My Flyme-> Pengaturan pribadi (opsi pertama) -> hak Sistem dan mengaturnya untuk membuka - menerima disclaimer dan konfirmasi.
2. Download dan berhasil menginstal Busybox (dari Google Play atau melihat APK di bawah ini)
3. Download dan menginstal Terminal Emulator (dari Google Play atau melihat apk bawah)
4. Ambil yang benar dan yang diinginkan internasional (i) ROM / firmware (update.zip) untuk perangkat Anda
- from http://www.flyme.cn/en/firmware.html (CN)
- or from: https://meizufans.eu/firmwares (EU)
- or from: http://www.flymeos.com/firmware.html (IN)
Note: I (international) = G (global) from now on.
Klik di sini untuk men-download converter pertama
Copy system.new.dat dan system.transfer.list (dari update.zip) untuk folder "di" (lihat folder converter)
Kemudian memulai proses konversi dengan memulai Sistem-conVERTER.cmd dan menekan opsi 1 [enter]
Jika berhasil dikonversi Anda dapat menemukan sistem-i.img di folder keluar .
6. Salin dikonversi sistem-img dari luar ke memori internal perangkat Meizu Anda
7. Pergi ke Settings-> Display-> Sleep dan set ke setidaknya 10 menit
8. Mulai Terminal Emulator dan run (ketik) perintah super user
Sebuah izin popup akan datang; memberikan izin dengan menekan memungkinkan (selalu memungkinkan).
9. Sekarang jalankan (tipe) perintah untuk menginstal sistem-img.
dd if = / sdcard / system.img of = / dev / block / platform / XXXXXXX / by-nama / sistem
Ganti XXXXXXX dengan sistem partisi yang benar untuk perangkat Anda
Mx4 Pro = 15540000.dwmmc0
M2 catatan = mtk-msdc.0
Mx4 = mtk-msdc.0 (OR mmcblk0p6)
MX5 = mtk-msdc.0 (OR mmcblk0p18)
Pro 5 = 15570000.ufs
Contoh untuk MX5: dd if = / sdcard / system.img of = / dev / block / platform / mtk-msdc.0 / by-nama / sistemCatatan: Pro5 mungkin memerlukan: dd if = / penyimpanan / ditiru / 0 / system.img bukan / sdcard /
10. Proses instalasi akan dimulai setelah dd jika perintah, tetapi harap dicatat ...
... Mungkin tampak bahwa menyalin / proses TIDAK memulai karena Anda tidak menyadarinya, tetapi DID mulai.
TIDAK ketik perintah baru atau apapun, hanya ...
... Bersabar dan memberikan perangkat Anda 5-10 menit untuk memproses.
11. Ketika proses ini selesai Anda akan melihat # di akhir
Perangkat Anda harus responsif sekarang - ini adalah normal
12. Sekarang hanya mematikan telepon (hold tombol power) dan reboot
13. Setelah berhasil boot perangkat Anda harus menjalankan I-rom
Setelah di Flyme lagi adalah bijaksana - tetapi tidak perlu - menyetel ulang telepon Anda. Pergi ke Settings-> tentang telepon-> memori-> data pabrik reset-> centang kedua kotak dan klik mulai membersihkan (ini bisa mengambil 5-10minutes). Selalu backup barang-barang Anda jika diperlukan.
Go to link download
Wednesday, November 16, 2016
GSM ALLADIN V 1 15 DZCRACK
GSM ALLADIN V 1 15 DZCRACK
Kali ini saya akan share just copas GSM ALLADIN V.1.15 CRACKED BY_DZCRACX RACE

DOWNLOUD
PASS:www.dhakamobile.com
Go to link download
Subscribe to:
Posts (Atom)