Showing posts with label bean. Show all posts
Showing posts with label bean. Show all posts
Sunday, December 25, 2016
Lenovo S960 Re Flashing with Android Jelly Bean Row Version ROW S128
Lenovo S960 Re Flashing with Android Jelly Bean Row Version ROW S128
Lenovo S960, Re Flashing with Android Jelly Bean Row Version - Today guide is about to flashing old firmware for Lenovo S960 or known as Vibe X, On this guide i would like to share how to flashing an Android Jelly Bean 4.2.2 on your device, the reason is why would back to Android 4.2.2 ? because when installing Android 4.4.2 or Android KitKat your device not as fast as using Android Jelly Bean 4.2.2.
This guide is using flash tool method, common method for Lenovo devices. This method will erase all data, and system on device so better do backup first before following this guide, and this flash tool method also have possibility to brick your device and remove your IMEI so consider it.
Disclaimer :
This guide for educational purpose only, We not responsible if your device bricked after following this tutorial. (DWYOR)

ROM Descriptions :
- Build Number : S960_ROW_S128_140127
- Date : 27-01-2014
- OS : Android Jelly Bean 4.2.2
- Languages : Russian , Ukrainian, English, Arabic, Spanish, French, Chinese, Vietnamese, Indonesian, Malaysian, Thai
- Google Applications : Include
- Root : No
Downloads :
- S960_ROW_S128_140127 ? 1.2 Gb, contains all required images files to flashing your device to Android Jelly Bean.
- USB VCOM Driver ? Install this driver first on your computer, Turn off your device and remove the battery, using USB cable connect your device while look at My Computer ? Manage ? Device Manager there will be MTK65xx Preloader Devices show up for 5 second than disappeared, before disappeared right click on it and select Update Driver Software point it to USB VCOM Driver extracted folder. When it finish disconnect and connect again there will be Mediatek PreLoader USB VCOM Port on your device manager.

- SP Flash Tool v3.1320 ? Flash tool that needed to flash the ROM to your device, recommended to use only this version.
Lenovo S960, Re Flashing with Android Jelly Bean Row Version ROW_S128
- Download add required files need to do this guide. It recommended to place all files on the one folder for easy organize it, because this guide using flash tool so first think you must to do is make sure that USB VCOM driver is installed properly on your computer.
- Extract all, ROM files and flash tool. Go to flash tool extracted folder and then run flash_tool.exe, if you are using windows 7 or later please make sure that you run it using administrator privilege to avoid any permission error.
- On the flash tool, check DA DL All with Checksum option and then click on Scatter-Loading button browse it to ROM extracted folder target_bin and the select MT6589_Android_scatter_emmc.txt. When you select android scatter file and load it to flash tool it also will automatically load another image files to flash tool.

- Now press Download button on the flash tool or your can hit F9 on your keyboard. This make flash tool begin to initialize ROM file and after few minutes it will become stand by and ready to make connection with your device. (When you got flash tool error 8038 when connect your device, then please try click firmware?upgrade button)
- Next step is turn off your device, because Lenovo S960 using non removable battery so you must make sure that your device is completely turn off. Then just connect your device to your computer.
- Flash tool will recognize your device and begin to start flashing process, then process will take 5-6 minutes to finish, GREEN CIRCLE will pop up on the middle on flash tool when it already finish.

- Done, now you can disconnect your device, turn your device on. First time boot will take longer usually take 4-5 minutes so please be patient. Go to dialer and dial ####8888#, this is will do factory reset on your device. (will remove all data on device, built in storage)
- Done, Just boot to your home screen and confirm firmware Build Number and make sure is same as ROM downloaded S960_ROW_S128_140127.
Congratulations, successful flashing Lenovo S960 with Android Jelly Bean 4.2.2, for china device please dont forget to change modem firmware after finish flashing. Leave any comments if you found problem or broken link regarding this guide. Thank You
Go to link download
Monday, December 19, 2016
Sony Xperia J ST26i Jelly Bean 4 1 2 Tested Firmware
Sony Xperia J ST26i Jelly Bean 4 1 2 Tested Firmware
You can use the firmware for flash or reset screen lock 100% tested.
Mobile : Xperia J
Model : ST26i
System Version : Jelly Bean 4.1.2
Baseband : 11.2.?.0.33

Mobile : Xperia J
Model : ST26i
System Version : Jelly Bean 4.1.2
Baseband : 11.2.?.0.33
download link:
ST26i_11.2.?.0.33_Arabic--www.SamSony.net--.ftf - 386.52 MB
flash tool:
https://mega.nz/#!z4sSTaQZ!BVO7GSmoTrTwuuJAhadVCO6LQqLXMF543teobwpDG-I
download mode (power off device volume down+plug usb)
Go to link download
Saturday, December 17, 2016
How to Installing Jelly Bean on Lenovo S860 ROW Version S860 ROW S116
How to Installing Jelly Bean on Lenovo S860 ROW Version S860 ROW S116
How to Installing Jelly Bean on Lenovo S860 ROW Version - Android KitKat for Lenovo S860 already launched with for ROW version or CN version, but today i will post a guide how to install or flashing Lenovo S860 with Android Jelly Bean (4.2.2) because sometime Android Jelly Bean is more easy to root, modified IMEI or maybe need to fix to maintenance your device. This guide is only for Lenovo S860 with 2 GB RAM, for Lenovo S860 with 1 GB RAM please refer to Flashing Lenovo S860 with CN version Firmware S860_S122.
This guide is installing your device with new operating system so this guide will erase all your data on device and have possibility to brick your device, so please do backup preparations first before starting to follow this guide.
Disclaimer :
This guide for educational purpose only, We not responsible if your device bricked after following this tutorial. Be careful failed update using this guide will make you must open your case to remove battery so consider it before follow this guide, Only for Lenovo S860 2 GB (DWYOR)

ROM Descriptions :
ROM Descriptions :
- Build Number : S860_ROW_S116_140405
- Date : 04-05-2014
- OS : Android 4.2.2 Jelly Bean
- Languages : Russian , Ukrainian, English, Arabic, Spanish, French, Chinese, Vietnamese, Indonesian, Malaysian, Thai
- Google Applications : Include
- Root : No
Downloads :
- S860_ROW_S116_140405 ? 1.03 GB, contains all required files to downgrade or upgrade your Lenovo S860 to Android 4.2.2 Jelly Bean.
- USB VCOM Driver ? Install this driver first on your computer, Turn off your device and remove the battery, using USB cable connect your device while look at My Computer ? Manage ? Device Manager there will be MTK65xx Preloader Devices show up for 5 second than disappeared, before disappeared right click on it and select Update Driver Software point it to USB VCOM Driver extracted folder. When it finish disconnect and connect again there will be Mediatek PreLoader USB VCOM Port on your device manager.
- SP Flash Tool v3.1324 ? flash tool need to flashing Android 4.2.2 Jelly Bean to your device, optional download already include on ROM download.
- Download all required files and save it on the same folder, before continued to the next step please make sure that USB VCOM driver is already completely installed on your computer, without this flash tool will not recognize your device.
- Extract ROM download and you will find target_bin and flash_tool folders, only need these 2 folders and ignore the other.
- Go to flash tool folder and run flash_tool.exe, if you are running windows 7 or later please run this using administrator privilege to avoid any permission error.
- On the flash tool please give check on DA DL All with Checksum option and then click on Scatter-Loading button, point it on target_bin/MT6582_Android_scatter.txt this will load all images required to flashing Lenovo S860 to flash tool.

- Finish configure all, now you can click Download button or hit F9, flash tool will begin initialize the ROM and get ready to make connection to your device. Wait until flash tool become stand by
- Turn off your device, because Lenovo S860 using non removable battery you must make sure it completely turn off before connect your device to computer. Wait 10-20 seconds after turning off your device, now connect your device to your computer using USB cable.
- Flash tool will begin recognize your device and starting the flashing process, the flashing process will take 5-6 minutes to finish. It finish when you can see GREEN CIRCLE in the middle of flash tool.

- Done, Now you can disconnect your device and try to boot it, first boot will take longer around 4-5 minutes to complete, please be more patient. Verify the build number on the System Settings ? About Phone ? Build Number make sure it same with the download file.
- Now you need to do factory reset and set your home country, open Dialer and dial #### 682 #, the phone will be reboot and apply country code to recovery. After completely start open Dialer again and dial ####8888## this will do factory reset.
That it, guide on how to upgrade or downgrade your Lenovo S860 to Android 4.2.2 Jelly Bean. I hope this guide can help you solve your problems, and please leave comments if you found any problems regarding this guide.
Go to link download
Monday, December 12, 2016
How to Root Unroot Xiaomi Redmi 1S armani running Android Jelly Bean 4 3 MIUI 5 MIUI JHCMIBH45 0
How to Root Unroot Xiaomi Redmi 1S armani running Android Jelly Bean 4 3 MIUI 5 MIUI JHCMIBH45 0
Here is the tutorial for rooting and unrooting Xiaomi Redmi 1S running Android Jelly Bean 4.3 , MIUI 5 - MIUI-JHCMIBH45.0

Disclaimer : I am not responsible if you brick your phone or if u make any other damage to your phone
You can use the same method to root any other older version also :)
Rooting :
1. First make sure you are running the same build i.e Android 4.3 , MIUI Version : MIUI-JHCMIBH45.0. Goto Settings > About to verify this.
2. Download this File - update.zip and copy it to the root of your Internal Storage.
3. Enable USB Debugging , Go to Settings > About phone and tap 5 times on Android Version to enable Developer option.
4. Reboot your phone to Recovery ( Open Updater app from Tools , Press the Menu / Options button and select Reboot to Recovery mode )
5. Now Select and confirm "Install update.zip to System" , this will take a few seconds. ( Use the Volume Up / Down to navigate and the Power Button to Select )

6. Now select and confirm Reboot. ( Reboot to System )
7. Open Security App , Select Permissions and Turn On the Root permission

THATS IT YOUR PHONE IS NOW ROOTED.
UnRooting :
1. Download this File - UnRoot Redmi 1S.zip , rename it to update.zip and copy it to the root of your Internal Storage.
2. Open Security App , Select Permissions and Turn OFF the Root permission

3. Reboot your phone to Recovery ( Open Updater app from Tools , Press the Menu / Options button and select Reboot to Recovery mode )
4. Now Select and confirm Install update.zip to System , this will take a few seconds.
5. Now Select and confirm Reboot. ( Reboot to System )
YOUR PHONE IS NOW UNROOTED.
If You Have Any Problems Feel Free To Comment :)
Disclaimer : I am not responsible if you brick your phone or if u make any other damage to your phone
You can use the same method to root any other older version also :)
Rooting :
1. First make sure you are running the same build i.e Android 4.3 , MIUI Version : MIUI-JHCMIBH45.0. Goto Settings > About to verify this.
2. Download this File - update.zip and copy it to the root of your Internal Storage.
3. Enable USB Debugging , Go to Settings > About phone and tap 5 times on Android Version to enable Developer option.
4. Reboot your phone to Recovery ( Open Updater app from Tools , Press the Menu / Options button and select Reboot to Recovery mode )
5. Now Select and confirm "Install update.zip to System" , this will take a few seconds. ( Use the Volume Up / Down to navigate and the Power Button to Select )
6. Now select and confirm Reboot. ( Reboot to System )
7. Open Security App , Select Permissions and Turn On the Root permission
THATS IT YOUR PHONE IS NOW ROOTED.
UnRooting :
1. Download this File - UnRoot Redmi 1S.zip , rename it to update.zip and copy it to the root of your Internal Storage.
2. Open Security App , Select Permissions and Turn OFF the Root permission
3. Reboot your phone to Recovery ( Open Updater app from Tools , Press the Menu / Options button and select Reboot to Recovery mode )
4. Now Select and confirm Install update.zip to System , this will take a few seconds.
5. Now Select and confirm Reboot. ( Reboot to System )
YOUR PHONE IS NOW UNROOTED.
If You Have Any Problems Feel Free To Comment :)
Go to link download
Saturday, December 10, 2016
How to Root Sony Xperia L C2104 C2105 on Jelly Bean 4 2 2 Build 15 3 A 1 12
How to Root Sony Xperia L C2104 C2105 on Jelly Bean 4 2 2 Build 15 3 A 1 12
Sony Released A new update to Xperia L , it is still 4.2.2 , just few bug fixes. The new build is 15.3.A.1.12. Thanks to CUBEANDCUBE for the Root.
.png)
So here is the tutroial how to Root Xperia L running Jelly Bean 4.2.2 Build 15.3.A.1.12
Disclaimer : I am not responsible if you brick your phone or if u make any other damage to your phone
So Lets Start :
1. First make sure you are running Jelly Bean 4.2.2 Build 15.3.A.1.12. Go to Settings > About to verify this.

2. Download this File - Root Xperia L Tool and exctract it completely using WinRAR or WinZip.
3. Enable USB Debugging , Go to Settings > About phone and tap 7 times on Build number to enable Developer options, now Go to Settings > Developer options to enable Enable USB debugging mode.
4. Enable Unknown Sources. Go to Settings > Security and check Unknown sources.
5. Connect USB Cable to phone , then connect it to your Computer. On your phone Skip the PC Companion Companion prompt (if it appears), see screenshot below.
6. Right Click on My Computer > Manage , now goto Device Manager , and see if Android is listed like the below screenshot , to verify your device is properly connected. If yes move on to the next step.
7. Now go to the Folder where you extracted the downloaded file from Step 2, and execute "install.bat" .
Note :- If your device is not properly connected or ADB drivers are not installed , you will be stuck on daemon started successfully .

8. The Rooting Process will start , wait for some time , your phone will automatically reboot, wait for some more time :P
9. When the Rooting Process is completed , the Screen will show --all finished--. Press Any Key to Continue.
THATS IT YOUR PHONE IS NOW ROOTED.
Note : This method works on both locked and unlocked bootloader devices!!!
If you have any problems feel free to comment :)
So here is the tutroial how to Root Xperia L running Jelly Bean 4.2.2 Build 15.3.A.1.12
Disclaimer : I am not responsible if you brick your phone or if u make any other damage to your phone
So Lets Start :
1. First make sure you are running Jelly Bean 4.2.2 Build 15.3.A.1.12. Go to Settings > About to verify this.
2. Download this File - Root Xperia L Tool and exctract it completely using WinRAR or WinZip.
3. Enable USB Debugging , Go to Settings > About phone and tap 7 times on Build number to enable Developer options, now Go to Settings > Developer options to enable Enable USB debugging mode.
4. Enable Unknown Sources. Go to Settings > Security and check Unknown sources.
5. Connect USB Cable to phone , then connect it to your Computer. On your phone Skip the PC Companion Companion prompt (if it appears), see screenshot below.
6. Right Click on My Computer > Manage , now goto Device Manager , and see if Android is listed like the below screenshot , to verify your device is properly connected. If yes move on to the next step.
7. Now go to the Folder where you extracted the downloaded file from Step 2, and execute "install.bat" .
Note :- If your device is not properly connected or ADB drivers are not installed , you will be stuck on daemon started successfully .
8. The Rooting Process will start , wait for some time , your phone will automatically reboot, wait for some more time :P
9. When the Rooting Process is completed , the Screen will show --all finished--. Press Any Key to Continue.
THATS IT YOUR PHONE IS NOW ROOTED.
Note : This method works on both locked and unlocked bootloader devices!!!
If you have any problems feel free to comment :)
Go to link download
Sunday, November 27, 2016
How to Root Sony Xperia M C1904 C1905 Jelly Bean 4 1 2 Build 15 1 A 1 9 15 1 C 1 17
How to Root Sony Xperia M C1904 C1905 Jelly Bean 4 1 2 Build 15 1 A 1 9 15 1 C 1 17
Root your Xperia M [C1904/C1905] running Jelly Bean 4.1.2 Build 15.1.C.1.17 or 15.1.A.1.9. To know what is root and what are its benefits / losses of rooting your device you can google that , dont ask me about that :P , I will post the tutorial on rooting Xperia M , if you face with any problem while feel free to comment. The files used in this tutorial are not mine.
You can also root by vRoot - Here is the link of the tutorial the screenshots are of Xperia M dual but it will work on Xperia M also :) - LINK
Read And Follow all the steps.
Step 1 - Rooting your Xperia M using Framaroot.apk
- Download Framaroot.apk from here - LINK , copy it to your phone.
- Install it like a normal app.
- Open Framaroot from the App Drawer.
- Now Select Install SuperSU.
- Select Gandalf exploit and then wait for few seconds for a pop up message that says Success.
- Now your phone will automatically reboot, after reboot you will SuperSU app in the app drawer , that means your Xperia M is rooted , hold on it is not finished yet :P
Step 2 - Installing BusyBox
- Download and Install BusyBox from the playstore or from here - LINK
- Open BusyBox , wait for few seconds untill it asks SuperSU access, Grant SuperSU access
- Now have patience and wait for some time to let it initialize , after initialization completes , you will see a Install button on bottom left corner , click Install then Select Normal
- Wait till the Installation process is complete , when the process is completed you will see a pop up that says Success.
- Installation of BusyBox is now complete :)
Step 3 - Reboot Fix (System Read/Write)
- Download reboot fix.rar from here - LINK , Extract it on your PC.
- Turn USB Debugging Mode On on your mobile from Settings>Developer Options. (Also Maker sure you have ADB Drivers installed , if you install Sony PC Companion and connect your phone with USB Debugging Mode on ADB Drivers will be installed)
- Make sure no ADB related program is running now like Sony PC Companion or Flashtool
- Run supersu.bat
- Follow the On Screen Instructions
Now your phone is successfully rooted , if you have any problems feel free to comment. :)
Source - XDA
Go to link download
Friday, November 18, 2016
How to root Micromax Canvas 2 Plus on Android 4 2 Jelly Bean Guide
How to root Micromax Canvas 2 Plus on Android 4 2 Jelly Bean Guide
How to root Micromax Canvas 2 Plus on Android 4.2 Jelly Bean [Guide] - Having a Micromax Canvas 2 Plus you want to get a little more? This guide will show you exactly how you can root your device! Before long you will have root access on your Micromax Canvas 2 Plus, opening the door to endless possibilities.
![How to root Micromax Canvas 2 Plus on Android 4.2 Jelly Bean [Guide]](https://blogger.googleusercontent.com/img/b/R29vZ2xl/AVvXsEgspFHVQDWHrLv4_qWF1V8TKBKXiAyBDZJBalNkE6msoxqWUvGsr9W4wIb7REdYfp4X1_jv-J8K2Wjp1fIEhZkV_s8chXvrBOhw_unlrJi68w9A9h1bGdjhjQdCOZjT69Zk4IyYBLczlirD/s320/micromax+roo.jpg "How to root Micromax Canvas 2 Plus on Android 4.2 Jelly Bean [Guide]")
Disclaimer: This guide is intended as a useful "how." dotTech and writers are not responsible for any gain or loss (including, but not limited to bricked devices) incurred as a result of following this guide. Root your device at your own risk. Rooting may void the warranty. Proceed at your own risk.
Requiretments
This guide is the root for the Micromax Canvas 2 Plus with Android 4.2 Jelly Bean. It is specifically for the Micromax Canvas 2 Plus.
Note that this clean all your files and data on your phone. Proceed at your own risk.
Before starting
Download the Micromax drivers and install them on your PC (if not already done). Micromax USB drivers can be found on this link.
His canvas 2 must be in USB debugging mode. Go to Settings and then Options for developers, and then check the box that says USB debugging.
Have your handy micro USB cable.
Download the root package and extract to a folder on the desktop of your PC. The root package can be found by following this link.
How To Root Micromax Canvas 2 Plus
- Connect your Micromax Canvas 2 Plus to your PC through its micro USBcable.
- Make sure USB debugging is enabled.
- Go to the folder where you extracted the root page on the desktop.
- Inside the root package, find a file called runme.bat and run. Select the normal mode, and follow all instructions runme.bat says. Be sure to read all the details.
- After ending runme.bat what you are doing in your Micromax Canvas 2 Plus have root!
- Fact!
Conclusion
Enjoy a rooted Micromax Canvas 2 Plus.
Go to link download
Thursday, November 10, 2016
How to Root Unroot Xiaomi Redmi 1S armani running Android Jelly Bean 4 3 MIUI 5
How to Root Unroot Xiaomi Redmi 1S armani running Android Jelly Bean 4 3 MIUI 5
Here is the tutorial for rooting and unrooting Xiaomi Redmi 1S running Android Jelly Bean 4.3 , MIUI 5
Disclaimer : I am not responsible if you brick your phone or if u make any other damage to your phone
Rooting :
1. First make sure you are running the same build i.e Android 4.3 , MIUI Version : MIUI-JHCMIBF36.0 / JHCMIBF34.0 ( works on both ). Goto Settings > About to verify this.

2. Download this File - update.zip and copy it to the root of your Internal Storage.
3. Enable USB Debugging , Go to Settings > About phone and tap 5 times on Android Version to enable Developer option.
4. Reboot your phone to Recovery ( Open Updater app from Tools , Press the Menu / Options button and select Reboot to Recovery mode )

5. Now Select and confirm "Install update.zip to System" , this will take a few seconds. ( Use the Volume Up / Down to navigate and the Power Button to Select )
6. Now select and confirm Reboot. ( Reboot to System )
7. Open Security App , Select Permissions and Turn On the Root permission
THATS IT YOUR PHONE IS NOW ROOTED.
UnRooting :
1. Download this File - UnRoot Redmi 1S.zip , rename it to update.zip and copy it to the root of your Internal Storage.
2. Open Security App , Select Permissions and Turn OFF the Root permission
3. Reboot your phone to Recovery ( Open Updater app from Tools , Press the Menu / Options button and select Reboot to Recovery mode )
4. Now Select and confirm Install update.zip to System , this will take a few seconds.
5. Now Select and confirm Reboot. ( Reboot to System )
YOUR PHONE IS NOW UNROOTED.
If You Have Any Problems Feel Free To Comment :)
Disclaimer : I am not responsible if you brick your phone or if u make any other damage to your phone
Rooting :
1. First make sure you are running the same build i.e Android 4.3 , MIUI Version : MIUI-JHCMIBF36.0 / JHCMIBF34.0 ( works on both ). Goto Settings > About to verify this.
2. Download this File - update.zip and copy it to the root of your Internal Storage.
3. Enable USB Debugging , Go to Settings > About phone and tap 5 times on Android Version to enable Developer option.
4. Reboot your phone to Recovery ( Open Updater app from Tools , Press the Menu / Options button and select Reboot to Recovery mode )
5. Now Select and confirm "Install update.zip to System" , this will take a few seconds. ( Use the Volume Up / Down to navigate and the Power Button to Select )
6. Now select and confirm Reboot. ( Reboot to System )
7. Open Security App , Select Permissions and Turn On the Root permission
THATS IT YOUR PHONE IS NOW ROOTED.
UnRooting :
1. Download this File - UnRoot Redmi 1S.zip , rename it to update.zip and copy it to the root of your Internal Storage.
2. Open Security App , Select Permissions and Turn OFF the Root permission
3. Reboot your phone to Recovery ( Open Updater app from Tools , Press the Menu / Options button and select Reboot to Recovery mode )
4. Now Select and confirm Install update.zip to System , this will take a few seconds.
5. Now Select and confirm Reboot. ( Reboot to System )
YOUR PHONE IS NOW UNROOTED.
If You Have Any Problems Feel Free To Comment :)
Go to link download
Thursday, October 20, 2016
How to Root Sony Xperia M Dual C2004 C2005 Jelly Bean 4 2 2 Build 15 2 A 1 12
How to Root Sony Xperia M Dual C2004 C2005 Jelly Bean 4 2 2 Build 15 2 A 1 12
So Xperia M Dual Sim Released and we have found a way to root it :P . This tutorial is for Xperia M Dual (C2004 / C2005) running Jelly Bean 4.2.2 Build 15.2.A.1.12.

Disclaimer : I am not responsible if you brick your phone or if u make any other damage to your phone
So Lets Start :
1. First make sure you are running Jelly Bean 4.2.2 Build 15.2.A.1.12. Go to Settings > About to verify this.

2. Enable USB Debugging , Go to Settings > About phone and tap 7 times on Build number to enable USB Debugging mode.
3. Enable Unknown Sources from Settings > Security.
4. Download vRoot from here - http://www.mgyun.com/vroot
Yeah it is in Chinese, so bear with it :P , download it and install this software just click next next like u install any other software :P
5. Open the vRoot and Connect your phone Xperia M to your PC , you will see a green Root icon in vRoot, click on that to start the rooting process. See the below screenshot.

6. When it is finished your phone will restart automatically and vRoot will show something like the below screenshot.

7. Congrats your phone is now rooted :P.

Note :- If you want to change the Kinguser (Chinese Superuser app) to SuperSU , Download this File - LINK. Extract it somewhere , and run runme_win.bat. Kinguser will change to SuperSU.
OR
If you want to change the Kinguser (Chinese Superuser app) to SuperSU , just download SuperSU from Playstore , open it , it will ask for Root Permissions , grant it , then follow the screen instructions to update the binary. Now open SuperSU , go to Settings and click on "Install SuperSU into /system" . Your phone will reboot and Kinguser will automatically get uninstalled :)
Note : This method works on both locked and unlocked bootloader devices!!!
If you have any problems feel free to comment.
Disclaimer : I am not responsible if you brick your phone or if u make any other damage to your phone
So Lets Start :
1. First make sure you are running Jelly Bean 4.2.2 Build 15.2.A.1.12. Go to Settings > About to verify this.
2. Enable USB Debugging , Go to Settings > About phone and tap 7 times on Build number to enable USB Debugging mode.
3. Enable Unknown Sources from Settings > Security.
4. Download vRoot from here - http://www.mgyun.com/vroot
Yeah it is in Chinese, so bear with it :P , download it and install this software just click next next like u install any other software :P
5. Open the vRoot and Connect your phone Xperia M to your PC , you will see a green Root icon in vRoot, click on that to start the rooting process. See the below screenshot.
6. When it is finished your phone will restart automatically and vRoot will show something like the below screenshot.
7. Congrats your phone is now rooted :P.
Note :- If you want to change the Kinguser (Chinese Superuser app) to SuperSU , Download this File - LINK. Extract it somewhere , and run runme_win.bat. Kinguser will change to SuperSU.
OR
If you want to change the Kinguser (Chinese Superuser app) to SuperSU , just download SuperSU from Playstore , open it , it will ask for Root Permissions , grant it , then follow the screen instructions to update the binary. Now open SuperSU , go to Settings and click on "Install SuperSU into /system" . Your phone will reboot and Kinguser will automatically get uninstalled :)
Note : This method works on both locked and unlocked bootloader devices!!!
If you have any problems feel free to comment.
Go to link download
Wednesday, September 14, 2016
How to Root Sony Xperia L C2104 C2105 on Jelly Bean 4 2 2 Build 15 3 A 1 17
How to Root Sony Xperia L C2104 C2105 on Jelly Bean 4 2 2 Build 15 3 A 1 17
A new update to Xperia L , it is still 4.2.2 , just few bug fixes. The new build is 15.3.A.1.17 . And here is the root method :D
.png)
So here is the tutroial how to Root Xperia L running Jelly Bean 4.2.2 Build 15.3.A.1.17
Disclaimer : I am not responsible if you brick your phone or if u make any other damage to your phone
So Lets Start :
1. First make sure you are running Jelly Bean 4.2.2 Build 15.3.A.1.17. Go to Settings > About to verify this.
2. Download this File - Root Xperia L Tool and exctract it completely using WinRAR or WinZip.
3. Enable USB Debugging , Go to Settings > About phone and tap 7 times on Build number to enable Developer options, now Go to Settings > Developer options to enable Enable USB debugging mode.
4. Enable Unknown Sources. Go to Settings > Security and check Unknown sources.
5. Connect USB Cable to phone , then connect it to your Computer. On your phone Skip the PC Companion Companion prompt (if it appears), see screenshot below.

6. Right Click on My Computer > Manage , now goto Device Manager , and see if Android is listed like the below screenshot , to verify your device is properly connected. If yes move on to the next step.

7. Now go to the Folder where you extracted the downloaded file from Step 2, and execute "install.bat" .
Note :- If your device is not properly connected or ADB drivers are not installed , you will be stuck on daemon started successfully . To install ADB drivers install Sony PC Companion and then connect your phone with USB Debugging Mode ON , ur drivers will get installed, exit PC Companion before starting the rooting process.
8. The Rooting Process will start , wait for some time , your phone will automatically reboot, wait for some more time :P
9. When the Rooting Process is completed , the Screen will show --all finished--. Press Any Key to Continue.
THATS IT YOUR PHONE IS NOW ROOTED.
Note : This method works on both locked and unlocked bootloader devices!!!
If you have any problems feel free to comment :)
So here is the tutroial how to Root Xperia L running Jelly Bean 4.2.2 Build 15.3.A.1.17
Disclaimer : I am not responsible if you brick your phone or if u make any other damage to your phone
So Lets Start :
1. First make sure you are running Jelly Bean 4.2.2 Build 15.3.A.1.17. Go to Settings > About to verify this.
2. Download this File - Root Xperia L Tool and exctract it completely using WinRAR or WinZip.
3. Enable USB Debugging , Go to Settings > About phone and tap 7 times on Build number to enable Developer options, now Go to Settings > Developer options to enable Enable USB debugging mode.
4. Enable Unknown Sources. Go to Settings > Security and check Unknown sources.
5. Connect USB Cable to phone , then connect it to your Computer. On your phone Skip the PC Companion Companion prompt (if it appears), see screenshot below.
6. Right Click on My Computer > Manage , now goto Device Manager , and see if Android is listed like the below screenshot , to verify your device is properly connected. If yes move on to the next step.
7. Now go to the Folder where you extracted the downloaded file from Step 2, and execute "install.bat" .
Note :- If your device is not properly connected or ADB drivers are not installed , you will be stuck on daemon started successfully . To install ADB drivers install Sony PC Companion and then connect your phone with USB Debugging Mode ON , ur drivers will get installed, exit PC Companion before starting the rooting process.
8. The Rooting Process will start , wait for some time , your phone will automatically reboot, wait for some more time :P
9. When the Rooting Process is completed , the Screen will show --all finished--. Press Any Key to Continue.
THATS IT YOUR PHONE IS NOW ROOTED.
Note : This method works on both locked and unlocked bootloader devices!!!
If you have any problems feel free to comment :)
Go to link download
Thursday, September 1, 2016
Lenovo P780 Installing Jelly Bean ROW Version S110 ROW
Lenovo P780 Installing Jelly Bean ROW Version S110 ROW
Lenovo P780 Installing Jelly Bean ROW Version S110_ROW - This is guide how to flashing or install Lenovo P780 with Jelly Bean ROW version. Lenovo P780 already have update for android KitKat, if you wanna know you can refer to this Lenovo P780 installing Android KitKat ROW Version, but you can always back to old firmware to enjoy it stability and improvement speed. This guide can be use and only for for Lenovo P780, even firmware in this guide if from official release it has possibility to brick you device and make you lost your IMEI so consider it first and do backup preparations before following this guide.
Disclaimer :
This guide for educational purpose only, We not responsible if your device bricked after following this tutorial. (DWYOR), As far i know this file is for Lenovo P780 4 GB.

ROM Descriptions :
- Build Number : P780_ROW_S110
- Date Release : 29-06-2013
- OS : Android 4.2.2 (Jelly Bean)
- Languages : Russian , Ukrainian, English, Arabic, Spanish, French, Chinese, Vietnamese, Indonesian, Malaysian, Thai
- Google Applications : Yes
- Root : No
Change Logs :
- IdeaFriend release version
- Lenovo Compass
- Full set of programs of the Russian regions
- Lenovo Power final version
Downloads :
- P780_ROW_S110 ? 648 Mb, contains all required files to update / downgrade your Lenovo P780 to S110_ROW
- USB VCOM Driver ? Install this driver first on your computer, Turn off your device and remove the battery, using USB cable connect your device while look at My Computer ? Manage ? Device Manager there will be MTK65xx Preloader Devices show up for 5 second than disappeared, before disappeared right click on it and select Update Driver Software point it to USB VCOM Driver extracted folder. When it finish disconnect and connect again there will be Mediatek PreLoader USB VCOM Port on your device manager.
- SP Flash Tool v3.1316 ? this is an optional download for flashing tool, you can download it if you want
Lenovo P780 Installing Jelly Bean ROW Version S110_ROW
- Download all required files and place it on one single folder, this is for easy organize the download files. Please make sure that USB VCOM driver is installed completely before continued to the next step.
- Extract P780_ROW_S110, you will get 4 folders but you only need target_bin and SP Flash Tool folder and ignore the other.
- Open flash tool folder and run Flash_Tool.exe, if you are using windows 7 or later please run it with administrator privilege to avoid any permission error.
- On the flash tool, check the DA DL ALL with Checksum option and the click on the Scatter-Loading button point it to target_bin/MT6589_Android_scatter_emmc.txt this action will also load all required image files to flash tool.

- When everything has completely configure, now you can press Download button (4) or hit F9, this will make pop up warning that tell not all images correctly loaded, just confirm and press Yes button.
- Flash tool become stand by mode and ready make connection with your device. Turn off your device and remove the battery, now you connect your device to your computer using USB cable If driver install completely then SP Flash Tool will recognized your device and begin starting the installation process, Installation process will be mark with RED, PURPLE, and YELLOW bar on the bottom SP Flash Tool and will be ended with GREEN CIRCLE on the middle of SP Flash Tool. Estimated time that it takes about 5-6 minutes so please relax and enjoy the show.

- Done, Now your Lenovo P780 running Android Jelly Bean with S110 version please confirm it with go to System Setting ? Build Number and make sure it same with downloaded ROM.
Congratulations, Now you know how to flashing Lenovo P780 using flash tool, this guide can also be use to upgrading or downgrading your current firmware but please make sure to have current firmware backup first. Please leave comments if you found any problems regarding this guide, Thank you for visit and reading
Go to link download
Friday, August 19, 2016
How to eradicate Nexus 7 second generation 2013 in Android 4 3 Jelly Bean and unlock the bootloader Guide
How to eradicate Nexus 7 second generation 2013 in Android 4 3 Jelly Bean and unlock the bootloader Guide
How to eradicate Nexus 7 (second generation, 2013) in Android 4.3 Jelly Bean and unlock the bootloader [Guide] - Update Nexus 7, 2012 to the second generation Nexus 7 released in 2013? Or maybe Nexus July 2013 is its first Nexus. Either way, they want to get more out of it? You are lucky. With this guide you will learn exactly how to eradicate the 2013 Nexus 7! After following this guide, the door is open to endless new possibilities regarding your Nexus 7.
![How to eradicate Nexus 7 (second generation, 2013) in Android 4.3 Jelly Bean and unlock the bootloader [Guide]](https://blogger.googleusercontent.com/img/b/R29vZ2xl/AVvXsEiMU8hI_Lf_2YaJAajwBrobyL2snoS7Q12H98PbGhpI9b_nf23OAtZmsekO_TzIonX7wdhw-7xuI5yYh0zQQrFvhm6wxCuz3LXDFfAMYDF9dhmJ65YOOaeLqcAmX9qGGKGdm8Z1Q2XZo928/s320/8453350591_e4191034fb_z.jpg "How to eradicate Nexus 7 (second generation, 2013) in Android 4.3 Jelly Bean and unlock the bootloader [Guide]")
Disclaimer: This guide is intended as a useful "how." dotTech and writers are not responsible for any gain or loss (including, but not limited to bricked devices) incurred as a result of following this guide. Root your device at your own risk. Rooting may void the warranty. Proceed at your own risk
Requiretments
This guide is the root for the operation is specifically for the second generation of Nexus 7, launched in 2013, with Android 4.3 Jelly Bean. Most likely it will not work in 2012 with Android 4.3 Nexus 7.
Note This procedure will erase all files and data on your Nexus 7. Proceed at your own risk.
Before starting
- You will need to have the Nexus 7 USB downloaded and installed on your PC drivers. You can download from this link controllers.
- You will need a microUSB cable handy, along with some free space on the Nexus 7 itself.
- You will need to download and install ADB and Fastboot on your Windows computer. You can download and learn to install ADB and Fastboot from here.
- You will need to download the OpenRecovery-TWRP-2.6.0.0-flo.img file. You can download it here. Once downloaded, move OpenRecovery-TWRP-2.6.0.0-flo.img the same same C: / folder you installed Android ADB and Fastboot a.
- You will need to download the file to your PC UPDATE-SuperSU-v.1.51.zip. Which can be downloaded by clicking this link. Save the file anywhere on your computer, but does not remove the file UPDATE-SuperSU-v.1.51.zip - will have to transfer the entire file, without extracting, your Nexus 7 below!
How to Root Nexus 7 2013 Second Generation
PART 1: Open the boot loader of the second generation Nexus 7 2013
- Make sure USB debugging is enabled on your Nexus 7. You can enable USB debugging, go to Settings, then click Options Applications Development. Once development options, go to Settings, then tap About phone and the build number seven times. After touching Build Number seven times a message saying "Now you are a developer" will appear. Go back to the area of ??development options and check the box that enables USB debugging mode.
- Turn off the Nexus 7.
- Power your Nexus 7 again, but in bootloader mode. You can accomplish this by holding down both volume buttons down the volume and power button at the same time.
- Connect your Nexus 7 to your PC via the microUSB cable.
- Open a command prompt and type the following command. It will tell you if your Nexus 7 is properly connected to your PC.
- fastboot devices
- Then enter the following command and be on the look out for your Nexus 7 to display a message asking if you are sure you want to unlock the bootloader. Select Yes.
- oem unlock Fastbook
- Once the process is complete, click Start to restart the Nexus 7.
- Wait until it finishes.
- Do not close the command prompt window. That we will need in Part 2. Go to Part 2.
PART 2: Installing custom TWRP Recovery In 2013 Second Generation Nexus 7
- Due to unlock the bootloader makes some settings are reset, you will need to enable USB debugging. You can enable USB debugging, go to Settings, then click Options Applications Development. Once development options, go to Settings, then tap About phone and the build number seven times. After touching Build Number seven times a message saying "Now you are a developer" will appear. Go back to the area of ??development options and check the box that enables USB debugging mode.
- Ensure that the Nexus 7 is still connected to the computer and the command prompt window is still open. Type the following command in the command prompt window.
- adb reboot bootloader
- Now we have to flash the custom recovery. This is a process that can not be interrupted. Something could go wrong if you disconnect the device or turn off the PC before it is complete, so be sure the battery is fully charged. You can flash custom recovery image to your Nexus 7 by entering the following command in the command prompt window on your computer:
- fastboot flash recovery OpenRecovery-TWRP-2.6.0.0-flo.img
- Wait until it ends, then move to part 3.
PART 3: rooting 2013 Second Generation Nexus 7
- Power off your Nexus 7 and Android reenter.
- Reconnect to your PC and transfer mode file when prompted on your Nexus 7.
- UPDATE-SuperSU-v1.51.zip transfer from the computer to the internal memory of the Nexus 7.
- Boot into your newly installed mode recovery. You can accomplish this is by unplugging the Nexus 7 from the computer, turn off the Nexus 7, then pressing and holding down both the volume and volume buttons and the power button simultaneously.
- Once the boot loader, using the volume keys to navigate recovery mode, select and press the power button to select.
- Once youre in the recovery TWRP, touch the Install option, and find the location of UPDATE-SuperSU-v1.51.zip. Select UPDATE-SuperSU-v1.51.zip and sliding left and right when TWRP calls Swipe to confirm flash. After doing this, you will begin the rooting process.
- Once the rooting is complete, find their way back to the main menu TWRP Recovery, and select the restart option.
- Once you have booted again Android, its second generation 2013 is rooted Nexus 7!
- Fact!
Go to link download
Thursday, August 11, 2016
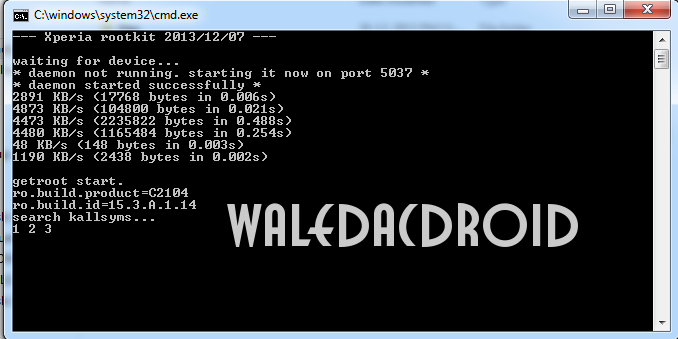
How to Root Sony Xperia L C2104 C2105 on Jelly Bean 4 2 2 Build 15 3 A 1 14
How to Root Sony Xperia L C2104 C2105 on Jelly Bean 4 2 2 Build 15 3 A 1 14
A new update to Xperia L , it is still 4.2.2 , just few bug fixes. The new build is 15.3.A.1.14 . And here is the root method :D.

So here is the tutroial how to Root Xperia L running Jelly Bean 4.2.2 Build 15.3.A.1.14
To root 15.3.A.1.17 Click Here
Disclaimer : I am not responsible if you brick your phone or if u make any other damage to your phone
So Lets Start :
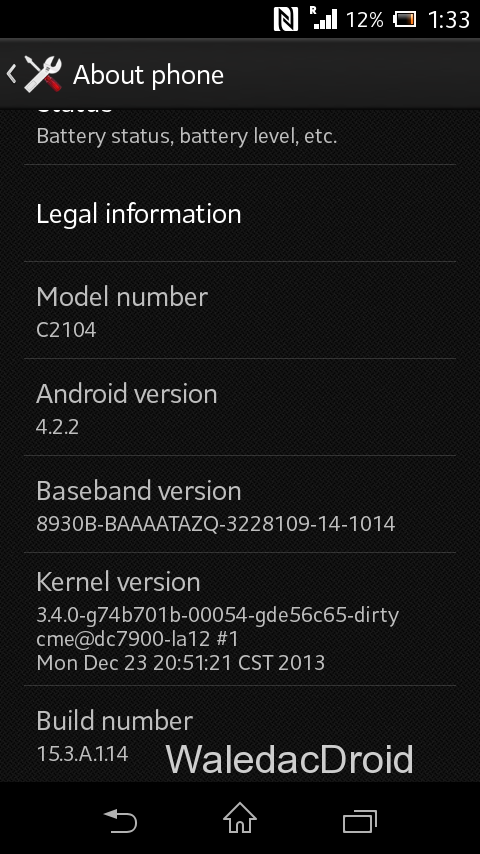
1. First make sure you are running Jelly Bean 4.2.2 Build 15.3.A.1.14. Go to Settings > About to verify this.
.png)
2. Download this File - Root Xperia L Tool and exctract it completely using WinRAR or WinZip.
3. Enable USB Debugging , Go to Settings > About phone and tap 7 times on Build number to enable Developer options, now Go to Settings > Developer options to enable Enable USB debugging mode.
4. Enable Unknown Sources. Go to Settings > Security and check Unknown sources.
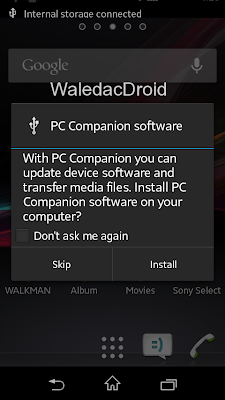
5. Connect USB Cable to phone , then connect it to your Computer. On your phone Skip the PC Companion Companion prompt (if it appears), see screenshot below.
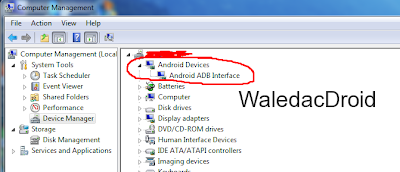
6. Right Click on My Computer > Manage , now goto Device Manager , and see if Android is listed like the below screenshot , to verify your device is properly connected. If yes move on to the next step.
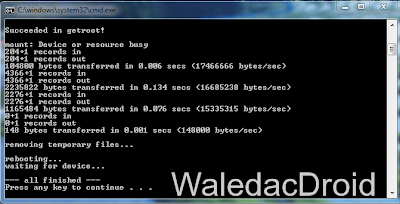
7. Now go to the Folder where you extracted the downloaded file from Step 2, and execute "install.bat" .
Note :- If your device is not properly connected or ADB drivers are not installed , you will be stuck on daemon started successfully .
.png)
8. The Rooting Process will start , wait for some time , your phone will automatically reboot, wait for some more time :P
9. When the Rooting Process is completed , the Screen will show --all finished--. Press Any Key to Continue.
THATS IT YOUR PHONE IS NOW ROOTED.
Note : This method works on both locked and unlocked bootloader devices!!!
If you have any problems feel free to comment :)
So here is the tutroial how to Root Xperia L running Jelly Bean 4.2.2 Build 15.3.A.1.14
To root 15.3.A.1.17 Click Here
Disclaimer : I am not responsible if you brick your phone or if u make any other damage to your phone
So Lets Start :
1. First make sure you are running Jelly Bean 4.2.2 Build 15.3.A.1.14. Go to Settings > About to verify this.
2. Download this File - Root Xperia L Tool and exctract it completely using WinRAR or WinZip.
3. Enable USB Debugging , Go to Settings > About phone and tap 7 times on Build number to enable Developer options, now Go to Settings > Developer options to enable Enable USB debugging mode.
4. Enable Unknown Sources. Go to Settings > Security and check Unknown sources.
5. Connect USB Cable to phone , then connect it to your Computer. On your phone Skip the PC Companion Companion prompt (if it appears), see screenshot below.
6. Right Click on My Computer > Manage , now goto Device Manager , and see if Android is listed like the below screenshot , to verify your device is properly connected. If yes move on to the next step.
7. Now go to the Folder where you extracted the downloaded file from Step 2, and execute "install.bat" .
Note :- If your device is not properly connected or ADB drivers are not installed , you will be stuck on daemon started successfully .
8. The Rooting Process will start , wait for some time , your phone will automatically reboot, wait for some more time :P
9. When the Rooting Process is completed , the Screen will show --all finished--. Press Any Key to Continue.
THATS IT YOUR PHONE IS NOW ROOTED.
Note : This method works on both locked and unlocked bootloader devices!!!
If you have any problems feel free to comment :)
Go to link download
Subscribe to:
Posts (Atom)