Saturday, December 10, 2016
How to Root Sony Xperia L C2104 C2105 on Jelly Bean 4 2 2 Build 15 3 A 1 12
How to Root Sony Xperia L C2104 C2105 on Jelly Bean 4 2 2 Build 15 3 A 1 12
Sony Released A new update to Xperia L , it is still 4.2.2 , just few bug fixes. The new build is 15.3.A.1.12. Thanks to CUBEANDCUBE for the Root.
.png)
So here is the tutroial how to Root Xperia L running Jelly Bean 4.2.2 Build 15.3.A.1.12
Disclaimer : I am not responsible if you brick your phone or if u make any other damage to your phone
So Lets Start :
1. First make sure you are running Jelly Bean 4.2.2 Build 15.3.A.1.12. Go to Settings > About to verify this.

2. Download this File - Root Xperia L Tool and exctract it completely using WinRAR or WinZip.
3. Enable USB Debugging , Go to Settings > About phone and tap 7 times on Build number to enable Developer options, now Go to Settings > Developer options to enable Enable USB debugging mode.
4. Enable Unknown Sources. Go to Settings > Security and check Unknown sources.
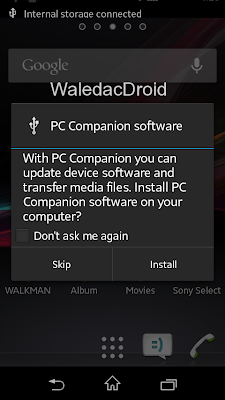
5. Connect USB Cable to phone , then connect it to your Computer. On your phone Skip the PC Companion Companion prompt (if it appears), see screenshot below.
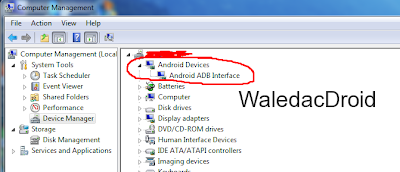
6. Right Click on My Computer > Manage , now goto Device Manager , and see if Android is listed like the below screenshot , to verify your device is properly connected. If yes move on to the next step.
7. Now go to the Folder where you extracted the downloaded file from Step 2, and execute "install.bat" .
Note :- If your device is not properly connected or ADB drivers are not installed , you will be stuck on daemon started successfully .

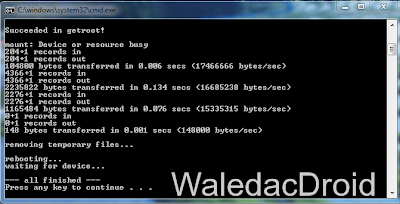
8. The Rooting Process will start , wait for some time , your phone will automatically reboot, wait for some more time :P
9. When the Rooting Process is completed , the Screen will show --all finished--. Press Any Key to Continue.
THATS IT YOUR PHONE IS NOW ROOTED.
Note : This method works on both locked and unlocked bootloader devices!!!
If you have any problems feel free to comment :)
So here is the tutroial how to Root Xperia L running Jelly Bean 4.2.2 Build 15.3.A.1.12
Disclaimer : I am not responsible if you brick your phone or if u make any other damage to your phone
So Lets Start :
1. First make sure you are running Jelly Bean 4.2.2 Build 15.3.A.1.12. Go to Settings > About to verify this.
2. Download this File - Root Xperia L Tool and exctract it completely using WinRAR or WinZip.
3. Enable USB Debugging , Go to Settings > About phone and tap 7 times on Build number to enable Developer options, now Go to Settings > Developer options to enable Enable USB debugging mode.
4. Enable Unknown Sources. Go to Settings > Security and check Unknown sources.
5. Connect USB Cable to phone , then connect it to your Computer. On your phone Skip the PC Companion Companion prompt (if it appears), see screenshot below.
6. Right Click on My Computer > Manage , now goto Device Manager , and see if Android is listed like the below screenshot , to verify your device is properly connected. If yes move on to the next step.
7. Now go to the Folder where you extracted the downloaded file from Step 2, and execute "install.bat" .
Note :- If your device is not properly connected or ADB drivers are not installed , you will be stuck on daemon started successfully .
8. The Rooting Process will start , wait for some time , your phone will automatically reboot, wait for some more time :P
9. When the Rooting Process is completed , the Screen will show --all finished--. Press Any Key to Continue.
THATS IT YOUR PHONE IS NOW ROOTED.
Note : This method works on both locked and unlocked bootloader devices!!!
If you have any problems feel free to comment :)
Go to link download
Subscribe to:
Post Comments (Atom)
No comments:
Post a Comment