Showing posts with label sony. Show all posts
Showing posts with label sony. Show all posts
Sunday, December 25, 2016
Keberadaan Sony Xperia E5 terlihat
Keberadaan Sony Xperia E5 terlihat
Terasa membingungkan jika kita melihat sepak terjang vendor Sony untuk sekarang ini, di mulai beberapa waktu lalu yang mengatakan bahwa Sony hanya akan berfokus untuk device Xperia dengan seri X saja hingga tahun 2018, dengan anggapan tersebut menjadikan bahwa dalam kurun waktu hingga 2018 nanti seharusnya tidak akan ada lagi device selain seri X keluaran Xperia lalu apa yang terjadi sekarang, Sony Xperia E5 tiba-tiba muncul kepermukaan?
Kabar ini datang dari sebuah dokumen yang berasal dari Russia, yang di dalam dokumen tersebut terlihat sebuah serial number dengan nama F3311 atau Xperia E5, sebelumnya kabar dari device ini juga sudah berhembus beberapa waktu lalu, tetapi ketika statement dari Sony keluar yang menyebut akan fokus untuk Xperia X ini, seolah kabar dari device in hilang begitu saja.

Menariknya device ini mempunyai spesifikasi yang cukup tinggi dengan di tenagai processor MediaTek Helio P10, dan juga ada 2 buah versi yang kabarnya akan mengisi seri ini yaitu seri F3311 yang menjadi versi reguler dan F3216 yang menjadi versi lite dari device tersebut, lalu apakah benar device Xperia seri E akan di rilis kembali?
Kemungkinan iya masih ada, karena Sony sampai saat ini belum mengeluarkan anggapan bahwa akan berhenti memproduksi Xperia di luar seri X, yang ada hanya Sony mengatakan bahwa mereka akan fokus pada seri X hingga tahun 2018, jadi kemungkinan device di luar seri X mungkin akan tetap ada dan di rilis sesuai jadwal sebelumnya.
Tetapi terdapat kemungkinan yang lebih besar lagi, yaitu pindahnya seri E ini ke seri X , dengan artian mungkin device ini nantinya akan di beri nama Xperia XE, tetapi semua ini hanya masih sebuah kemungkinan, jadi dengan kata lain tidak ada berita yang lebih akurat lagi ketika pihak Sony belum angkat bicara terkait hal tersebut, jadi kita tunggu saja.
sumber phonearena
Go to link download
Friday, December 23, 2016
DOWNLOAD SONY XBO X1 FIRMWARE
DOWNLOAD SONY XBO X1 FIRMWARE

DESCRIPTION
ROM Phone X-BO X1 – ROM Android 5.1
ONLY MT6580
DOWNLOAD X BO X1 STOCK ROM
Install ROM:
- Unpack FlashTools, and Click on Flash_tool.exe
- Select "scatter-Loading" and search MT6572_Android_scatter.txt in ROM
- Wait file to be added into Flash Tool
- Select "Download Only" or if upgrade "Firmware upgrade"
- Turn off your phone, remove the battery (if the battery is removable) and replace it after some seconds (and dont turn on the phone).
- Press “Download” button to start
- and connect your phone into the computer via USB data cable.
- The process will start and a red progress bar will appear after color purple, yellow.
- And green circles display
- Finish !
- You can now safely disconnect your phone and turn it on.
Go to link download
Monday, December 19, 2016
Sony Xperia J ST26i Jelly Bean 4 1 2 Tested Firmware
Sony Xperia J ST26i Jelly Bean 4 1 2 Tested Firmware
You can use the firmware for flash or reset screen lock 100% tested.
Mobile : Xperia J
Model : ST26i
System Version : Jelly Bean 4.1.2
Baseband : 11.2.?.0.33

Mobile : Xperia J
Model : ST26i
System Version : Jelly Bean 4.1.2
Baseband : 11.2.?.0.33
download link:
ST26i_11.2.?.0.33_Arabic--www.SamSony.net--.ftf - 386.52 MB
flash tool:
https://mega.nz/#!z4sSTaQZ!BVO7GSmoTrTwuuJAhadVCO6LQqLXMF543teobwpDG-I
download mode (power off device volume down+plug usb)
Go to link download
Saturday, December 17, 2016
handphone sony dan cara flashing semua tipe sony xperia
handphone sony dan cara flashing semua tipe sony xperia
Sony merupakan produsen elektronik terbesar kedua setelah samsung. Produsen asal jepang ini memang terkenal dengan suaranya yang khas, dimana disetiap produk ciptaanya menghasilkan suara-suara yang jernih dibanding dengan produk dari hasil ciptaan vendor lain.

Bagi masyarakat indonesia sendiri, sony memang sangat dikenal luas oleh para pecinta smartphone yang ada di nusantara. Banyak alasan yang membuat produk dari sony ini mudah dikenal, diantaranya sony memiliki ciri khas di dalam suara yang dihasilkan, gambarnya pun bagus, bahkan di segi kamera sony memiliki tingkat ketajaman yang tinggi.
Disamping itu semua masih ada lagi, yakni service center yaang sudah tersebar luas di indonesia, hal ini tentunya mendjadi daya tarik tersendiri. Bukan hanya spesifikasi dan performa yang dihasilkan saja yang bisa membuat nyaman para konsumenya, tempat service juga memiliki peran penting untuk memberi lebih kenyamanan kepada setiap konsumenya.
cara flash semua tipe xperia
Go to link download
Friday, December 16, 2016
Sony Xperia M2 Aqua D2403 Lollipop 5 1 1 Tested Firmware
Sony Xperia M2 Aqua D2403 Lollipop 5 1 1 Tested Firmware
You can use the firmware for flash or reset screen lock 100% tested.
Mobile : Xperia M2 Aqua
Model : D2403
System Version : Lollipop 5.1.1
Baseband : 18.6.A.0.175 Customized MEA

Mobile : Xperia M2 Aqua
Model : D2403
System Version : Lollipop 5.1.1
Baseband : 18.6.A.0.175 Customized MEA
download link:
https://docs.google.com/uc?id=0ByxbVOOPbJaka3k1TmhKVFZlM0k&export=download
flash tool:
https://mega.nz/#!z4sSTaQZ!BVO7GSmoTrTwuuJAhadVCO6LQqLXMF543teobwpDG-I
download mode (power off device volume down+plug usb)
how to flash:
Go to link download
Wednesday, December 14, 2016
Android USB Drivers Samsung Motorola Sony LG ZTE HTC ASUS Huawei Acer Amazo
Android USB Drivers Samsung Motorola Sony LG ZTE HTC ASUS Huawei Acer Amazo
USB Driver is a compulsory thing to be installed on you PC so that your mobile device can interact with your PC. These drivers help us to connect our phone to the computer and perform tasks like transferring data, syncing your device with a PC, using tools like Odin, Sony Flashtool and SuperOneClick, and rooting and flashing firmwares on your device. Almost every manufacturer provides USB drivers with the handset package. Here, we are providing the links to USB drivers for most Android device manufacturers like Samsung, LG, Sony, Google, HTC, Motorola, Dell, ZTE, etc.
Please note that the drivers provided below are compatible with almost all devices made by the respective brands. If the downloaded drivers do not work for you, visit the official site to download the specific USB drivers for your device.
Motorola USB Drivers
Download Motorola USB Drivers (Win)
Motorola USB Drivers (Latest)
Google USB Drivers
Download Google USB Drivers
Download Galaxy Nexus USB Drivers (GSM or CDMA-Verizon)
Universal ***** Driver 0.72 (Compatible with Nexus 4, 10, Q, & S)
Samsung USB Drivers
Download Latest Samsung Kies
Direct Link
Samsung_USB_Driver_1.5.27.0_2
SAMSUNG_USB_Driver_v1.5.23.0
Mirror Link
Download Samsung USB Drivers [older]
In case the above drivers do not work for you, do as described below.
HTC Sync Manager
Download HTC USB Drivers
Mirror Link
HTC Drivers (Compatible with Win 8)
Mirror to Download Directory
In case the above drivers do not work for you, do as described below:
Download Latest Sony USB Drivers from Official Site
Sony PC Companion
Sony Bridge for Mac
Download Sony ADB Flashtool Drivers
Mirror Link
LG USB Drivers
Download LG USB Drivers Mirror Link
In case the above drivers do not work for you, do as described below:
Download Dell (Phones & Tablets) USB Drivers Go to the link and choose your mobile device or tablet to download the specific version USB drivers.
Intel Android USB Drivers
Download Intel USB Drivers
ZTE USB Drivers
Download ZTE USB Drivers
Mirror Link
ASUS USB Drivers
Download ASUS USB Drivers or
Download ASUS PC Suite (drivers included)
Download Nexus 7 USB Drivers
Huawei USB Drivers
Download Huawei USB Drivers or
Download HiSuite (drivers included).
Acer USB Drivers
Download Acer USB Drivers
Sharp USB Drivers
Download Sharp USB Drivers
Amazon USB Drivers
Download Amazon USB Drivers Amazon SupportPage
Pantech USB Drivers
Download Pantech USB Drivers
XIAOMI USB Drivers
for M2,MI ONE,MI PLUS, etc.
Download XIAOMI USB Drivers
OPPO USB Drivers
for Finder x907,x905…
Download OPPO USB Drivers
Lenovo USB Drivers
for A750 and others
Download Lenovo USB Drivers
Please note that the drivers provided below are compatible with almost all devices made by the respective brands. If the downloaded drivers do not work for you, visit the official site to download the specific USB drivers for your device.
Motorola USB Drivers
Download Motorola USB Drivers (Win)
Motorola USB Drivers (Latest)
Google USB Drivers
Download Google USB Drivers
Download Galaxy Nexus USB Drivers (GSM or CDMA-Verizon)
Universal ***** Driver 0.72 (Compatible with Nexus 4, 10, Q, & S)
Samsung USB Drivers
Download Latest Samsung Kies
Direct Link
Samsung_USB_Driver_1.5.27.0_2
SAMSUNG_USB_Driver_v1.5.23.0
Mirror Link
Download Samsung USB Drivers [older]
In case the above drivers do not work for you, do as described below.
- Go to the Samsung Mobile official site
- Type the name and model of your device in the search box.
- Select your device and click the Support tab/button.
- You will get the download link for the specific USB Drivers for your device.
- Download the drivers and install onto to your computer.
HTC Sync Manager
Download HTC USB Drivers
Mirror Link
HTC Drivers (Compatible with Win 8)
Mirror to Download Directory
In case the above drivers do not work for you, do as described below:
- Go to the HTC official site
- Type the name and model of your device in the search box.
- Select your device and click the Support tab/button.
- In the support page, click the downloads tab.
- Here you will get the download link for the specific HTC Sync Drivers for your device.
- After downloading HTC Sync, start the installation process. You only need to install the USB driver and not the app itself.
Download Latest Sony USB Drivers from Official Site
Sony PC Companion
Sony Bridge for Mac
Download Sony ADB Flashtool Drivers
Mirror Link
LG USB Drivers
Download LG USB Drivers Mirror Link
In case the above drivers do not work for you, do as described below:
- Go to the LG Electronics official site
- Type the name and model of your device in the search box.
- Select your device and click the Resources button.
- In the support page, click the downloads tab.
- Download the drivers and install onto to your computer.
Download Dell (Phones & Tablets) USB Drivers Go to the link and choose your mobile device or tablet to download the specific version USB drivers.
Intel Android USB Drivers
Download Intel USB Drivers
ZTE USB Drivers
Download ZTE USB Drivers
Mirror Link
ASUS USB Drivers
Download ASUS USB Drivers or
Download ASUS PC Suite (drivers included)
Download Nexus 7 USB Drivers
Huawei USB Drivers
Download Huawei USB Drivers or
Download HiSuite (drivers included).
Acer USB Drivers
Download Acer USB Drivers
Sharp USB Drivers
Download Sharp USB Drivers
Amazon USB Drivers
Download Amazon USB Drivers Amazon SupportPage
Pantech USB Drivers
Download Pantech USB Drivers
XIAOMI USB Drivers
for M2,MI ONE,MI PLUS, etc.
Download XIAOMI USB Drivers
OPPO USB Drivers
for Finder x907,x905…
Download OPPO USB Drivers
Lenovo USB Drivers
for A750 and others
Download Lenovo USB Drivers
Go to link download
Saturday, December 10, 2016
How to Root Sony Xperia L C2104 C2105 on Jelly Bean 4 2 2 Build 15 3 A 1 12
How to Root Sony Xperia L C2104 C2105 on Jelly Bean 4 2 2 Build 15 3 A 1 12
Sony Released A new update to Xperia L , it is still 4.2.2 , just few bug fixes. The new build is 15.3.A.1.12. Thanks to CUBEANDCUBE for the Root.
.png)
So here is the tutroial how to Root Xperia L running Jelly Bean 4.2.2 Build 15.3.A.1.12
Disclaimer : I am not responsible if you brick your phone or if u make any other damage to your phone
So Lets Start :
1. First make sure you are running Jelly Bean 4.2.2 Build 15.3.A.1.12. Go to Settings > About to verify this.

2. Download this File - Root Xperia L Tool and exctract it completely using WinRAR or WinZip.
3. Enable USB Debugging , Go to Settings > About phone and tap 7 times on Build number to enable Developer options, now Go to Settings > Developer options to enable Enable USB debugging mode.
4. Enable Unknown Sources. Go to Settings > Security and check Unknown sources.
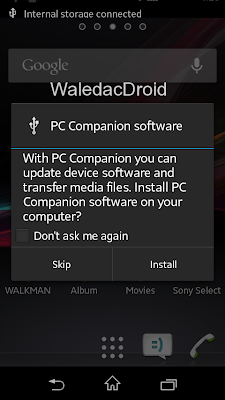
5. Connect USB Cable to phone , then connect it to your Computer. On your phone Skip the PC Companion Companion prompt (if it appears), see screenshot below.
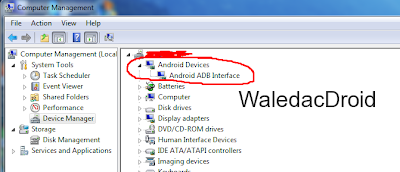
6. Right Click on My Computer > Manage , now goto Device Manager , and see if Android is listed like the below screenshot , to verify your device is properly connected. If yes move on to the next step.
7. Now go to the Folder where you extracted the downloaded file from Step 2, and execute "install.bat" .
Note :- If your device is not properly connected or ADB drivers are not installed , you will be stuck on daemon started successfully .

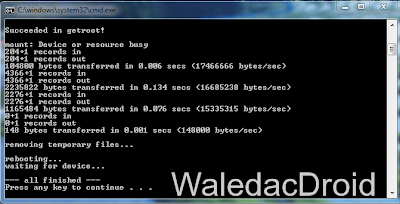
8. The Rooting Process will start , wait for some time , your phone will automatically reboot, wait for some more time :P
9. When the Rooting Process is completed , the Screen will show --all finished--. Press Any Key to Continue.
THATS IT YOUR PHONE IS NOW ROOTED.
Note : This method works on both locked and unlocked bootloader devices!!!
If you have any problems feel free to comment :)
So here is the tutroial how to Root Xperia L running Jelly Bean 4.2.2 Build 15.3.A.1.12
Disclaimer : I am not responsible if you brick your phone or if u make any other damage to your phone
So Lets Start :
1. First make sure you are running Jelly Bean 4.2.2 Build 15.3.A.1.12. Go to Settings > About to verify this.
2. Download this File - Root Xperia L Tool and exctract it completely using WinRAR or WinZip.
3. Enable USB Debugging , Go to Settings > About phone and tap 7 times on Build number to enable Developer options, now Go to Settings > Developer options to enable Enable USB debugging mode.
4. Enable Unknown Sources. Go to Settings > Security and check Unknown sources.
5. Connect USB Cable to phone , then connect it to your Computer. On your phone Skip the PC Companion Companion prompt (if it appears), see screenshot below.
6. Right Click on My Computer > Manage , now goto Device Manager , and see if Android is listed like the below screenshot , to verify your device is properly connected. If yes move on to the next step.
7. Now go to the Folder where you extracted the downloaded file from Step 2, and execute "install.bat" .
Note :- If your device is not properly connected or ADB drivers are not installed , you will be stuck on daemon started successfully .
8. The Rooting Process will start , wait for some time , your phone will automatically reboot, wait for some more time :P
9. When the Rooting Process is completed , the Screen will show --all finished--. Press Any Key to Continue.
THATS IT YOUR PHONE IS NOW ROOTED.
Note : This method works on both locked and unlocked bootloader devices!!!
If you have any problems feel free to comment :)
Go to link download
Thursday, December 8, 2016
How to Download Sony Xperia Mobile Firmware using XperiFirm and create FTF file
How to Download Sony Xperia Mobile Firmware using XperiFirm and create FTF file
When Sony releases software updates , the update is rolled out in phases , so if you dont get the update but cannot wait , here is the tutorial to download official firmwares for your Xperia devices.
This tutorial is for all Sony Xperia devices.
You can download the official latest version firmware of your mobile , create a FTF file and flash it on your mobile
Create your own ftf file i.e the official stock firmware
Disclaimer : I am not responsible if you brick your phone or if u make any other damage to your phone
1.
2. Now navigate to the folder where u extracted XperiFirm and run XperiFirm.exe , u will get a window like the below screenshot.

3. Now select the model number , select the exact model number of your phone (goto settings >about to know your model number) , do not download any other phones firmware and flash it on your phone , I will be downloading for Xperia Z1 ( C6903 ) , u can see in the screenshot below.
Note :- To check CDA i.e Customization Number , dial *#*#7378423#*#* in your mobile , select Service Info > Software Info , you can see the Customization Number ( CDA )

4. Click on Check All to see which variant has got the update , like for my Xperia Z1 ( C6903 ) - UAE Customized AE has got the latest update of Lollipop Android 5.0.2 Build 14.5.A.0.242. You can ask in the comment section regarding your devices latest build and update.

5. Now in the right hand side , click on the build number which u want to download , a dialogue box will appear , Tick - Unpack automatically and click on Download ( See Note below to Download manually )


6. Select the folder where you want the files to be saved and click on OK , the download will begin , wait for the download to complete , depending on your internet connection it will take a little time.


7. Once the download is complete , open Flashtool , click on Tools > Bundles > Create.

8. A dialogue box will open , Select the folder where u downloaded the files using XperiFirm

9. The files will be added in the box , select all the files and click on Right Arrow ( -> ) see the screenshot below.


10. Now double click on Device field and select your device , enter the branding and version in the fields respectively.
11. Finally click on Create , it will take some time to create the FTF file , once it is done u will see the confirmation message in flashtool "Bundle Creation Finished". You can see the ftf file in C:Flashtoolfirmwares


12. Now you can use Flashtool to flash to FTF file you created , refer this article on how to flash using Flashtool - LINK
Note : - If you are facing any download issues while downloading in the firmware in Step 6 , you can also use the Manual Download option.
I. To Manually Download , instead of clicking on Download click on Manual , A dialogue box will appear to Copy URLs , click on Yes. Now a dialogue box will appear that URLs have been copied do not click on OK


II. Now Open Notepad , Right Click and Click Paste ( OR Press CTRL + V ) , now using any download manager download all the files 1 by 1.

III. When you have downloaded all the files return to XperiFirm , and now click on OK , which was left untouched.

IV. A dialogue box will appear to Unpack , click on YES.

V. Select the folder where you downloaded all the files, unpacking will begin , when it is done , follow from step 7 to create FTF file using Flastool


Feel Free to Comment if you have any doubts ;)
This tutorial is for all Sony Xperia devices.
You can download the official latest version firmware of your mobile , create a FTF file and flash it on your mobile
Create your own ftf file i.e the official stock firmware
Disclaimer : I am not responsible if you brick your phone or if u make any other damage to your phone
1.
- Download and extract XperiFirm - LINK ( Source )
- Download Flashtool from the official website - http://www.flashtool.net/downloads.php (Please do not use any old version of flashtool , download the latest version)
2. Now navigate to the folder where u extracted XperiFirm and run XperiFirm.exe , u will get a window like the below screenshot.
3. Now select the model number , select the exact model number of your phone (goto settings >about to know your model number) , do not download any other phones firmware and flash it on your phone , I will be downloading for Xperia Z1 ( C6903 ) , u can see in the screenshot below.
Note :- To check CDA i.e Customization Number , dial *#*#7378423#*#* in your mobile , select Service Info > Software Info , you can see the Customization Number ( CDA )
4. Click on Check All to see which variant has got the update , like for my Xperia Z1 ( C6903 ) - UAE Customized AE has got the latest update of Lollipop Android 5.0.2 Build 14.5.A.0.242. You can ask in the comment section regarding your devices latest build and update.
5. Now in the right hand side , click on the build number which u want to download , a dialogue box will appear , Tick - Unpack automatically and click on Download ( See Note below to Download manually )
6. Select the folder where you want the files to be saved and click on OK , the download will begin , wait for the download to complete , depending on your internet connection it will take a little time.
7. Once the download is complete , open Flashtool , click on Tools > Bundles > Create.
8. A dialogue box will open , Select the folder where u downloaded the files using XperiFirm
9. The files will be added in the box , select all the files and click on Right Arrow ( -> ) see the screenshot below.
10. Now double click on Device field and select your device , enter the branding and version in the fields respectively.
11. Finally click on Create , it will take some time to create the FTF file , once it is done u will see the confirmation message in flashtool "Bundle Creation Finished". You can see the ftf file in C:Flashtoolfirmwares
12. Now you can use Flashtool to flash to FTF file you created , refer this article on how to flash using Flashtool - LINK
Note : - If you are facing any download issues while downloading in the firmware in Step 6 , you can also use the Manual Download option.
I. To Manually Download , instead of clicking on Download click on Manual , A dialogue box will appear to Copy URLs , click on Yes. Now a dialogue box will appear that URLs have been copied do not click on OK
II. Now Open Notepad , Right Click and Click Paste ( OR Press CTRL + V ) , now using any download manager download all the files 1 by 1.
III. When you have downloaded all the files return to XperiFirm , and now click on OK , which was left untouched.
IV. A dialogue box will appear to Unpack , click on YES.
V. Select the folder where you downloaded all the files, unpacking will begin , when it is done , follow from step 7 to create FTF file using Flastool
Feel Free to Comment if you have any doubts ;)
Go to link download
Sony resmi konfirmasi keberadaan Sony Xperia E5
Sony resmi konfirmasi keberadaan Sony Xperia E5
Setelah beberapa waktu lalu publik di bingungkan dengan anggapan bahwa Sony hanya akan fokus untuk seri Xperia X saja hingga tahun 2018 dan tidak akan merilis seri selain seri Xperia X, tetapi setelah anggapan tersebut lalu muncul sebuah indikasi tipe keluaran seri E dengan nama Sony Xperia E5, dan hal ini menambah penggemar Sony Xperia semakin bingung tentang kejelasan seri Xperia selain tipe X, tetapi sekarang anggapan tidak ada seri Xperia selain tipe X sudah di patahkan dengan datangnya konfirmasi resmi dari pihak Sony yang merilis sebuah renders dengan deskripsi Sony Xperia E5.

Foto renders dan juga deskripsi smartphone tersebut datang secara resmi dari akun faceboot Sony Mobile yang hanya beberapa saat lalu mereka rilis, dengan datangnya kabar ini berarti kesimpulannya adalah bahwa benar Sony memang akan fokus kepada seri X hingga tahun 2018, tetapi juga masih merilis smartphone non-seri X juga, termasuk dengan seri Xperia E, M, dan C, dengan indikasi demikian, paling tidak sudah di ketahui jajaran tipe Sony Xperia yang lain masih di lanjutkan dan tidak di hentikan.
Dalam deskripsi yang Sony rilis tidak ada info tentang spesifikasi atau clue kapan device ini akan di rilis, yang ada hanya deskripsi tersebut menyatakan keberadaan Sony Xperia E5 benar-benar ada, kalau benar tentang pemberitaan sebelumnya maka seri build number smartphone ini adalah F3311 yang beberapa waktu lalu muncul di database dengan bahasa Rusia.
Pada gambar renders terlihat bahwa Sony Xperia E5 tampil dengan sangat elegant dengan finishing yang rapi, meski demikian tetap saja seri Xperia E5 ini akan berada pada level kelas menengah kebawah, jadi untuk harga tidak akan jauh melampaui device Sony Xperia lainnya, untuk sekarang hanya di perlihatkan jenis warna hitamnya saja, tetapi di pastikan akan banyak pilihan warna yang nantinya akan tersedia, untuk spesifikasinya masih belum jelas, tetapi kemungkinan besarnya device ini akan mempunyai spesifikasi lumayan dengan dukungan processor kelas menengah, bisa dari Qualcomm bisa juga dari MediaTek, untuk kabar selanjutnya kita tunggu saja perkembangan lanjutannya dari Sony.
sumber facebook
Go to link download
Wednesday, December 7, 2016
How to Root Sony Xperia Z1 C6902 C6903 C6906 C6943 4 4 4 KitKat Build 14 4 A 0 108
How to Root Sony Xperia Z1 C6902 C6903 C6906 C6943 4 4 4 KitKat Build 14 4 A 0 108
Root your Sony Xperia Z1 running Android 4.4.4 KitKat easily with just one click. This tutorial is for Build 14.4.A.0.108 , it may work on other older builds also.
Thanks to CubeandCube for the root tool (exploit)

Disclaimer : I am not responsible if you brick your phone or if u make any other damage to your phone
The images used are of C6902 model but this works on all models of Xperia Z1 running KitKat 4.4.4
So Lets Start :
1. First make sure you are running KitKat 4.4.4 Build 14.4.A.0.108. Go to Settings > About to verify this. This method may work on older firmwares.

2. Download this File - rootkitXperia_20140719.zip and exctract it completely using WinRAR or WinZip.
3. Enable USB Debugging , Go to Settings > About phone and tap 7 times on Build number to enable Developer options, now Go to Settings > Developer options to enable Enable USB debugging mode.


4. Enable Unknown Sources. Go to Settings > Security and check Unknown sources.
5. Connect USB Cable to phone , then connect it to your Computer. On your phone Skip the PC Companion Companion prompt (if it appears), a prompt will come on your mobile to Allow USB Debugging , click on Ok, see screenshot below.

6. Right Click on My Computer > Manage , now goto Device Manager , and see if Android is listed like the below screenshot , to verify your device is properly connected. If yes move on to the next step. (If no then install ADB Drivers , if u have Sony PC Companion installed just open it and wait for some time the drivers will get installed automatically , then close PC Companion and proceed )

7. Now go to the Folder where you extracted the downloaded file from Step 2, and execute "install.bat" .
Note :- If your device is not properly connected or ADB drivers are not installed , you will be stuck on daemon started successfully . To install ADB drivers install Sony PC Companion and then connect your phone with USB Debugging Mode ON , ur drivers will get installed, exit PC Companion before starting the rooting process.
8. The Rooting Process will start , wait for some time , your phone will automatically reboot, wait for some more time :P

9. When the Rooting Process is completed , the Screen will show --all finished--. Press Any Key to Continue.
THATS IT YOUR PHONE IS NOW ROOTED.
Note : This method works on both locked and unlocked bootloader devices!!!
If you have any problems feel free to comment :)
Thanks to CubeandCube for the root tool (exploit)
Disclaimer : I am not responsible if you brick your phone or if u make any other damage to your phone
The images used are of C6902 model but this works on all models of Xperia Z1 running KitKat 4.4.4
So Lets Start :
1. First make sure you are running KitKat 4.4.4 Build 14.4.A.0.108. Go to Settings > About to verify this. This method may work on older firmwares.
2. Download this File - rootkitXperia_20140719.zip and exctract it completely using WinRAR or WinZip.
3. Enable USB Debugging , Go to Settings > About phone and tap 7 times on Build number to enable Developer options, now Go to Settings > Developer options to enable Enable USB debugging mode.
4. Enable Unknown Sources. Go to Settings > Security and check Unknown sources.
5. Connect USB Cable to phone , then connect it to your Computer. On your phone Skip the PC Companion Companion prompt (if it appears), a prompt will come on your mobile to Allow USB Debugging , click on Ok, see screenshot below.
6. Right Click on My Computer > Manage , now goto Device Manager , and see if Android is listed like the below screenshot , to verify your device is properly connected. If yes move on to the next step. (If no then install ADB Drivers , if u have Sony PC Companion installed just open it and wait for some time the drivers will get installed automatically , then close PC Companion and proceed )
7. Now go to the Folder where you extracted the downloaded file from Step 2, and execute "install.bat" .
Note :- If your device is not properly connected or ADB drivers are not installed , you will be stuck on daemon started successfully . To install ADB drivers install Sony PC Companion and then connect your phone with USB Debugging Mode ON , ur drivers will get installed, exit PC Companion before starting the rooting process.
8. The Rooting Process will start , wait for some time , your phone will automatically reboot, wait for some more time :P
9. When the Rooting Process is completed , the Screen will show --all finished--. Press Any Key to Continue.
THATS IT YOUR PHONE IS NOW ROOTED.
Note : This method works on both locked and unlocked bootloader devices!!!
If you have any problems feel free to comment :)
Go to link download
Tuesday, December 6, 2016
Unlock Relock bootloader using Flashtool Android Sony Xperia
Unlock Relock bootloader using Flashtool Android Sony Xperia
Unlock your bootloader
a) download and install latest Flashtool from here
b) start Flashtool and click on BLU button on the top
c) turn off your phone and when Flashtool shows pop up window, connect phone to PC with holding volume down button (to boot in Flashmode)
d) click on get unlock key button, it will switch you to Sony Mobile website (For Sony Phones Only), here complete all boxes
e) copy IMEI form Flashtool to Sony Mobile site, than you will get unlock code to your mailbox
f) copy unlock key to Flashtool window and than click unlock
g) connect phone with holding menu button when Flashtool shows pop up window
h) wait to unlock finish.
Relock your bootloader
a) start Flashtool and click on BLU button on the top
b) turn off your phone and when Flashtool shows pop up window, connect phone to PC with holding volume down button (to boot in Flashmode)
c) just click on relock button and your bootloader is locked for now
For Flashboot Mode: Press back Key or for Touch Navigation Key model, Press Volumn Down Key
For any queries, Please leave comments bellow.
HELP MAKES ALL HAPPY
Go to link download
Wednesday, November 30, 2016
Sony Xperia E4 E2105 KitKat 4 4 4 Tested Firmware
Sony Xperia E4 E2105 KitKat 4 4 4 Tested Firmware
You can use the firmware for flash or reset screen lock 100% tested.
Mobile : Xperia E4
Model : E2105
System Version : KitKat 4.4.4
Baseband : 24.0.A.5.14 Customized MA

Mobile : Xperia E4
Model : E2105
System Version : KitKat 4.4.4
Baseband : 24.0.A.5.14 Customized MA
download link:
https://docs.google.com/uc?id=0ByxbVOOPbJakdldQWFNuMk9mRlk&export=download
flash tool:
https://mega.nz/#!z4sSTaQZ!BVO7GSmoTrTwuuJAhadVCO6LQqLXMF543teobwpDG-I
download mode (power off device volume down+plug usb)
Go to link download
Tuesday, November 29, 2016
Cara Flashing Sony Xperia SP
Cara Flashing Sony Xperia SP
Buat yg Xperia SP nya lagi bootloop karena gonta ganti ROM atau ganti kernel atau hal lainnya, atau mungkin Xperianya udah lemot, pengen dibuat fresh seperti HP baru lagi maka kalian harus melakukan flashing ulang pada device Xperia nya agar Hp nya bisa digunain lagi dengan normal ^_^ . Hari ini ane kasi tutorial cara flash ulang ke stock ROM bawaan si SP ini. Buat yg belum tau apa itu flashing, bisa cek disini gan.
Di tutorial kali ini yg akan ane flash sebagai contoh adalah firmware XSP Jelly Bean V.4.3 C5302 versi 12.1.A.1.207 Region Indonesia. Kenapa ane pilih firmware .207? Itu karena versi ini adalah firmware terakhir yg terupdate yg dibuat Sony untuk Xperia SP
Baca juga:
Cara root Sony Xperia SP
Cara melegakan RAM di Android
Cara mengambil file Apk dari aplikasi yang terinstal di Android
Sebelum melakukan flash, siapin dulu bahan-bahannya :D
Langsung aja deh kita mulai proses flashing nya ya:


[Update 06/07/2015]
Tips tambahan untuk pengguna Windows 8 keatas supaya bisa instal driver flashtool:
Dirangkum dari berbagai sumber, terutama dari XDA
Credit to Original Uploader:
.kuping,gepeng. @kaskus untuk firmware
xperiafirmware.com untuk mirror flashtool
Penting! Kalian akan kehilangan semua data Internal Memory saat melakukan flashing ini, karena di tutorial kali ini adalah cara untuk "FRESH INSTALL"
Di tutorial kali ini yg akan ane flash sebagai contoh adalah firmware XSP Jelly Bean V.4.3 C5302 versi 12.1.A.1.207 Region Indonesia. Kenapa ane pilih firmware .207? Itu karena versi ini adalah firmware terakhir yg terupdate yg dibuat Sony untuk Xperia SP
Baca juga:
Cara root Sony Xperia SP
Cara melegakan RAM di Android
Cara mengambil file Apk dari aplikasi yang terinstal di Android
Sebelum melakukan flash, siapin dulu bahan-bahannya :D
- FlashTool - Download
- Firmware yg ingin di flash (C5302 12.1.A.1.207) - Download
Pastikan baterai HP diatas 50% sebelum melakukan percobaan ini untuk jaga2 agar HP tidak kehabisan baterai saat dilakukan flashing dan menyebabkan kerusakan yg lebih parah
Langsung aja deh kita mulai proses flashing nya ya:
- Jika HP ente masih hidup (dapat boot normal) ane saranin aktifin mode USB debugging nya. Kalo ada yg belum tau cara enable USB debugging, bisa baca disini dulu gan sebelum lanjut ke tahap berikutnya. Tapi kalo si SP nya uda bootloop (ga bisa booting lagi) ya uda deh, coba langsung diflash aja sambil banyak2 doa supaya sukses proses flashing nya :D
- Selanjutnya, instal program Flashtool nya, klik Next aja sampe selesai proses instalasinya
 |
| Instal FlashTool |
- Setelah itu copy kan file firmware Xperia SP kita ke direktori "C:FlashtoolFirmwares"
 |
| Copy file firmware |
- Di langkah ini, saatnya instal driver untuk XSP kita. Colokin kabel data dari komputer/laptop ke XSP kita, lalu buka instalan driver flashtool di C:Flashtooldrivers, buka Flashtool-drivers, lalu instal seperti biasa, klik Next, lalu di halaman kedua instalasi (lihat gambar kedua dibawah), beri ceklist pada pilihan Flashmode Drivers dan Fastboot Drivers, lalu klik Install
 |
| Install FlashTool Driver (1) |
- Lalu akan muncul Device Driver Installation Wizard, klik Next lagi. Jika ada pop up menu muncul, pilih saja "Instal driver anyway". Jika instalasi driver berhasil maka di statusnya akan Ready to Use (lihat gambar), dan klik Finish
 |
| Proses instal driver, klik Next lagi |
 |
| Ceklist driver yang akan diinstal, lalu klik instal |
 |
| Proses Instal Driver Sukses |
- Sekarang buka program Flashtool nya di "C:FlashtoolFlashtool.exe". Jika menggunakan Windows 7/8/8.1 ane saranin klik kanan file FlashTool nya terus pilih Run As Administrator. Catatan: Jika komputer anda menggunakan sistem operasi 64bit, maka jalankan file yang Flashtool64.exe
 |
| Jalankan FlashTool nya |
- Klik gambar petir pada bagian sebelah kiri Flashtool, lalu pilih Flashmode, dan klik OK
- Setelah itu akan muncul tampilan untuk memilih firmware mana yg ingin di flash di HP kita (Firmware Selector). Pilih device Sony Xperia SP kita (C5302), lalu klik tombol Flash di bagian bawah
- Setelah itu kalian harus menunggu sebentar karena program Flashtool sedang mempersiapkan file untuk proses flashingnya (akan muncul tulisan "preparing files for flashing"). Gak lama kemudian pasti akan muncul tampilan "Wait for flashmode". Pada saat ini, matikan HP nya, trus cabut dari kabel data. Setelah XSP nya dicabut dari kabel data, tekan tombol VOLUME BAWAH (VOL DOWN), lalu colokin lagi ke kabel datanya, sampe muncul LED warna HIJAU dan setelah itu proses flashing akan dimulai
 |
| Wait for Flashmode |
- Proses flashing akan berjalan. Saat ini kalian harus banyak2 doa :v :D supaya bisa berhasil dan ga error / proses berhenti di tengah jalan
 |
| Tampilan proses flashing |
- Jika proses flashing telah selesai, dan ada tulisan Flashing finished, berarti proses flashing sudah selesai, silahkan dicabut HP nya dari kabel data dan coba nyalain XSP kalian
- Setelah Xperia SP kalian dihidupkan, proses loading awal akan sangat lama (sekitar 5-8menit), harap ditunggu saja, jangan dimatikan HP nya. Nanti akan muncul tampilan awal seperti ini:
- Selamat, Xperia kalian sudah berhasil di flash
[Update 06/07/2015]
Tips tambahan untuk pengguna Windows 8 keatas supaya bisa instal driver flashtool:
- Sebelum instal driver flashtool, maka kalian harus buka command prompt (admin), lalu ketikkan perintah dibawah ini, setelah itu, restart dulu komputer kalian
bcdedit /set testsigning on
- Dan jika proses flashing sudah selesai, maka buka lagi command prompt (admin), lalu ketikkan seperti dibawah ini, setelah itu jangan lupa restart komputernya
bcdedit /set testsigning off
Kalau kalian ingin pasang Custom ROM lagi setelah flashing ke stock ROM, kalian harus menginstal CWM di Xperia SP agar bisa pakai Custom ROM lagi
Jika ada yang kurang jelas bisa komentar dibawah
Jika ada yang kurang jelas bisa komentar dibawah
Dirangkum dari berbagai sumber, terutama dari XDA
Credit to Original Uploader:
.kuping,gepeng. @kaskus untuk firmware
xperiafirmware.com untuk mirror flashtool
Go to link download
Subscribe to:
Posts (Atom)