Showing posts with label 14. Show all posts
Showing posts with label 14. Show all posts
Wednesday, December 7, 2016
How to Root Sony Xperia Z1 C6902 C6903 C6906 C6943 4 4 4 KitKat Build 14 4 A 0 108
How to Root Sony Xperia Z1 C6902 C6903 C6906 C6943 4 4 4 KitKat Build 14 4 A 0 108
Root your Sony Xperia Z1 running Android 4.4.4 KitKat easily with just one click. This tutorial is for Build 14.4.A.0.108 , it may work on other older builds also.
Thanks to CubeandCube for the root tool (exploit)

Disclaimer : I am not responsible if you brick your phone or if u make any other damage to your phone
The images used are of C6902 model but this works on all models of Xperia Z1 running KitKat 4.4.4
So Lets Start :
1. First make sure you are running KitKat 4.4.4 Build 14.4.A.0.108. Go to Settings > About to verify this. This method may work on older firmwares.

2. Download this File - rootkitXperia_20140719.zip and exctract it completely using WinRAR or WinZip.
3. Enable USB Debugging , Go to Settings > About phone and tap 7 times on Build number to enable Developer options, now Go to Settings > Developer options to enable Enable USB debugging mode.


4. Enable Unknown Sources. Go to Settings > Security and check Unknown sources.
5. Connect USB Cable to phone , then connect it to your Computer. On your phone Skip the PC Companion Companion prompt (if it appears), a prompt will come on your mobile to Allow USB Debugging , click on Ok, see screenshot below.

6. Right Click on My Computer > Manage , now goto Device Manager , and see if Android is listed like the below screenshot , to verify your device is properly connected. If yes move on to the next step. (If no then install ADB Drivers , if u have Sony PC Companion installed just open it and wait for some time the drivers will get installed automatically , then close PC Companion and proceed )

7. Now go to the Folder where you extracted the downloaded file from Step 2, and execute "install.bat" .
Note :- If your device is not properly connected or ADB drivers are not installed , you will be stuck on daemon started successfully . To install ADB drivers install Sony PC Companion and then connect your phone with USB Debugging Mode ON , ur drivers will get installed, exit PC Companion before starting the rooting process.
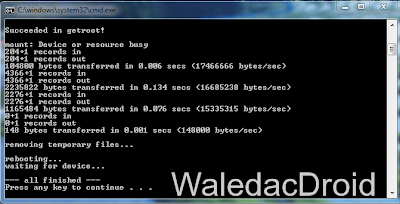
8. The Rooting Process will start , wait for some time , your phone will automatically reboot, wait for some more time :P

9. When the Rooting Process is completed , the Screen will show --all finished--. Press Any Key to Continue.
THATS IT YOUR PHONE IS NOW ROOTED.
Note : This method works on both locked and unlocked bootloader devices!!!
If you have any problems feel free to comment :)
Thanks to CubeandCube for the root tool (exploit)
Disclaimer : I am not responsible if you brick your phone or if u make any other damage to your phone
The images used are of C6902 model but this works on all models of Xperia Z1 running KitKat 4.4.4
So Lets Start :
1. First make sure you are running KitKat 4.4.4 Build 14.4.A.0.108. Go to Settings > About to verify this. This method may work on older firmwares.
2. Download this File - rootkitXperia_20140719.zip and exctract it completely using WinRAR or WinZip.
3. Enable USB Debugging , Go to Settings > About phone and tap 7 times on Build number to enable Developer options, now Go to Settings > Developer options to enable Enable USB debugging mode.
4. Enable Unknown Sources. Go to Settings > Security and check Unknown sources.
5. Connect USB Cable to phone , then connect it to your Computer. On your phone Skip the PC Companion Companion prompt (if it appears), a prompt will come on your mobile to Allow USB Debugging , click on Ok, see screenshot below.
6. Right Click on My Computer > Manage , now goto Device Manager , and see if Android is listed like the below screenshot , to verify your device is properly connected. If yes move on to the next step. (If no then install ADB Drivers , if u have Sony PC Companion installed just open it and wait for some time the drivers will get installed automatically , then close PC Companion and proceed )
7. Now go to the Folder where you extracted the downloaded file from Step 2, and execute "install.bat" .
Note :- If your device is not properly connected or ADB drivers are not installed , you will be stuck on daemon started successfully . To install ADB drivers install Sony PC Companion and then connect your phone with USB Debugging Mode ON , ur drivers will get installed, exit PC Companion before starting the rooting process.
8. The Rooting Process will start , wait for some time , your phone will automatically reboot, wait for some more time :P
9. When the Rooting Process is completed , the Screen will show --all finished--. Press Any Key to Continue.
THATS IT YOUR PHONE IS NOW ROOTED.
Note : This method works on both locked and unlocked bootloader devices!!!
If you have any problems feel free to comment :)
Go to link download
Sunday, October 9, 2016
AFT V 1 14
AFT V 1 14
AFT V1.14
Supported Models : Model Name
A68M PadFone E
A91 PadFone X
A400CG ZenFone 4
A450CG ZenFone 4
A500CG ZenFone 5
A501CG ZenFone 5
A502CG ZenFone 5
A500KL ZenFone 5
A600CG ZenFone 6
A601CG ZenFone 6
FE170CG ASUS Fonepad 7
FE171CG ASUS Fonepad 7
FE171MG ASUS Fonepad 7
FE375CL ASUS Fonepad 7
FE375CG ASUS Fonepad 7
FE375CXG ASUS Fonepad 7
FE380CG ASUS Fonepad 8
FE380CXG ASUS Fonepad 8
ME70C ASUS MeMO Pad 7
ME70CX ASUS MeMO Pad 7
ME103K ASUS MeMO Pad 10
ME170C ASUS MeMO Pad 7
ME171C ASUS MeMO Pad 7
ME175CG ASUS Fonepad 7
ME176C ASUS MeMO Pad 7
ME176CX ASUS MeMO Pad 7
ME181C ASUS MeMO Pad 8
ME181CX ASUS MeMO Pad 8
ME372CG ASUS Fonepad 7
ME372CL ASUS Fonepad 7
ME375CL ASUS Fonepad 7
ME560CG ASUS Fonepad Note 6
ME572C Tablet | ASUS MeMO Pad 7
ME572CL Tablet | ASUS MeMO Pad 7
ME581C ASUS MeMO Pad 8
ME581CL ASUS MeMO Pad 8
PF400CG PadFone mini
PF450CL Asus PadFone X mini
PF451CL PadFone mini
PF500KL PadFone S
TF103C ASUS Transformer Pad
TF103CE ASUS Transformer Pad
TF103CG ASUS Transformer Pad
TF303K ASUS Transformer Pad
TF303CL ASUS Transformer Pad
Z170C ASUS ZenPad C 7.0
Z170CG ASUS ZenPad C 7.0
Z370C ASUS ZenPad C 7.0
Z370CG ASUS ZenPad C 7.0
Z580C ASUS ZenPad S 8.0
Z580CA ASUS ZenPad S 8.0
ZC451CG ZenFone C
ME375CL ASUS MeMO Pad 7 LTE
ZE500CL ZenFone 2
ZE500KG ASUS ZenFone 2 Laser
ZE550ML Asus Zenfone 2
ZE551ML Asus Zenfone 2
DOWNLOAD DI BAWAH
DOWNLOAD
Go to link download
Sunday, August 28, 2016
OnePlus 3 akan di resmi di perkenalkan pada 14 Juni
OnePlus 3 akan di resmi di perkenalkan pada 14 Juni
Salah satu device paling di tunggu besutan vendor OnePlus dengan seri flagship terbaru OnePlus 3 sekarang mendapat sedikit kejelasan dari perkenalan resminya dan waktu lauunching resminya di kabarkan akan terjadi pada tanggal 14 Juni mendatang, untuk event dan tempat launchingnya belum di ketahui.

Kabar ini di dapat dari salah seorang fans dari device OnePlus yang menanyakan kepada bagian dari vendor OnePlus terkait tentang waktu perilisan resmi dari device ini dan benar saja si penanya mendapatkan sebuah jawaban yang singkat tapi lengkap, yaitu di katakan bahwa device ini akan resmi di perkenalkan pada tanggal 14 Juni mendatang dan pada acara perkenalan resmi tersebut kalian dapat melihtnya secara streaming melalui gadget VR dan juga secara streaming biasa.

Terkait benar atau tidaknya informasi ini masih belum bisa di pastikan secara penuh, tetapi hanya kabar inilah yang paling kuat tentang indikasi dari waktu perkenalan resmi device ini, secara umumnya device OnePlus 3 ini memiliki spesifikasi yang tinggi, yap benar saja ini adalah device andalan genarasi terbaru besutan dari OnePlus jadi wajar saja jika para penggemar device OnePlus diluar sana banyak menantikan kapan devcie ini akan resmi di perkenalkan,
Menurut kabar yang beredar OnePlus 3 ini akan hadir dalam 2 biah versi berbeda dengan letak perbedaan di size RAM dan juga storage, secara garis besarnya device akan hadir dengan layar seluas 5.5 inch dengan kualitas FullHD, dapur pacu dari Qualcomm Snapdragon 820, RAM 3GB/4GB, storage 32GB/64GB, juga di bekali kemampuan kamera dengan resolusi 16MP dan juga depan 8MP, untuk sistem operasi kabarnya device ini akan hadir dalam versi Android Marshmallow.
sumber gizmochina
Go to link download
Thursday, August 11, 2016
How to Root Sony Xperia L C2104 C2105 on Jelly Bean 4 2 2 Build 15 3 A 1 14
How to Root Sony Xperia L C2104 C2105 on Jelly Bean 4 2 2 Build 15 3 A 1 14
A new update to Xperia L , it is still 4.2.2 , just few bug fixes. The new build is 15.3.A.1.14 . And here is the root method :D.

So here is the tutroial how to Root Xperia L running Jelly Bean 4.2.2 Build 15.3.A.1.14
To root 15.3.A.1.17 Click Here
Disclaimer : I am not responsible if you brick your phone or if u make any other damage to your phone
So Lets Start :
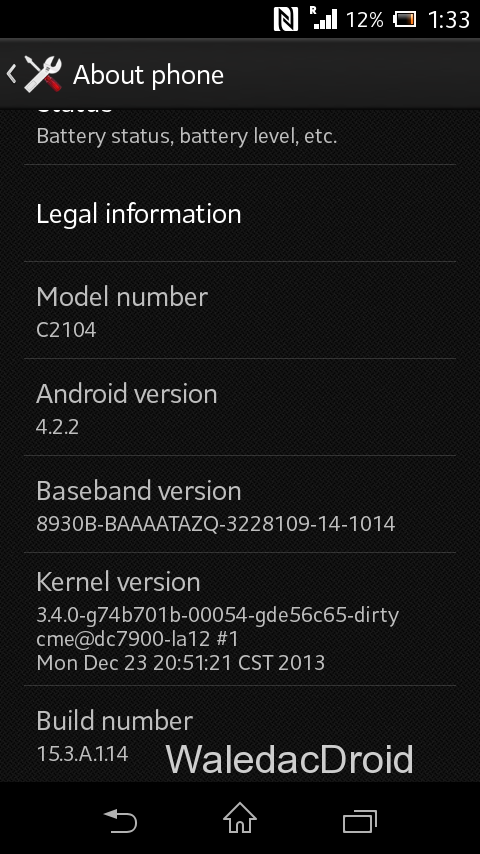
1. First make sure you are running Jelly Bean 4.2.2 Build 15.3.A.1.14. Go to Settings > About to verify this.
.png)
2. Download this File - Root Xperia L Tool and exctract it completely using WinRAR or WinZip.
3. Enable USB Debugging , Go to Settings > About phone and tap 7 times on Build number to enable Developer options, now Go to Settings > Developer options to enable Enable USB debugging mode.
4. Enable Unknown Sources. Go to Settings > Security and check Unknown sources.
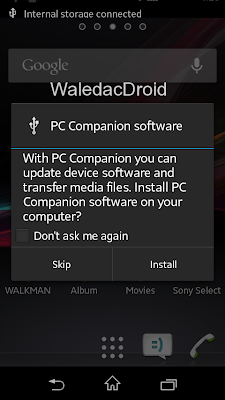
5. Connect USB Cable to phone , then connect it to your Computer. On your phone Skip the PC Companion Companion prompt (if it appears), see screenshot below.
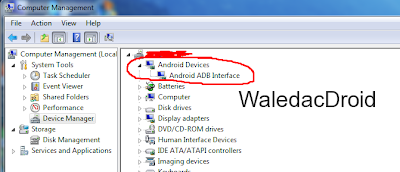
6. Right Click on My Computer > Manage , now goto Device Manager , and see if Android is listed like the below screenshot , to verify your device is properly connected. If yes move on to the next step.
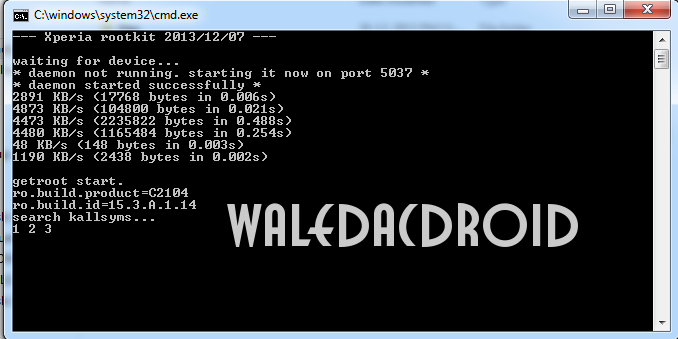
7. Now go to the Folder where you extracted the downloaded file from Step 2, and execute "install.bat" .
Note :- If your device is not properly connected or ADB drivers are not installed , you will be stuck on daemon started successfully .
.png)
8. The Rooting Process will start , wait for some time , your phone will automatically reboot, wait for some more time :P
9. When the Rooting Process is completed , the Screen will show --all finished--. Press Any Key to Continue.
THATS IT YOUR PHONE IS NOW ROOTED.
Note : This method works on both locked and unlocked bootloader devices!!!
If you have any problems feel free to comment :)
So here is the tutroial how to Root Xperia L running Jelly Bean 4.2.2 Build 15.3.A.1.14
To root 15.3.A.1.17 Click Here
Disclaimer : I am not responsible if you brick your phone or if u make any other damage to your phone
So Lets Start :
1. First make sure you are running Jelly Bean 4.2.2 Build 15.3.A.1.14. Go to Settings > About to verify this.
2. Download this File - Root Xperia L Tool and exctract it completely using WinRAR or WinZip.
3. Enable USB Debugging , Go to Settings > About phone and tap 7 times on Build number to enable Developer options, now Go to Settings > Developer options to enable Enable USB debugging mode.
4. Enable Unknown Sources. Go to Settings > Security and check Unknown sources.
5. Connect USB Cable to phone , then connect it to your Computer. On your phone Skip the PC Companion Companion prompt (if it appears), see screenshot below.
6. Right Click on My Computer > Manage , now goto Device Manager , and see if Android is listed like the below screenshot , to verify your device is properly connected. If yes move on to the next step.
7. Now go to the Folder where you extracted the downloaded file from Step 2, and execute "install.bat" .
Note :- If your device is not properly connected or ADB drivers are not installed , you will be stuck on daemon started successfully .
8. The Rooting Process will start , wait for some time , your phone will automatically reboot, wait for some more time :P
9. When the Rooting Process is completed , the Screen will show --all finished--. Press Any Key to Continue.
THATS IT YOUR PHONE IS NOW ROOTED.
Note : This method works on both locked and unlocked bootloader devices!!!
If you have any problems feel free to comment :)
Go to link download
Subscribe to:
Posts (Atom)