Showing posts with label or. Show all posts
Showing posts with label or. Show all posts
Saturday, December 24, 2016
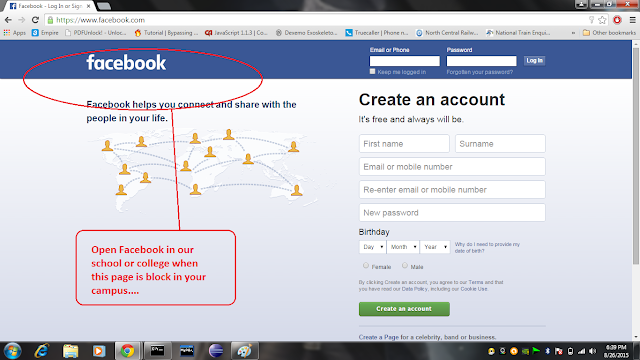
How to Open Block Facebook page or youtube in School or College Computer
How to Open Block Facebook page or youtube in School or College Computer
There are some Steps.......and using this Steps you will open any block website in Schools and Colleges.....
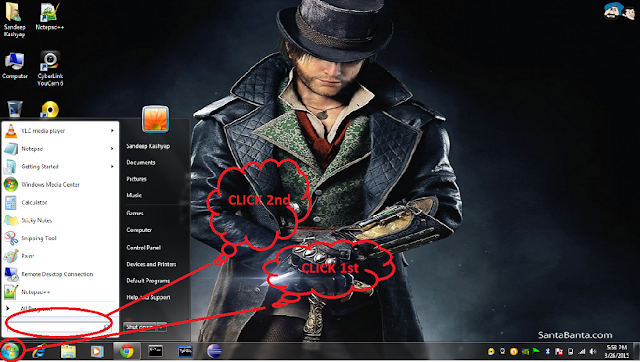
Step:1
Click Start(which is left bottom in Desktop Screen) see the given below image....
Step: 2
when you click start then then you click search Text_Field.. see above image ....
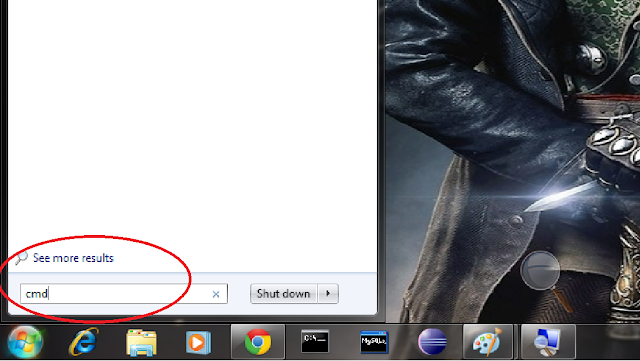
Now...in the Search box Type cmd and then press Enter button... as shown in given below image..
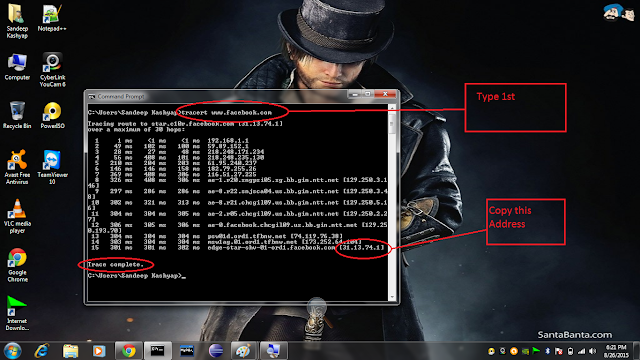
Step: 3
Now you seen a black screen window which is called (Command prompt)
........now type tracert www.facebook.com in Black Screen.... and then Press Enter Button.. see the image which is given below.
Step: 4
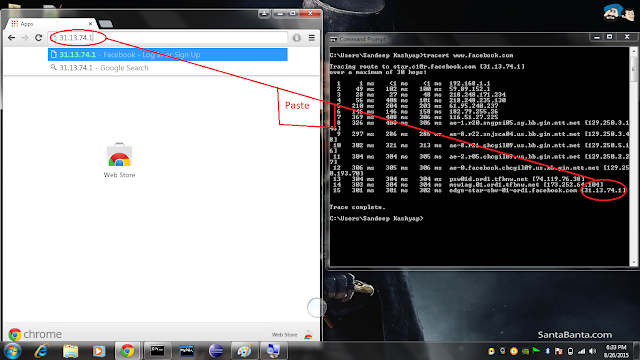
When Trace Complete then Copy the address and then Simply Paste this address in our Web Browser(Google chrome, FireFox,Internet Explorer.....etc) see given below image..
Now, press Enter button ......then You see Facebook page is open........see given below image ...yaa hoo....you got it....
.............................................................................................................................................................
what is hidden story of this block page?
Ans:- Mostly colleges or school will block this type of pages(and the secret - they will block only URL not at all).... and In this we study how to find Ip address of a particular Website( this process apply all the website not only the facebook)..because cant be block Ip.... I mean School or college Only block URL but we open website using Ip address.....
.................................................................................................................................................................
Go to link download
Wednesday, December 21, 2016
How to flash unbrick or upgrade MediaTek MTK devices with WiseLinkTool
How to flash unbrick or upgrade MediaTek MTK devices with WiseLinkTool
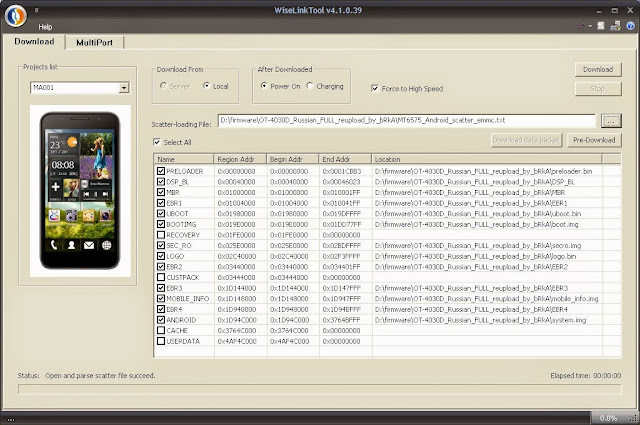
How to flash/unbrick or upgrade MediaTek (MTK) devices with WiseLinkTool
This is another tool which can be used in flashing our MediaTek MTK devices. It works basically like SP Flash Tool but can read scatter files which are either in .txt or .sca format.
Has multi port option which can flash many similar devices at same time.
OK now lets go to how to use WiseLinkTool
Download WiseLinkTool v4.1.0.39 or WiseLinkTool v4.6.4.44
Download and install MTK USB VCOM drivers from here
Extract, install and launch by opening WiseLinkTool.exe inside installation folder
Click on Open RegCode File Navigate and select ZZZZZZZZZZZZZZZZZZZZZZZZ.key from extract folder
Click OK
Now Click on the button with ... to load scatter file (Scatter files can either be in .txt or .sca format)
Navigate and select the scatter file of the device you want to flash/unbrick or upgrade.
Tick the required partition to flash (Tick all for complete flash or upgrade)
Click Download Button and connect phone to PC
When process is complete,the phone will reboot or start charging depending on the option selected After Downloaded Tab.
Note that first boot after flash
Congrats! you have successfully flashed your device
Common Errors after flashing a device
If you have null or invalid imei number after flash, restore with mtk engineering mode app, chamelephon, SN Write Tool or mtk droid tools
If device bootloops after flash process, do a factory reset from recovery.
If screen of device divides/displays funny colours when boot up, use another ROM or Firmware
Go to link download
Sunday, December 11, 2016
Change or Fix null invalid imei on mtk devices using Chamelephon
Change or Fix null invalid imei on mtk devices using Chamelephon
Change or Fix null/invalid imei on mtk devices using Chamelephon
If you have the null/invalid IMEI or you just want to change your IMEI to another one for some reason, this app is going to help you do just that in very easy steps.
 This app supports many new updated MediaTeK chips. Most Huawei devices are supported by this app whose IMEI were very hard to repair or change.
Note
Changing of imei is illegal in some countries
Do this at your own risk
Your phone must be rooted for this to work (root with iroot or kingroot)
This will not work on Samsung devices except for clones (copy)
If you are interested changing or repairing Samsung imei use octopus box
steps:
Download and install Chamelephon from playstore or diirect link here
Launch Chamelephon
Grant Super User access
Enter the new IMEI numbers you want to apply on your device
Tap Apply new IMEIs
Tap Change on the popup that appears
After that put your phone on flight mode
After about 10 seconds turn off the flight mode
Check your IMEI by dialing *#06#
Success..............
If you have the null/invalid IMEI or you just want to change your IMEI to another one for some reason, this app is going to help you do just that in very easy steps.
Note
Changing of imei is illegal in some countries
Do this at your own risk
Your phone must be rooted for this to work (root with iroot or kingroot)
This will not work on Samsung devices except for clones (copy)
If you are interested changing or repairing Samsung imei use octopus box
steps:
Download and install Chamelephon from playstore or diirect link here
Launch Chamelephon
Grant Super User access
Enter the new IMEI numbers you want to apply on your device
Tap Apply new IMEIs
Tap Change on the popup that appears
After that put your phone on flight mode
After about 10 seconds turn off the flight mode
Check your IMEI by dialing *#06#
Success..............
SCREEN SHOT BELOW

CLICK GENERATE


Go to link download
Tuesday, November 8, 2016
LG D335 Smart AVI Full Virus Apps Remove Or Delete 100 Done
LG D335 Smart AVI Full Virus Apps Remove Or Delete 100 Done
Operation : Check / Read Info [ v1.49 ]
1. Power Off Phone , Remove battery , Insert back
2. Insert USB cable. In some cases require hold BootKey
Wait for phone...
Phone found! [ 48 ]
Sync...
Inital Boot Ok!
BB_CPU_PID : 6582
BB_CPU_NME : [MediaTek] MT6582_S00
BB_CPU_EXT : 0xCA01 , 0x8A00 , 0x0000
Processing BROM stage
Settings for BROM configured!
SecCfgVal : 0x00000000
BromVer : 0x00FF
BLVersion : 0x0001
PreLoader : Active [ Boot with PL ]
BootLdrSS : NORMAL with SPRELOADER
Processing DA stage
DA Select done, will use SecMode DA
Sending and initialize DA ...
Running DA ver.4.2 on BBID : 0x87
NAND Flash : NOT INSTALLED
eMMC Flash : 1501005137585341420B1DD6FC0B42AB
Initialize Memory ...
DRAM already initialized by Preloader
DAgent sent , init HW now
eMMC FlashIC initialized
[eMMC] : FLASH_VEN : 0x15 , OEM : 0100
[eMMC] : FLASH_INF : [SAMSUNG] , BASX7
[eMMC] : FLASH_CID : 1501005137585341420B1DD6FC0B42AB
[eMMC] : FLASH_BRT : 0x00400000 , 0x00400000 , 0x00080000
[eMMC] : FLASH_LEN : 0x00000001D2000000
[eMMC] : FLASH_UCP : 7456 MiB [eMMC 8 GiB]
DEV RID : 0xF5C98DBA4A9752A62327F02A98FC561B
INT RAM : 0x00020000
EXT RAM : 0x40000000 [1 GiB]
BOOT TYPE : EMMC_FLASH_BOOT
SOC VERIFY : C1
Boot Ok!
[AP] : Initial info read Ok!
Brand : lge
ProdName : luv80ds_global_com
ProdModel : LG-D335
Device : luv80ds
AndroidVer: 4.4.2
MTKxCPU : MT6582
MTKxPRJ : ALPS.W10.24.p0
SECURITY :
BTMAC Addr : 000046658201
WiFi MAC : 000000000000
MODEM :
BaseBand : MT6582_S00_MOLY_WR8_W1338_MD_WG_TC01_SP_V11_P2_1_w g_n
Done!
Elapsed: 00:00:13
Reconnect Power/Cable!

Operation : Remove Viruses [SmartAV] [ v1.49 ]
SmartAV Conf : 100/80/2000
1. Power Off Phone , Remove battery , Insert back
2. Insert USB cable. In some cases require hold BootKey
Wait for phone...
Phone found! [ 48 ]
Sync...
Inital Boot Ok!
BB_CPU_PID : 6582
BB_CPU_NME : [MediaTek] MT6582_S00
BB_CPU_EXT : 0xCA01 , 0x8A00 , 0x0000
Processing BROM stage
Settings for BROM configured!
SecCfgVal : 0x00000000
BromVer : 0x00FF
BLVersion : 0x0001
PreLoader : Active [ Boot with PL ]
BootLdrSS : NORMAL with SPRELOADER
Processing DA stage
DA Select done, will use SecMode DA
Sending and initialize DA ...
Running DA ver.4.2 on BBID : 0x87
NAND Flash : NOT INSTALLED
eMMC Flash : 1501005137585341420B1DD6FC0B42AB
Initialize Memory ...
DRAM already initialized by Preloader
DAgent sent , init HW now
eMMC FlashIC initialized
[eMMC] : FLASH_VEN : 0x15 , OEM : 0100
[eMMC] : FLASH_INF : [SAMSUNG] , BASX7
[eMMC] : FLASH_CID : 1501005137585341420B1DD6FC0B42AB
[eMMC] : FLASH_BRT : 0x00400000 , 0x00400000 , 0x00080000
[eMMC] : FLASH_LEN : 0x00000001D2000000
[eMMC] : FLASH_UCP : 7456 MiB [eMMC 8 GiB]
DEV RID : 0xF5C98DBA4A9752A62327F02A98FC561B
INT RAM : 0x00020000
EXT RAM : 0x40000000 [1 GiB]
BOOT TYPE : EMMC_FLASH_BOOT
SOC VERIFY : C1
Boot Ok!
SmartAV Init Ok!
Scanning FileSystem now , please wait
Scan Done, infected files found : 29
Removing infected files and scripts ...
SmartAV Report : Removed 29 infected files!
Making additional operations ...
Special Op #1 : Clear Recovery Data Ok!
Special Op #3 : PostFix Ok!
Done!
Done!
Elapsed: 00:02:54
Reconnect Power/Cable!

1. Power Off Phone , Remove battery , Insert back
2. Insert USB cable. In some cases require hold BootKey
Wait for phone...
Phone found! [ 48 ]
Sync...
Inital Boot Ok!
BB_CPU_PID : 6582
BB_CPU_NME : [MediaTek] MT6582_S00
BB_CPU_EXT : 0xCA01 , 0x8A00 , 0x0000
Processing BROM stage
Settings for BROM configured!
SecCfgVal : 0x00000000
BromVer : 0x00FF
BLVersion : 0x0001
PreLoader : Active [ Boot with PL ]
BootLdrSS : NORMAL with SPRELOADER
Processing DA stage
DA Select done, will use SecMode DA
Sending and initialize DA ...
Running DA ver.4.2 on BBID : 0x87
NAND Flash : NOT INSTALLED
eMMC Flash : 1501005137585341420B1DD6FC0B42AB
Initialize Memory ...
DRAM already initialized by Preloader
DAgent sent , init HW now
eMMC FlashIC initialized
[eMMC] : FLASH_VEN : 0x15 , OEM : 0100
[eMMC] : FLASH_INF : [SAMSUNG] , BASX7
[eMMC] : FLASH_CID : 1501005137585341420B1DD6FC0B42AB
[eMMC] : FLASH_BRT : 0x00400000 , 0x00400000 , 0x00080000
[eMMC] : FLASH_LEN : 0x00000001D2000000
[eMMC] : FLASH_UCP : 7456 MiB [eMMC 8 GiB]
DEV RID : 0xF5C98DBA4A9752A62327F02A98FC561B
INT RAM : 0x00020000
EXT RAM : 0x40000000 [1 GiB]
BOOT TYPE : EMMC_FLASH_BOOT
SOC VERIFY : C1
Boot Ok!
[AP] : Initial info read Ok!
Brand : lge
ProdName : luv80ds_global_com
ProdModel : LG-D335
Device : luv80ds
AndroidVer: 4.4.2
MTKxCPU : MT6582
MTKxPRJ : ALPS.W10.24.p0
SECURITY :
BTMAC Addr : 000046658201
WiFi MAC : 000000000000
MODEM :
BaseBand : MT6582_S00_MOLY_WR8_W1338_MD_WG_TC01_SP_V11_P2_1_w g_n
Done!
Elapsed: 00:00:13
Reconnect Power/Cable!
Operation : Remove Viruses [SmartAV] [ v1.49 ]
SmartAV Conf : 100/80/2000
1. Power Off Phone , Remove battery , Insert back
2. Insert USB cable. In some cases require hold BootKey
Wait for phone...
Phone found! [ 48 ]
Sync...
Inital Boot Ok!
BB_CPU_PID : 6582
BB_CPU_NME : [MediaTek] MT6582_S00
BB_CPU_EXT : 0xCA01 , 0x8A00 , 0x0000
Processing BROM stage
Settings for BROM configured!
SecCfgVal : 0x00000000
BromVer : 0x00FF
BLVersion : 0x0001
PreLoader : Active [ Boot with PL ]
BootLdrSS : NORMAL with SPRELOADER
Processing DA stage
DA Select done, will use SecMode DA
Sending and initialize DA ...
Running DA ver.4.2 on BBID : 0x87
NAND Flash : NOT INSTALLED
eMMC Flash : 1501005137585341420B1DD6FC0B42AB
Initialize Memory ...
DRAM already initialized by Preloader
DAgent sent , init HW now
eMMC FlashIC initialized
[eMMC] : FLASH_VEN : 0x15 , OEM : 0100
[eMMC] : FLASH_INF : [SAMSUNG] , BASX7
[eMMC] : FLASH_CID : 1501005137585341420B1DD6FC0B42AB
[eMMC] : FLASH_BRT : 0x00400000 , 0x00400000 , 0x00080000
[eMMC] : FLASH_LEN : 0x00000001D2000000
[eMMC] : FLASH_UCP : 7456 MiB [eMMC 8 GiB]
DEV RID : 0xF5C98DBA4A9752A62327F02A98FC561B
INT RAM : 0x00020000
EXT RAM : 0x40000000 [1 GiB]
BOOT TYPE : EMMC_FLASH_BOOT
SOC VERIFY : C1
Boot Ok!
SmartAV Init Ok!
Scanning FileSystem now , please wait
Scan Done, infected files found : 29
Removing infected files and scripts ...
SmartAV Report : Removed 29 infected files!
Making additional operations ...
Special Op #1 : Clear Recovery Data Ok!
Special Op #3 : PostFix Ok!
Done!
Done!
Elapsed: 00:02:54
Reconnect Power/Cable!
Go to link download
Saturday, November 5, 2016
Unlocking bootloader for Lenovo S90 running Android KitKat or Android Lollipop ROW CN
Unlocking bootloader for Lenovo S90 running Android KitKat or Android Lollipop ROW CN
Unlocking bootloader for Lenovo S90 running Android KitKat or Android Lollipop (ROW/CN) - Unlocking bootloader is necessary step for modified Lenovo S90, some advantages unlocking bootloader is root can be install on your device, change official recovery with custom recovery in this case change to TWRP.
Rooting and change custom recovery also give some advantage too, from backing up system until installing custom ROM also. But the process to unlocking bootloader is not easy and sometime can make your device brick, so must be understand the risk before start following this guide.
The author assume that you already know the risk if the process is fail, and there is no warranty if the process is always success 100%.
Disclaimer :
This guide for educational purpose only, We not responsible if your device bricked after following this tutorial. (DWYOR)
")
Requirements :
- PC with windows 7 preferably 32 bit, windows 8 and windows 10 not suitable for the guide.
- A good shape USB cable
- We need to install all necessary driver and a flasher program, download below files and begin install it one by one
- Qualcomm_USB_Drivers_Windows ? there is no exe file so you must install it manual, if you dont know how to do it search at google.
- LenovoUsbDriver ? just extract and run it.
- QPST 2.7.422 ? flasher program need to install first before continued to the next step.
- Prepare device to ready for the next step.
- Turn on USB debugging, go to System Setting ? Developer Options ? give check on USB debbugging. If you missing Developer Options then go to System Setting ? About Phone ? tap 7x until 10x on Build Number
")
- Put the phone on diagnosis mode :
- Android KitKat 4.4.4 ? connect the phone to pc using USB cable then make dial *#*#8899#*#*, then just select OK
- Android Lollipop 5.0.2 ? turn off the phone, then turn it on again with hold Volume down + Power button until you can see service menu.
- Turn on USB debugging, go to System Setting ? Developer Options ? give check on USB debbugging. If you missing Developer Options then go to System Setting ? About Phone ? tap 7x until 10x on Build Number
- Look on the device manager on your pc, you should see something like on the picture
")
click on the image if you want see bigger picture
- S90-ROW_UnLock_BootLoader ? for international devices with Android KitKat firmware
- S90-CN_UnLock_BootLoader ? for china devices with Android KitKat firmware
- S90-ROW_UnLock_BootLoader_L ? for international devices with Android Lollipop firmware
- S90-CN_UnLock_BootLoader_L ? for china devices with Android Lollipop firmware
Unlocking bootloader for Lenovo S90 running Android KitKat or Android Lollipop (ROW/CN)
- Download the suitable files for your devices, and extract it contents on any drive. example C:S90-ROW_UnLock_BootLoader
- Run QFIL flasher program
- On the Programmer Path, select prog_emmc_firehose_8916.mbn from the extracted folder, it will automatically load Search Path
- Click on Load XML.... button and select rawprogram0.xml and patch0.xml also from extracted folder
")
- Click the Download button and wait the process until it finish, device will automatically reboot.
Done, now you have successful unlocking your Lenovo S90 Sisley, continued with rooting and install custom recovery for your Lenovo S90 Sisley. Leave comments if you found any problem or broken links regarding this guide.
Go to link download
Tuesday, October 25, 2016
How To Install TWRP CWM ClockWorkMod or Any Custom Recovery on Xiaomi Redmi 1s
How To Install TWRP CWM ClockWorkMod or Any Custom Recovery on Xiaomi Redmi 1s
How To Install TWRP/CWM (ClockWorkMod) or Any Custom Recovery on Xiaomi Redmi 1s

Xiaomi Redmi 1s is among the fastest selling smartphone in India. Popularity of Redmi 1s is likely due to the high specification/price ratio. Recalling specifications it is powered by a 1.6GHz Quad Core Qualcomm Snapdragon 400 processor which is overclocked to 1.6GHz from 1.2GHz. 1GB of RAM and 8GB of internal storage, which is expandable further up to 64GB via microSD card. It is bundled with a 4.7-inches HD capacitive touchscreen with decent viewing angles. The smartphone was less than half the price of Motorola Moto G (first gen.) as well as Moto G (Second Gen.) yet similar configuration, I would say better configuration than both the devices.
If you are a beginner to flashing custom ROMs and mods on your smartphone then the essential is to have a recovery, different than what manufacturer provide. There are key players in the market like CWM (ClockWorkMod), TWRP and Philz recovery. TWRP is my personal preference because its easy to use and supports almost all ROMs. CWM is also a great alternative, but some ROMs like LaceUp and RedmeXtreme were more comfortable with Philz and TWRP.
Please Note – Installing custom recovery void your smartphones warranty. Even for Xiaomi. Proceed with caution, you can’t blame me or AndroidCS afterwards.
Method One Using Mi Recovery
Difficulty – Very Easy
It is one of the simplest way to flash, files on Xiaomi smartphones. Using Mi Recovery to flash TWRP/CWM or any other custom recovery on Redmi 1s.
There are two procedures to install custom recoveries opt according to your preference.
- Download the recovery package *.zip file on your smartphone or computer then transfer it to the root directory of your smartphone.
- Now launch Updater application, then in settings of Updater select Install Update via Zip.
- After that browse *.zip you just transferred to the root directory.
- Hit Install update. It will extract and install, then a popup to reboot the device will display.
- Reboot device
Alternative
- Download the recovery package *.zip file on your smartphone or computer and transfer it to the root directory of your internal memory.
- Now rename the file as update.zip from whatever it was previously.
- Turn off the device.
- Now hold Volume Up and Power key simultaneously to boot in Mi Recovery.
- Select English as preferred language.
- Then Select Install.zip
- Reboot System
Method Two Using Fastboot
Difficulty – Moderate
- Install latest drivers for your Redmi 1s on your computer. You will require a Windows computer for this procedure.
- Now Download Custom Recovery for Redmi 1s, TWRP or CWM. Links mentioned below.
- Install ADB and Fast boot on your system. Click here to install ADB and Fast boot on your computer.
- Recheck latest drivers are installed.
- Now reboot your Redmi 1s in fast boot mode by pressing and holding Volume Down and Power Key simultaneously.
- Extract recovery zip file to obtain *.img file required to flash. Now paste this *.img file inside ADB and Fast boot folder.
- Connect your smartphone to your computer.
- Inside ADB + Fast boot + recovery *.img folder press Shift and then Right Click to get a dialog box having several options, select “Open command windows here.”
- Type the following command “adb devices” without quotes, hit enter.
- You will see, your device Id as a result, if nothing appears remove previously installed drivers for Redmi 1s and install the latest one and proceed further.
- To flash recovery type this command. “fastboot flash recovery (recovery name).img”, without quotes and hit enter.
- Flashing will commence and end soon.
- Then type “adb reboot recovery” without quotes, to enter into recovery and confirm recovery is successfully flashed on your smartphone.
Bonus Method
If your Redmi 1s is rooted then you can use TWRP’s application to install the custom recovery available on Google Play Store. Click here.
Download Links
Download recoveries from the links below
- TWRP *.img click here
- TWRP v2.8.4.0 .zip click here
- Philz Touch v6.5.5.0 .zip click here
- CWM Recovery .zip click here
Go to link download
Sunday, August 28, 2016
Lenovo S930 change or replace Modem Firmware for Better Signal
Lenovo S930 change or replace Modem Firmware for Better Signal
Lenovo S930 change or replace Modem Firmware for Better Signal - Todays guide is again about replacing or changing modem file on current running firmware for Lenovo S930, this guide is to solve the problem with signal reception on Lenovo S930.
This guide will modified Leovo S930 system files so it very recommend to do backup preparation before start to following this guide, with this i hope you can solve signal issued on your Lenovo S930 device.
Disclaimer :
This guide for educational purpose only, We not responsible if your device bricked after following this tutorial. Even this guide is already tested but it has possibility to brick your phone, (DWYOR)

Requirements :
- To be able modified system files Lenovo S930 must already ROOTED and using custom recovery, you can see at Rooting Lenovo S930 running International Firmware version
- Already have full backup current ROM and modem, once you replace modem file there is impossible to restore is back.
Downloads :
- Modem_S930_V17_ROW ? modem file from ROW S117, this can be flash using custom recovery can be use for international or china device
- Modem_S930_V18_ROW ? modem file from ROW S118, this can be flash using custom recovery can be use for international or china device
- Modem_S930_V11_CN ? modem file from china firmware, usually used by china devices and install using custom recovery.
- Modem_1wg_n ? this modem file taken from Vibe 1.5 china firmware, can only install using manual installation.
Lenovo S930 change or replace Modem Firmware for Better Signal
- Recovery Mode Installation
- This installation mode only can be do with custom recovery, no standard recovery can do this method.
- Turn off your device and boot to recovery mode, press and hold Power button + Volume Down + Volume Up button and release until you can see recovery main menu
- On the custom recovery main menu select Install zip from sd card ? Choose zip from sd card ? point it to downloaded modem file

- After installation finish back to custom recovery main menu, select Reboot System Now
- Boot normally and confirm with go to System Setting ? About Phone ? look on the Baseband Version make sure it same with the downloaded modem file.
- Manual Installation
- Install Root Explorer on your device, this program needed ROOT to be run
- Copy the downloaded file to your device, the name must be modem.img so just rename it
- Open Root Explorer and navigate to /etc/firmware
- Move modem.img from downloaded modem file to /etc/firmware then set permission to RW--R--R.

- Done, now reboot your phone.
Go to link download
Friday, August 19, 2016
Install Custom Recovery Cannibal Touch Recovery on Lenovo S939 Android 4 4 or 4 2
Install Custom Recovery Cannibal Touch Recovery on Lenovo S939 Android 4 4 or 4 2
Install Custom Recovery Cannibal Touch Recovery on Lenovo S939 Android 4.4 or 4.2 - Alternative custom recovery here is Cannibal Touch Recovery for Lenovo S939 running Android KitKat or Android JellyBean. Cannibal touch recovery also have same function like any other custom recovery such as backup, restore, installing custom ROM, wipe data and cache, etc.
Custom recovery is the second modification that must be done if you wanna optimize your Lenovo S939 with custom recovery installed you can root Lenovo S939 with easily and install custom ROM on your Lenovo S939, but every changes made also have possibility to brick your Lenovo S939 like installing custom recovery and rooting Lenovo S939 make your warranty void and make basic user can delete system file, so please very consider it before making any change to your Lenovo S939.
Disclaimer :
This guide for educational purpose only, We not responsible if your device bricked after following this tutorial. Changing or modified Android system file may result bricked device so please be careful (DWYOR).

Downloads :
- COT_S939_Recovery ? file custom recovery, this file can installed using mobileUncle or with flash tool
- SP FlashTool v5.1352 ? tool that use to install custom recovery to your device.
- USB VCOM driver ? driver that need to be installed so flash tool can recognize your device.
Install Custom Recovery Cannibal Touch Recovery on Lenovo S939 Android 4.4 or 4.2
- First thing to do is install USB Vcom driver on your computer, without this driver installed on your computer flash tool will not recognize your device and progress bar will stay at 0%, for installing USB Vcom driver please refer to this below :
- turn off your device and remove the battery, If you device using non removable make sure that your device is completely turn off wait like 20 seconds after power off the device
- open device manager on your computer
- connect your device using USB cable
- there will be MTK65xx Preloader Devices show on your device manager, PORT section for 5 second or less and then disappear
- disconnect and connect your device again, right click on MTK65xx Preloader Devices before it disappear, select Update Driver Software
- point it USB VCOM extracted folder, and install the driver from there.
- disconnect and connect your device again, there will be Mediatek PreLoader USB VCOM Port on your device manager PORT section.
- After successful install USB Vcom driver now we can start the step to update Lenovo S920, for step by step for update please refer to below :
- Extract ROM downloaded and the flash tool on then same folder, for easy organize it and flashing it. Go to flash tool extracted folder and run flash_tool.exe. If you are using windows 7 or later please run it using administrator privilege.
- On the flash tool, please go to Options ? Option ? Download please make sure DA DL All with Checksum already checked, click X (Close) to back to Flash Tool, this option is very important so please dont forget it.

- Once back to flash tool, now please click on the Scatter-Loading button and point it to ROM extracted folder and the select MT6592_Android_scatter.txt this will automatically loaded recovery image.
- Now you can press Download button or hit CTRL+D.

- Installation will start once you connect your device, and only take time 5-10 seconds to finish. You will see GREEN CIRCLE on the middle of flash tool once the installation finish and you can disconnect your device.
- Done, You have successful install Cannibal Touch Recovery on your Lenovo S939 please confirm it with boot to recovery mode, press and hold Power button + Volume Up + Volume Down button until you can see cannibal touch main menu.
That all, how simple to install custom recovery on Lenovo S939. Please leave any comments if you found any problems or broken links regarding this guide and Thank you for your visit.
Go to link download
Subscribe to:
Posts (Atom)