How to Backup NVRAM Image for Lenovo Devices - This guide i take from some russian forum, this guide will backup your NVRAM.img. For you who dont know what is NVRAM, NVRAM is some partition on the MTK devices that store all files about ability to communicate such as IMEI number, mac address, device settings, and etc. So once you lost your NVRAM block partition your devices will also lose it ability to communicate. So today i will show you a guide how to backup NVRAM partition, so you can save it on your computer and restore for later. Read careful and hope this guide can be useful for you.
Disclaimer : This guide for educational purpose only, We not responsible if your device bricked after following this tutorial (DWYOR)
Tools :
MtkDroidTool v2.5.3
Flash Tool v3.1238 *Flash tool version can be different for every devices
USB VCom driver ? this needed to be installed first, without this flash tool will not recognize your device and progress bar will remaining at 0%
How to Backup NVRAM Image for Lenovo Devices
Get the scatter file
First thing to do is we must get the scatter file of your device, scatter file is file that arrange a partition on your device.
MtkDroidTool will only work if you already install ADB driver, so please see Tutorial : Manual installing Android ADB USB Driver
Enable USB Debugging on your device also, System Setting ? Developer Options ? check USB Debugging option.
Open MtkDroidTool, connect your device to your computer, wait until it appear on MtkDroidTool then press "Block Map" button (1)
On the next window, click "Creating scatter file"button (2) and save it as MT6577_Android_scatter_emmc.txt *MT6577 is your processor model, so you can change it with your processor model
Done, above guide is how to obtain your device scatter file. Now continued to the next step.
Find the address and length of nvram
Now we should read the scatter file and find NVRAM block partition.
Open the scatter file with any text editor, it recommended to use Notepad++ because you can see the format and that make easy to find the block.
Find the __NODL_NVRAM
The string after __NODL_NVRAM maybe different each and another, on mine is 0xA08000
Now look at the next block __NODL_SECCFG and the string after it 0xF08000, *On other devices this maybe different, depending on which block is come out first
So now we already have 2 numbers, 0xA08000 and0xF08000. To find the NVRAM length use programmer calculator and calculate that 2 numbers : 0xF08000 - 0xA08000 = 0x500000
So on this step we got 0x500000
Merge the nvram.img
Create folder named target_binand put the scatter file on the step 1 inside it along with flash tool folder.
Open flash tool folder and run flash_tool.exe
On flash tool, click "Scatter Loading" button (3), browse to target_bin and select the scatter file MT6577_Android_scatter_emmc.txt
Then click "Read Back" tab (4)
On read back window, click "Add" button (5), the table will show N/A row, double click on the line (6) and name the file. ie ROM_NVRAM and the click "Save" button (7)
On the "Read block start address" window, insert address and length that we have received before on the previous step (8).
Start Address: 0xA08000
Length : 0x500000
now you can click "OK" button (9)
Click "Read Back" button (10) , now turn off your device and remove the battery but if your device use non removable battery then you must make sure device is already completely turn off, connect your device. Flash tool will immediate starting the process to read your NVRAM block and save to computer. It will show GREEN CIRCLE on the middle of flash tool once it finish
Done
That it, How to Backup NVRAM Image for Lenovo Devices. I hope this guide can be useful for you and can help you solve your problems regarding IMEI and signal, please leave comments if you found any problem or broken links regarding this guide.
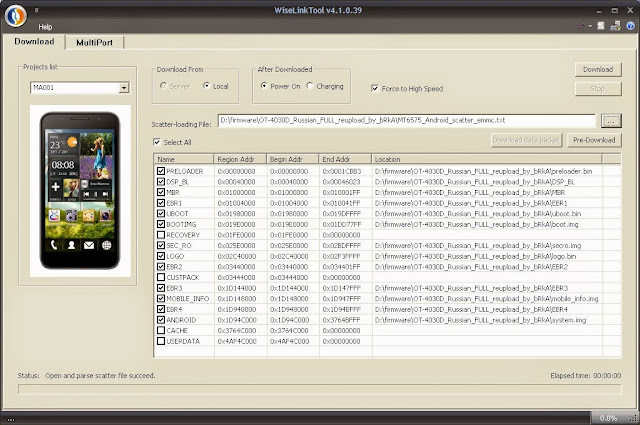
How to flash unbrick or upgrade MediaTek MTK devices with WiseLinkTool
How to flash/unbrick or upgrade MediaTek (MTK) devices with WiseLinkTool
This is another tool which can be used in flashing our MediaTek MTK devices. It works basically like SP Flash Tool but can read scatter files which are either in .txt or .sca format.
Has multi port option which can flash many similar devices at same time.
OK now lets go to how to use WiseLinkTool
Download WiseLinkTool v4.1.0.39 or WiseLinkTool v4.6.4.44
Download and install MTK USB VCOM drivers from here
Extract, install and launch by opening WiseLinkTool.exe inside installation folder
Click on Open RegCode File Navigate and select ZZZZZZZZZZZZZZZZZZZZZZZZ.key from extract folder
Click OK
Now Click on the button with ... to load scatter file (Scatter files can either be in .txt or .sca format)
Navigate and select the scatter file of the device you want to flash/unbrick or upgrade.
Tick the required partition to flash (Tick all for complete flash or upgrade)
Click Download Button and connect phone to PC
When process is complete,the phone will reboot or start charging depending on the option selected After Downloaded Tab.
Note that first boot after flash
Congrats! you have successfully flashed your device
Common Errors after flashing a device
If you have null or invalid imei number after flash, restore with mtk engineering mode app, chamelephon, SN Write Tool or mtk droid tools
If device bootloops after flash process, do a factory reset from recovery.
If screen of device divides/displays funny colours when boot up, use another ROM or Firmware
Stock firmwares for LG devices come in KDZ (and sometimes TOT)format. You can flash these firmwares using the LG Flashtool on a Windows PC to either restore a device stock firmware or downgrade from an updated release.
Below is a guide on how to flash KDZ firmwares on LG devices, follow the instructions carefully
Extract/Unzip the LG Flash Tool 2014 .zip file on your PC. You’ll get a bunch of files required to run the program.
Double-click/Run LGFlashTool2014.exe file to Open LG Flash Tool. ? If it doesn’t open, install Visual C++ Runtime Library from here and then try again.
Boot your LG device into Download Mode:
Power off your LG device.
Press and hold Volume Up button.
Connect your device to PC with a USB cable while holding the Volume Up button.
You’ll boot into download mode with “Firmware Update” written on top of the screen.
Now load the .kdz firmware file into LG Flash Tool window on your PC. Click the browse button at the end of the “Select KDZ file”line. Leave every other option as is on the LG Flash Tool window.
Once you’ve selected .kdz firmware file, click “CSE Flash” button to proceed on flashing the .KDZ firmware to your LG device. ? FYI, the “Normal Flash” button doesn’t wipe data and the “CSE Flash” button wipes data. If you’re upgrading from a stock firmware, then “Normal Flash” might do.
You’ll get a “Read Phone Information” window, it will be blank for the most part. Just hit the START button and proceed.
You’ll be asked for administrator permissions for some LG program on your PC, accept it.
Now you’ll see “Select Country & Language” window. Select“Different” from the country list and then “English” from the language list. And remember to NOT tick the Smartphone upgrade checkbox, it’s for Windows Mobile phones not your LG device running on Android.
To finally begin firmware flashing process, hit the “OK” button.
You’ll see a progress bar now. Just wait until it’s 100%, after which you might get an error “Connection to server failed”. This is okay. DON’T disconnect your phone at this point.
Watch your phone closely, you’ll see some activity going on the screen with “COM” written in green text. Once that happens click OK to the “Connection to server failed” error.
Now watch the firmware update progress bar on your phone. Once it’s complete, your phone will automatically reboot. And then you can disconnect your phone from PC and close the LG Flash Tool utility as well.
Change or Fix null invalid imei on mtk devices using Chamelephon
Change or Fix null/invalid imei on mtk devices using Chamelephon
If you have the null/invalid IMEI or you just want to change your IMEI to another one for some reason, this app is going to help you do just that in very easy steps.
This app supports many new updated MediaTeK chips. Most Huawei devices are supported by this app whose IMEI were very hard to repair or change.
Note
Changing of imei is illegal in some countries
Do this at your own risk
Your phone must be rooted for this to work (root with iroot or kingroot)
This will not work on Samsung devices except for clones (copy)
If you are interested changing or repairing Samsung imei use octopus box
steps: Download and install Chamelephon from playstore or diirect link here
Launch Chamelephon
Grant Super User access
Enter the new IMEI numbers you want to apply on your device
Improving GPS on MTK devices, Especially on Lenovo - I got this article on the russian Lenovo forum, maybe you interesting and wanna fix GPS on your device, so read and understand it.
What is "Chinese" GPS and how to fight it ... or why not working GPS on CN (and not only) devicesThe bulk of the owners of mobile devices brought from the capital city of China and not only faced with the problem of "not working» GPS. Why in quotes? Because it actually works, the problem is not on the device (or GPS-receiver), and in running with the device almanac of GPS satellites. In this topic I will try to briefly reveal a theory of GPS-positioning and explain how without deleting and editing any system files, including gps.conf, calibrate and customize your device to work correctly with GPS.
* A small digression for amateurs and professionals straightening and replacement gps.conf - this file in OS Android 4.4X (aka KitKat) is absent.
First, a little theory
- GPS ( Global Positioning System ), in a literal translation - Global Positioning System. The GPS system operates on the basis of orbiting satellites that are in six orbits, whose height is about 20,000 kilometers, and the velocity is 3000 m / sec (i.e., daily for each satellite completes two "spiral" around the Earth). Data from satellites are transmitted on two frequencies - both civilian and military. We omit the military, our device is not available, but a civil (1575.42 MHz) allows for error less than 3 meters ( declared by the error of 10 meters smartphones or GPS navigators caused international or other laws on the use of GPS for civilian purposes ) GPS satellites transmit two types of data - the almanac and ephemeris .
- Almanac - contains the parameters of the orbits of all the satellites. Each satellite transmits almanac for all satellites. Almanac data are not very accurate and are valid for several months.
- Ephemeris - the exact coordinates of each satellite, adjusting the parameters of its orbit and clock (these data are not collected in one day, based on the tracking of its orbit and position in the sky, not only on Earth, but also of other celestial bodies). Taken separately GPS satellite transmits data only own ephemeris. Retransmission of satellite ephemeris occurs every 30 seconds. These data are not valid for more than 30 minutes. If the GPS-receiver was switched off for more than 30 minutes, and then re-enabled, it starts looking for satellites, based on his famous anthology. According to the data recorded in the almanac, GPS satellites to select and initiate the search. Now imagine - not only that our GPS smartphone / tablet does not work more than a few months, so it has taken a couple of hundred thousand kilometers from the last-place calibration. From here and "grow legs" in "does not work" GPS.
To our built-in GPS device wound up he needs Almanac of the satellites in the area and their ephemeris.
Creating almanac and ephemeris receipt
* To create an almanac and ephemeris receiving satellites requires ROOT access * All the procedures recommended in the open, or at least on the street
Turn on GPS (this requires lower "blind" and click the icon GPS )
With the help of the engineering code or MobileUncleTools log in Engineering ( MTK ) mode device ( EngineerMode ? MTK )
Once in the engineering menu phone to navigate to the tab Location and go in YGPS
On the tab "Satellites" should be red dots (that satellites), and below them (bottom) signal scales. If the signal scales absent, and satellites (red dots) is, it is said that the satellite phone sees, but can not connect to it because of incorrectly recorded anthology.
For proper operation of the GPS to create a new almanac, in line with our current location : In paragraph YGPS go to the tab "Information", and then, with an interval of 5-10 seconds, alternately press the button "full","Warm","hot","Cold"(thus causing a complete reset of the old almanac).
Warm, Hot and Cold - there are three modes of starting the GPS receiver :
hot - time, position, almanac and ephemeris are known, takes a few seconds
Warm - time position with some restrictions and almanac known. Ephemeris from at least 3 satellites, known since the last shutdown.
Cold - time coordinates are known with some restrictions. Almanac and ephemeris are unknown.
Full, most likely it through all three modes to search for satellites
After that, go to the tab NMEA Log and click on the start - will burn and create new Almanac
After you run the NMEA Log turn on the tailgate "Satellites"and wait for 5-10 minutes until the phone itself does not find all the satellites and connect to them ( * not necessarily all ). Indication of the connection are "greenish" point satellites (remember before that they were red) and "suddenly" earned scale satellites (will bottom) We are waiting until the scale also changed its red color to green.
When the GPS receiver records the satellite, then it shows "empty" bar signal strength. At this point, yet there is a process of data collection ephemeris. When ephemeris of each satellite is adopted, the corresponding signal strength bar turns green, and the data received from the satellite are suitable for navigation.
After connecting to the maximum number of satellites back to the tab Nmea Log and click "stop". Exit the engineer mode, launches Navitel (Yandeks.Navigator, MapFactor: GPS Navigation, Igo Primo or others. To taste) as well as the status of GPS, Google Maps, GPS and other GPS Test app and enjoy life.
And finally, a few words about 2D Fix and 3D Fix 2D Fix and 3D Fix it two modes of error correction using GPS
DOP - indicator of the quality of GPS reception
GPS has its own system of quality criteria for receiving a signal - DOP (Position Dilution of Precision, deterioration of positioning accuracy). DOP quality depends on the ability of GPS [receiver] corrected signals from satellites. Availability 3D fix is ??not a sufficient criterion of quality. If more than 6 DOP indicates poor signal quality. Less than 4 - enough to record tracks OSM (openstreetmap - street map). Less than 2 - very good quality.
When 2D Fix correction occurs based on latitude and longitude
When 3D Fix correction occurs based on latitude, longitude and altitude
Therefore, a good DOPa can achieve even with 2D fix Finally fly in the ointment from Navitel: I do not know 9 (current) version of the program (maybe fixed a), but in the 3 and 5 versions so accurately, DOP is missing. No, of course it is (without it would not work), but only corrects the error in the horizontal (HDOP) and vertical (VDOP) planes
PS In order to calculate the exact coordinates with GPS navigation enough to connect to only three satellites. Video Guide : Original source : http://lenovo-forums.ru/topic/8945-lenovo-s660-?????????-??????-gps-gps-?-???-?-???-????????/
Best Cheapest Data Plan For Ordinary And Heavy User
These plans are not cheat or tweak and it will work on all devices including Nokia touch-light that is gprs enabled.
Ordinary User Data Plan: This one is for those who don’t consume much on their devices, they merely download, just to surf the net, read news and socialize and turn off their data.
We have a plan that equally suits you.
Glo N1,000 ~ 1.5GB: *777# and follow the prompt. No strange settings required.
Etisalat N1,000 for 1GB: *229*2*7#. No strange settings required.
MTN 1.3GB for N1,000. Send 106 to 131
MTN 3.75GB for N2,000 Send 110 to 131 and it will be activated
Airtel 1GB for N1,000: *496# it will last you for 30 days.
Heavy User Data Plans: This plan works best for those that love to download all the time.. NB: This data plan works on all devices, be it Java phones, Symbian, Android, iPad, iPad, PC.
The Airtel Night Plan: Airtel Unlimited Night Plan: Airtel network is strong in most locations and strongest during the night hour. This plan is unlimited at night; no speed throttling, and it is download as you want.
For 1hour plan, dial *481*1# and it cost N100 ~ unlimited For 3hours plan, dial *481*2# and it cost N300 ~ unlimited For 6hour plan, dial *481*3# and it cost N500. ~ unlimited
Night Plans: Glo 1GB for N200 (12am – 5am) Glo 3GB for N500 for Sat and Sun + 7 Nights
MTN daily unlimited Plan: Unfortunately, not all of you are eligible for this plan.
To get this plan, load your MTN line with N150 and dial *567*59#. It works on all smartphones, PC and iOS.
MTN BBLITED: For now MTN BIS is not working on Android, hopefully before the month run out, a better way to fix it will be unveiled.
Glo Blackberry Plan: Glo Blackberry plan has been reduced to 3GB For N1,400 and N1,500 respectively. I tried the N1,400 and it zaps data a lot while the N1,500 plan doesn’t zap at all.
To Subscribe Dial *777*21# ~ 3GB For N1,400 Dial *777*23# ~ N1,500 or dial *777# and follow the prompt respectively. It works on BB10 and Android who’s IMEI has been tweaked to .
How to use MAUI META 3G v6 to Restore IMEI for MTK Devices
How to use MAUI META 3G v6 to Restore IMEI for MTK Devices - Since i started this blog and begin to starting guiding people to update there Android Devices especially MTK devices i got a lot complain about missing IMEI, losing signal network and how to fix it. Actually i am already has one guide on how to do it Several Method to Change IMEI for MTK Devices but seem this guide not 100% percent work, Because of this problem now i am trying to posting another way how to restore IMEI using MAUI META 3G v6 and i hope this guide will solve IMEI problem.
Disclaimer : This guide for educational purpose only, We not responsible if your device bricked after following this tutorial. (DWYOR)
Downloads :
MAUI META 3G v6 ? 26.7 Mb, tool to use to for changing IMEI for MTK devices.
Android_Gadget_CDC ? driver that need to be installed first before changing IMEI, but if you ever use MTK Droid Tool and successful to connect then no need to install it, and make sure it installed correctly if not tool will not recognize your devices
How to use MAUI META 3G v6 to Restore IMEI for MTK Devices
Download all required tool and place on one folder for easy organized it, Android_Gadget_CDC must completely installed before continued to the next step so please make sure it there is no question mark sign on computer device manager when you connect your device.
Connect your device on your computer and copy BPLGUInfoCustomAppSrcP_MT6589_*** from /system/etc/mddb/ on your device to your computer, this is a modemdb needed when change IMEI. I am use Root Explorer as my Android windows explorer because it can navigate to /system without root access.
Disconnect your device and turn off, now install MAUI META 3G v6 and run it. On MAUI META 3G v6 select Options ? Connect Smart phone into META mode make sure you check it, then click on Reconnect button. Signal light will be blinking red and green, and it will turn yellow when you successful connect your device
Now connect your device (turn off condition), wait until charger battery disappear then press Power button and hold for 2 seconds then release it and your devices will on META mode and MAUI META 3G v6 will recognize your device, If device turn lit then turn off your device and try again. (i need more then one to get this connected)
After successfully connect your devices, now select IMEI Download (2), it will open IMEI download windows where you can edit your IMEI here
On IMEI download windows, click on Change NVRAM Database File? and point it to BPLGUInfoCustomAppSrcP_MT6589_*** that already you copy to your computer on the step 2.
Then insert your IMEI on the IMEI text box for SIM 1 or SIM 2, must be valid 14 digit IMEI number. Then just click Download To Flash button, success message can be see on the bottom of MAUI META 3G v6
Done, now just press Disconnect button, and boot your device to home screen. Open dialer and try dial *#06# it will show your IMEI confirm it already change
That all, So easy i hope this guide can help you solve IMEI problems. But it a great idea if you make backup NVRAM before modified your device, Please leave any comments when you found something problem regarding this guide.
Smart Clip2 Software v1 17 01 More Moto devices and more fw versions supported
Smart-Clip2 Software v1.17.01 is out!
1. The solution for the most recent firmware versions of Moto If Smart-Clip2 Software reports the following message: "This baseband version is not supported. Try downgrading it." while youre working with new Moto devices, please do so by following the steps listed in this manual. This is a quick and simple procedure that doesn’t require root and bootloader unlock.
2. New Moto models have been tested and added to the list of supported devices: ? XT1524 ? XT1540 ? XT1542 ? XT1562 ? XT1563 ? MOTO G3 ? Moto X Play ? Moto X+1 Follow this manual to perform unlock or repair procedure.
If you have one of the listed above phone models, please start unlock/repair operation and post your logs in the corresponding thread of the official forum
Activate Pack 4 to perform service procedures for more than 200 of new Qualcomm based devices, including Sony, Motorola, ZTE and others.
ClockWorkMod Recovery 5.5.0.4 Easy installation for Pre-Requists: - Rooted Device - Locked / Unlocked Bootloader - Phone Should be ON
1.Enable USB Debugging on device 2.Enable Unknown Sources 3.Enable Mass Storage(MSC) in USB Connectivity 4.Download Zip (4Shared) and extract It 5.Connect your device using usb data cable 6.Run install-cwm?.cmd install-cwm1.cmd for Xperia Arc / Neo install-cwm2.cmd for Xperia Mini / MiniPro / Active / Live With Walkman 7.Follow on screen instruction
After Installation 1. Disconnect from PC 2. Restart the Phone 3. Press Volumn Down Key Repeatedly when Sony Logo appears. 4. There will be the CWM menu.
Enjoy.............
For any queries, Please leave comments bellow. HELP MAKES ALL HAPPY
How to remove Factory Reset Protection on Samsung devices Using Miracle box
How to remove Factory Reset Protection on Samsung devices Miracle box
Samsung included the factory reset protection on most of their new devices. So after using factory reset from recovery menu, setting up the phone requires you to enter the Google account used previously on the phone which can be annoying especially if you bought the phone from someone and just need to set it up as a new device.
This tutorial will show you how to remove this FRP lock on Samsung devices miracle box
First of all you will need to Download and install Samsung USB drivers from here
Download miracle box crack here Open miracle box crack loader click on samsung tab
Boot device into download mode by Holding Volume Down + Home + Power button
Connect device to PC using USB scan the port
Miracle box will detect device and display its on COM PORT click on reset frp a n cllick start rebootin das all see picture guide below