Showing posts with label touch. Show all posts
Showing posts with label touch. Show all posts
Friday, November 11, 2016
Alternative Custom Recovery for Lenovo S920 Carliv Touch 2 4
Alternative Custom Recovery for Lenovo S920 Carliv Touch 2 4
Alternative Custom Recovery for Lenovo S920 Carliv Touch 2.4 - Carliv touch recovery is an alternate custom recovery that can be use to modified or maintenance your device. This custom recovery also have function like any other custom recovery like CWM or TWRP. Carliv touch recovery work with Android Jelly Bean or with Android KitKat, so now you can install root on your Android KitKat through carliv touch recovery.
Even this guide already confirm to work with Android KitKat but there is still possibility that this guide can brick your device and make you lose your data. So please make your own personal preparation before following this guide, backup your current recovery and etc.
Disclaimer :
This guide for educational purpose only, We not responsible if your device bricked after following this tutorial. Even this guide is already tested but it has possibility to brick your phone, (DWYOR)

Downloads :
- CTRv2.4_S920_CN_recovery ? 5.6 Mb, contains recovery.img for CN version firmware and scatter file for MT6589
- CTRv2.4_S920_ROW_recovery ? 5.8 Mb, contains recovery.img for ROW version firmware and scatter file for MT6589
- USB VCOM Driver ? Install this driver first on your computer, Turn off your device and remove the battery, using USB cable connect your device while look at My Computer ? Manage ? Device Manager there will be MTK65xx Preloader Devices show up for 5 second than disappeared, before disappeared right click on it and select Update Driver Software point it to USB VCOM Driver extracted folder. When it finish disconnect and connect again there will be Mediatek PreLoader USB VCOM Port on your device manager.

- SP Flash Tool v5.1352 ? Tool for flash recovery.img to device, newest version.
Alternative Custom Recovery for Lenovo S920 Carliv Touch 2.4
- Download all required files and place it on one folder, make sure you downloaded the right version depend on your firmware. Make sure USB VCOM driver installed completely before continued to next step.
- Extract SP Flash Tool v5.1352 and CTRv2.4_S920_ROW_recovery (i am assuming you use ROW version firmware), on the same folder. Go to Flash Tool extracted folder and run Flash_Tool.exe, if you are running windows 7 please run it using administrator privilege. Confirm OK if you ask about the scatter does not exist on the first run.
- On the Flash_Tool click on Options ? Option ? Download ? make sure DA DL ALL with Checksum already checked, close the Option dialog to back to Flash Tool.

- Back to Flash_Tool again click Scatter-Loading button point it to CTRv2.4_S920_ROW_recovery extracted folder and select MT6589_Android_scatter_emmc.txt, this action will make recovery.img automatically loaded on the Flash Tool.

- Leave Download Only option and then click Download button or hit CTRL+D, wait for 2-3 seconds then turn off your device and remove the battery. Connect your device to computer using USB cable.
- If USB VCOM driver installed completely Flash Tool will immediately start the flashing process, this process will only take 10-15 seconds and will be end with GREEN Circle in the middle of Flash Tool.

- Done, now you can disconnect your device and try to turn on. If you wanna go to Recovery Mode press and hold Power Button + Volume Up + Volume Down until you can see Carliv Touch Recovery main menu.
Congratulations, You already successful install custom recovery to your Lenovo S920, this will replace Lenovo Standard Recovery, Please leave any comments if you got problems regarding this guide.
Go to link download
Sunday, October 30, 2016
How to Install Custom Recovery on Lenovo A319 Carlive Touch v3 0
How to Install Custom Recovery on Lenovo A319 Carlive Touch v3 0
How to Install Custom Recovery on Lenovo A319 Carliv Touch v3.0 - If you want to root your device, especially on Lenovo devices. First you must change your current recovery files with custom recovery and install root application from recovery mode. Today i will show you how to install custom recovery for Lenovo A319, this guide will replace your current stock recovery with custom recovery so please consider to backup current recovery, once it replace there is no way to restore it without the backup.
In this guide we will use flash tool to install custom recovery, and contains 2 type on custom recovery so you can choose what you like to install.
Please read the requirements first before starting to install, this will need a computer and you will need to install some driver.
Disclaimer :
This guide for educational purpose only, We not responsible if your device bricked after following this tutorial. (DWYOR)

Downloads :
- SP Flash Tool v3.1344 ? flash tool for installing custom recovery to your device, very recommended that you use this version only.
- CTRv27 ? custom recovery Carliv Touch, this version already enable to read external sd card and can use touch screen to operate it
- CWM v5.5.0.4 ? custom recovery cyanogenMod, use volume up and volume down for navigation, this is old fashion custom recovery.
- USB VCOM ? driver that need to install so flash too will recognize your device
Requirement :
- Download and installing USB VCOM driver, follow below step :
- turn off your device and remove the battery, If you device using non removable make sure that your device is completely turn off wait like 20 seconds after power off the device
- open device manager on your computer
- connect your device using USB cable
- there will be MTK65xx Preloader Devices show on your device manager, PORT section for 5 second or less and then disappear
- disconnect and connect your device again, right click on MTK65xx Preloader Devices before it disappear, select Update Driver Software
- point it USB VCOM extracted folder, and install the driver from there.
- disconnect and connect your device again, there will be Mediatek PreLoader USB VCOM Port on your device manager PORT section.
- Above requirement must be completely installed, without it flash tool will not recognize your device and the progress will stay at 0%. Download flash tool and custom recovery file, extract it and place it on one folder.
- Run flash_tool.exe, if you are using windows 7 or later than please run it using administrator privileges to avoid any permission error.
- On the flash tool, make sure you check DA DL All with Checksum option, then click on Scatter-Loading button browse it to extracted custom recovery folder and then select MT6572_Android_scatter.txt this will automatically load recovery.img to flash tool

- When everything is set up just press Download button or short cut F9, this will trigger warning that say not all images loaded completely just confirm and press Yes button.
- Now turn off your device, remove the battery. If you device using non-removable battery just make sure that device is completely turn off.
- Connect your device, if USB VCOM driver is completely installed flash tool will recognize your device and start installation process, the process will take 10-15 seconds and will be mark with GREEN CIRCLE in the middle of flash tool.

- Done, now you can disconnect your device. To enter to recovery mode on Lenovo A319 you need press and hold Volume Up + Power Buton while your device is off.
Congratulations, now you already successful install custom recovery to your Lenovo A319, now you can root your device easily using custom recovery. Please leave comments if you found any broken link or problem regarding this guide. Thank You
Go to link download
Monday, October 10, 2016
Fitur baru MIUI Touch Assistant sudah dapat di nikmati
Fitur baru MIUI Touch Assistant sudah dapat di nikmati
Umumnya hal ini bukan lah hal baru yang ada pada OS Android, telah banyak rilis fitur semacam ini dari aplikasi pihak ketiga yang banyak tersedia di Playstore, tetapi yang menariknya disini adalah bahwa fitur ini secara default akan hadir dalam versi MIUI yang beberapa waktu lalu secara bersamaan di perkenalkan sebagai salah satu fitur baru yang ada pada MIUI V8, tetapi entah atas dasar pertimbangan apa, fitur ini hadir pada rom MIUI V7.2 terbaru yang di baru dirilis oleh pihak developers dan kabarnya fitur ini hanya tersedia pada rom MIUI versi china.

Jika bertanya kelebihannya apa dari aplikasi pihak ketiga, jelas sudah terlihat ini adalah fitur bawaan asli dari MIUI buka aplikasi pre-installed dan keuntungannya adalah fitur ini langsung di tangani oleh framework, jadi dengan kesimpulan kinerja fitur ini lebih baik dari aplikasi pihak ketiga dan juga lebih hemat RAM, karena di jalankan secara default oleh system.


Tampilan fitur ini hampir sama saja dengan fitur tombol virtual touch assistant lainnya, hanya saja seperti keuntungan lebih yang telah di jelaskan di atas, juga fitur ini dapat menangani semua fungsi quick setting yang ada pada rom MIUI, kalian dapat melakukan customize sesuka hati kalian untuk menambahkan fungsi yang paling terpakai menurut kalian, dan cara settingnya pun cukup mudah dan gampang di pahami kalian hanya perlu masuk ke menu setting > additonal settings > touch assistant, pada menu tersebut kalian dapat melakukan pengaturan yang menurut kalian paling terbaik bagi kalian.

Untuk jenis rom MIUI V7.2 mana saja yang sudah dapat menggunakan fitur ini belum di ketahui, dan ada kemungkinan semua update terbaru rom MIUI versi 7.2 setelah acara perkenalan MIUI V8 lalu, mungkin sudah mendapatkan fitur ini, jadi untuk sekarang silahkan kalian update versi ROM MIUI kalian agar dapat menggunakan fitur keren ini.
sumber en.miui
Go to link download
Wednesday, September 21, 2016
RECOVERY PhilZ Touch 6 59 0 GT S7270
RECOVERY PhilZ Touch 6 59 0 GT S7270
[RECOVERY] PhilZ Touch 6.59.0 GT-S7270 - Very good followers! Today our developer "andii_nr" brings a new Custom Recovery for the S7270 model and its variants region. It is nothing less than philz Touch Recovery, also known as Advanced CWM Recovery.
As the name suggests, this recovery is a version of CWM that brings all functions to be sorely lacking and that is fine. Furthermore, it is touch with customizable interface. So, as a definition for that we understand, philz Touch is the middle step between CWM and TWRP; so it is very useful for average users.
![[RECOVERY] PhilZ Touch 6.59.0 GT-S7270](https://blogger.googleusercontent.com/img/b/R29vZ2xl/AVvXsEhBUi4lGqQm19i3ASduB4s7v2aSD-3QyCgyR0DPYZTQjbbXloCF4U_Id-ev7CpBzW8xl00pF20bvx9XDKifluoHzgAAZjXOYm7RMy5EgxYTWZpSEXOvll-sElY2conTwgclzIdkxHDKTvtP/s320/cwm_screen009.png "[RECOVERY] PhilZ Touch 6.59.0 GT-S7270")
Facility (CWM):
1. Download Zip
2. Turn on the phone in Recovery mode (a previous version of CWM required)
3. Install zip
4. OK flashing
5. Go to advanced options, restart recovery
6. Ready
Installation (For Odin):
1. Download file ".tar.md5"
2. Place the PDA (AP) Odin box
3. Connect the phone in Download mode
4. Install with the options provided phisticated (Reset time, auto reboot)
5. Ready!
Download:
CWM version: CLICK HERE
Odin version: CLICK HERE
AROMA File Manager: CLICK HERE
* The file browser flashes once you have installed the recovery *
Go to link download
Saturday, August 27, 2016
Cara Instal CWM Recovery TWRP dan Philz Touch Untuk Sony Xperia SP
Cara Instal CWM Recovery TWRP dan Philz Touch Untuk Sony Xperia SP
Buat kalian yg mau backup ROM nya untuk jaga-jaga atau udah bosan dengan stock ROM bawaan pabrik dan ingin ganti menggunakan Custom ROM yg biasanya memang "lebih menarik" daripada stock ROM di XSP nya, kalian wajib install recovery ini dulu :D . Cara kali ini ane share dari thread seseorang yg ane baca di XDA yg membuat 3 recovery sekaligus !!! Untuk tipe Xperia SP sendiri, ane lebih recommend gunain CWM, karena kayaknya paling reliable dan jarang gagal dalam install ROM / flashing.
Bahan yg perlu disiapin:
Baca juga:
Cara melegakan RAM di Android
Cara root semua jenis Android
Cara deodex ROM Xperia SP
Tanpa basa basi lagi, langsung aja ane kasi tutorialnya:


Tested On Windows XP & Windows 8.1 64 bit
Download Link:
Download ADB Driver Installer
Server 1 | Server 2 (Direct Link)
Download CWM SP 4.4.2
Server 1 | Server 2 (Direct Link)
Credit to dssmex @XDA
Bahan yg perlu disiapin:
- ADB Driver Installer - Download
- CWM Sony Xperia SP - Download
- Baterai dalam keadaan yg cukup
Sebelum praktek instal CWM, HH kalian harus udah dalam keadaan di Root, terinstal aplikasi SuperSU dan USB Debugging dalam keadaan ON. Kalau HH kalian belum di root dan install supersu, mampir ke sini dulu gan (cara root sony xperia sp) dan untuk aktifin USB Debugging, baca cara enable USB debugging disini. Ini persyaratan wajib yaa supaya bisa instal custom recovery CWM / TWRP / Philz nya.
Baca juga:
Cara melegakan RAM di Android
Cara root semua jenis Android
Cara deodex ROM Xperia SP
Tanpa basa basi lagi, langsung aja ane kasi tutorialnya:
- Konekin XSP agan ke PC dengan kabel data
- Buka program ADB Driver Installer tadi yg udah di download, terus liat Status HH nya, jika status nya "Driver Incorrectly", langsung klik Install, hal ini berfungsi untuk menginstal driver Xperia SP kita agar HH nya dapat dikenali sistem PC Windows.
 |
| Install Driver ADB |
- Jika instalasi berjalan sukses, maka pada bagian Device Status, akan berubah menjadi OK, exit aja jika sudah selesai
- Sekarang, kalian ekstrak file CWM SP 4.4.1.zip yg sudah di download, bisa ekstrak dengan software 7zip , WinRAR dan sejesnisnya. Setelah itu jalankan file Install.bat dan akan muncul layar hitam command prompt seperti berikut
- Lanjut pilih opsi pertama (ketik angka 1), lalu enter untuk memulai proses instalasi custom recovery nya
 |
| Proses sedang berjalan |
 |
| Proses sedang berjalan |
- Pada saat proses instalasi berjalan, lihat di layar XSP kalian, akan ada permintaan Request Root Permission dari aplikasi SuperSU untuk memperbolehkan sistem Android diinstal CWM dkk. Di layar HH kalian akan muncul pop up menu SuperSU dan ada pilihan Deny / Grant , kalian harus pilih Grant supaya CWM bisa diinstal di Android kalian. Saran ane pastikan layar hp dalam keadaan menyala saat proses instalasi ini berjalan agar kalian bisa melihat request dari aplikasi superSU nya karena pilihan yg tampil ini hanya muncul selama 15 detik, jika kalian tidak memilih dalam waktu itu, maka otomatis aplikasi superSU akan memilih Deny dan menggagalkan instalasi CWM nya
- Jika instalasi CWM dan kawan kawan nya :D sukses, maka tampil tulisan "Philz Touch , CWM Touch , and TWRP succesfully installed" [ all done! ]
- Selamat XSP kalian telah berhasil diinstal CWM dkk. Kalian bisa mulai install custom ROM deh ^_^
Untuk masuk ke recovery mode, saat XSP di hidupkan akan muncul lampu LED Hijau - Putih - Merah (lampu berurut hidup dari kiri ke kanan), setelah lampu merah menyala di bagian kanan, selanjutnya akan berubah menjadi lampu biru. Saat lampu biru ini menyala, kalian bisa masuk ke recovery mode dengan menekan tombol volume up(+) untuk masuk ke Philz , volume down(-) untuk TWRP atau tekan tombol kamera untuk masuk ke recovery CWMDemikian yang dapat ane bagikan, silahkan komen jika kurang jelas :D
Tested On Windows XP & Windows 8.1 64 bit
Download Link:
Download ADB Driver Installer
Server 1 | Server 2 (Direct Link)
Download CWM SP 4.4.2
Server 1 | Server 2 (Direct Link)
Credit to dssmex @XDA
Go to link download
Friday, August 19, 2016
Install Custom Recovery Cannibal Touch Recovery on Lenovo S939 Android 4 4 or 4 2
Install Custom Recovery Cannibal Touch Recovery on Lenovo S939 Android 4 4 or 4 2
Install Custom Recovery Cannibal Touch Recovery on Lenovo S939 Android 4.4 or 4.2 - Alternative custom recovery here is Cannibal Touch Recovery for Lenovo S939 running Android KitKat or Android JellyBean. Cannibal touch recovery also have same function like any other custom recovery such as backup, restore, installing custom ROM, wipe data and cache, etc.
Custom recovery is the second modification that must be done if you wanna optimize your Lenovo S939 with custom recovery installed you can root Lenovo S939 with easily and install custom ROM on your Lenovo S939, but every changes made also have possibility to brick your Lenovo S939 like installing custom recovery and rooting Lenovo S939 make your warranty void and make basic user can delete system file, so please very consider it before making any change to your Lenovo S939.
Disclaimer :
This guide for educational purpose only, We not responsible if your device bricked after following this tutorial. Changing or modified Android system file may result bricked device so please be careful (DWYOR).

Downloads :
- COT_S939_Recovery ? file custom recovery, this file can installed using mobileUncle or with flash tool
- SP FlashTool v5.1352 ? tool that use to install custom recovery to your device.
- USB VCOM driver ? driver that need to be installed so flash tool can recognize your device.
Install Custom Recovery Cannibal Touch Recovery on Lenovo S939 Android 4.4 or 4.2
- First thing to do is install USB Vcom driver on your computer, without this driver installed on your computer flash tool will not recognize your device and progress bar will stay at 0%, for installing USB Vcom driver please refer to this below :
- turn off your device and remove the battery, If you device using non removable make sure that your device is completely turn off wait like 20 seconds after power off the device
- open device manager on your computer
- connect your device using USB cable
- there will be MTK65xx Preloader Devices show on your device manager, PORT section for 5 second or less and then disappear
- disconnect and connect your device again, right click on MTK65xx Preloader Devices before it disappear, select Update Driver Software
- point it USB VCOM extracted folder, and install the driver from there.
- disconnect and connect your device again, there will be Mediatek PreLoader USB VCOM Port on your device manager PORT section.
- After successful install USB Vcom driver now we can start the step to update Lenovo S920, for step by step for update please refer to below :
- Extract ROM downloaded and the flash tool on then same folder, for easy organize it and flashing it. Go to flash tool extracted folder and run flash_tool.exe. If you are using windows 7 or later please run it using administrator privilege.
- On the flash tool, please go to Options ? Option ? Download please make sure DA DL All with Checksum already checked, click X (Close) to back to Flash Tool, this option is very important so please dont forget it.

- Once back to flash tool, now please click on the Scatter-Loading button and point it to ROM extracted folder and the select MT6592_Android_scatter.txt this will automatically loaded recovery image.
- Now you can press Download button or hit CTRL+D.

- Installation will start once you connect your device, and only take time 5-10 seconds to finish. You will see GREEN CIRCLE on the middle of flash tool once the installation finish and you can disconnect your device.
- Done, You have successful install Cannibal Touch Recovery on your Lenovo S939 please confirm it with boot to recovery mode, press and hold Power button + Volume Up + Volume Down button until you can see cannibal touch main menu.
That all, how simple to install custom recovery on Lenovo S939. Please leave any comments if you found any problems or broken links regarding this guide and Thank you for your visit.
Go to link download
Thursday, August 18, 2016
How to Install Custom Dual Recovery TWRP and PhilZ Touch and ClockworkMod CWM on Sony Xperia Z1
How to Install Custom Dual Recovery TWRP and PhilZ Touch and ClockworkMod CWM on Sony Xperia Z1
This post will guide to you install Custom Recovery on your Xperia Z1 ( C6902, C6903, C6909, C6943 )
.jpg)
.jpg)
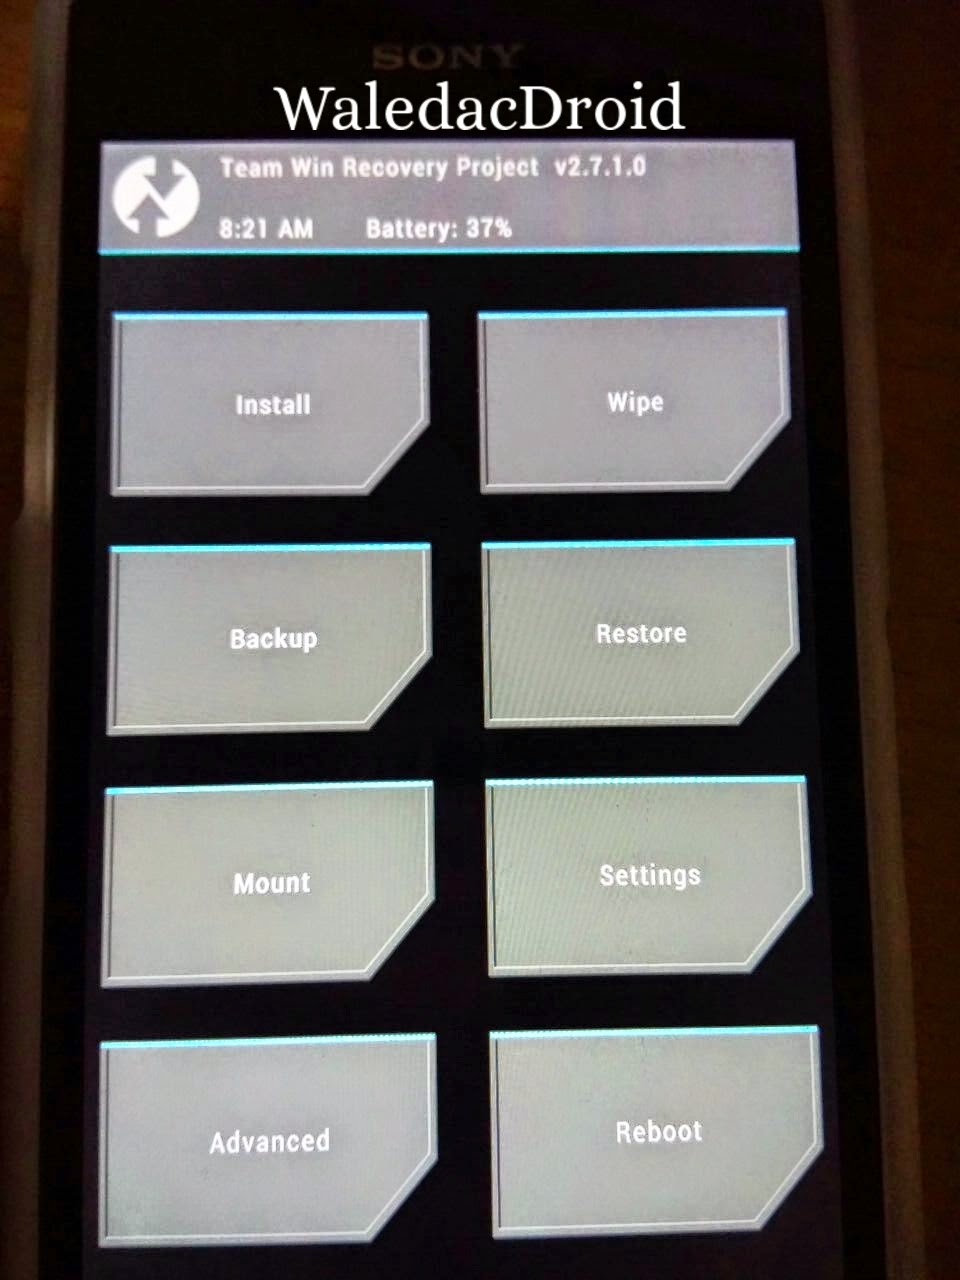
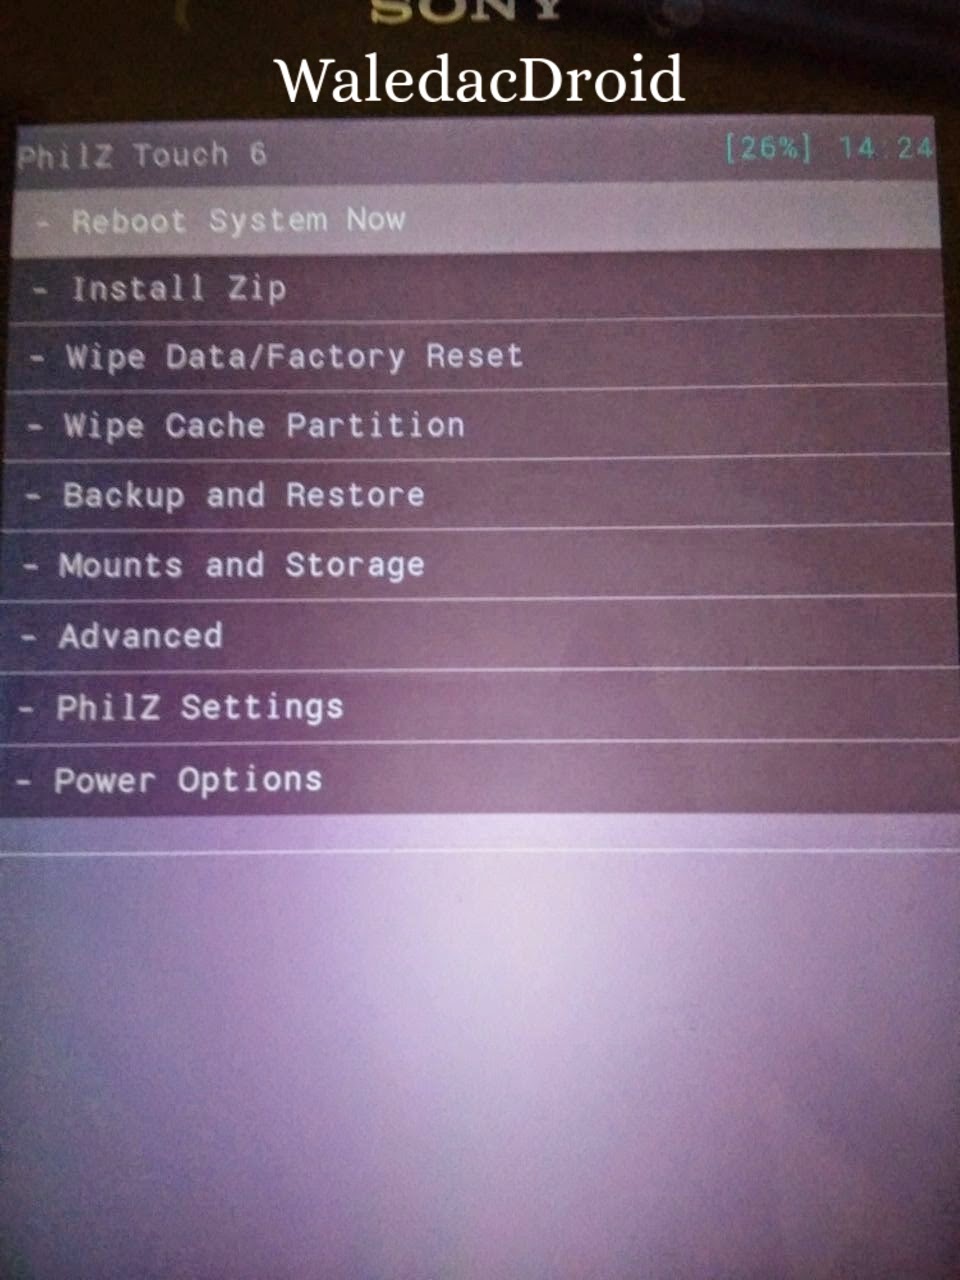
The recovery is Dual Recovery and includes PhilZ Touch 6.48.4 , CWM 6.0.5.0 and TWRP 2.7.1.0
Thanks to [NUT] for the Recovery.
This recovery is only for Xperia Z1 do not try it on any other phone. If you want to install Custom Recovery on any other Sony Z series phone just comment your model , I can provide you with the files :)
Disclaimer : I am not responsible if you brick your phone or if u make any other damage to your phone
Note : This works on both locked and unlocked bootloader devices!!!
REQUIREMENTS :-
1. Xperia Z1 running Android KitKat
2.
INSTRUCTIONS :-
1. Download this zip package - XZDualRecovery
2. Extract the zip file.
3. Enable USB debugging from Settings > Developer Options.
4. Enable Unknown sources from Settings > Security
5. Connect your phone to your Computer.
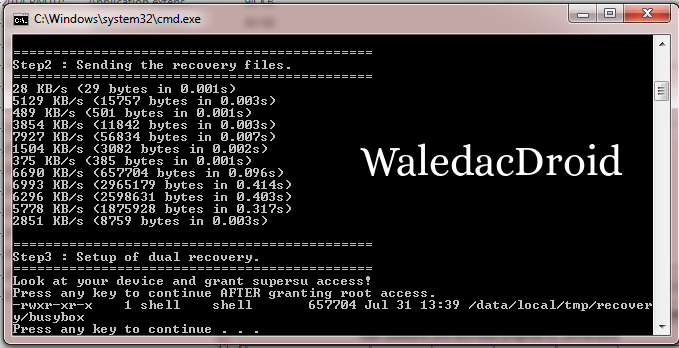
6. Click on install.bat ( CMD window will open , see below screenshot )
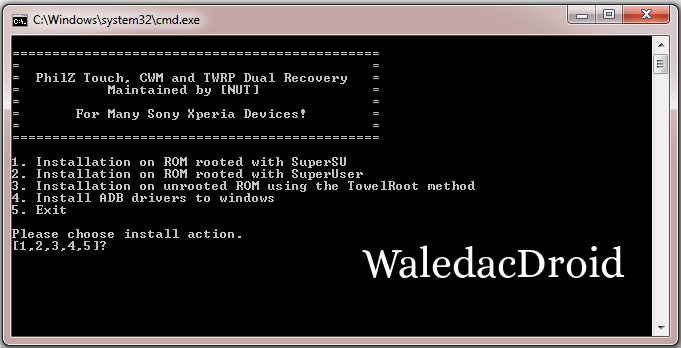.png)
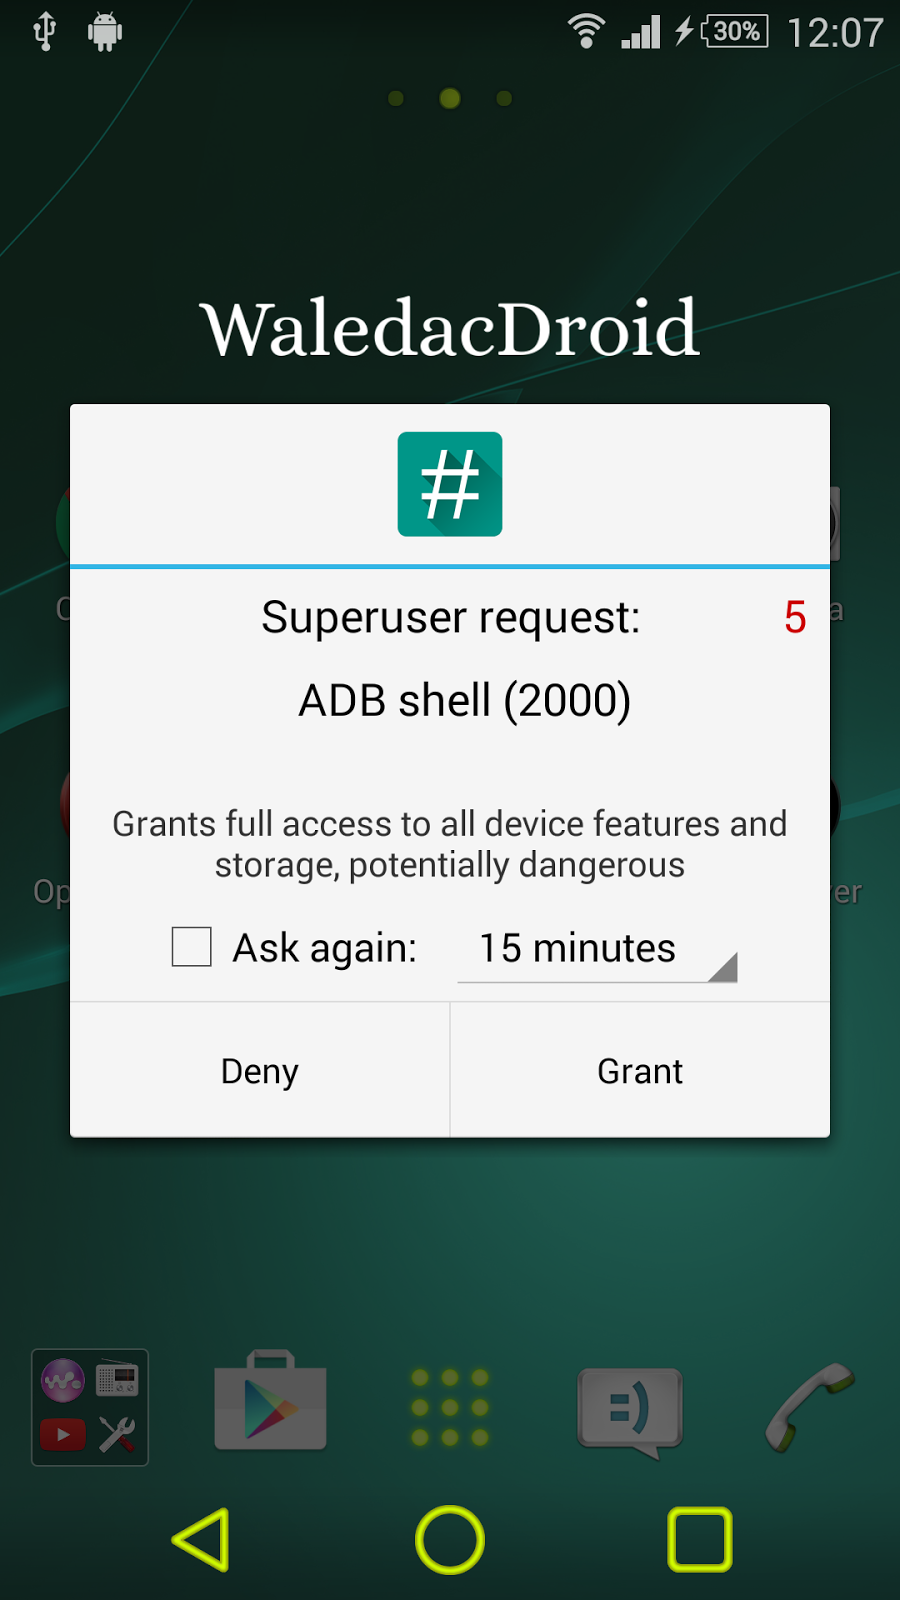
7. Now Press 1 and hit Enter , where it says Please choose install action. The installation will begin , you will be asked to grant Super User permissions in your mobile , Select Grant
.png)
.png)
.png)
HOW TO USE :-
1. Power Off your Phone.
2. Power On your Phone.
3. Press the Volume Down Button for TWRP and Volume Up Button for PhilZ Touch, when you see the Sony Logo and Green Notification Light
4. Also you will see an app named NDR Utils in the app drawer, you can use that to boot into recovery.
If you have any problems feel free to comment :)
The recovery is Dual Recovery and includes PhilZ Touch 6.48.4 , CWM 6.0.5.0 and TWRP 2.7.1.0
Thanks to [NUT] for the Recovery.
This recovery is only for Xperia Z1 do not try it on any other phone. If you want to install Custom Recovery on any other Sony Z series phone just comment your model , I can provide you with the files :)
Disclaimer : I am not responsible if you brick your phone or if u make any other damage to your phone
Note : This works on both locked and unlocked bootloader devices!!!
REQUIREMENTS :-
1. Xperia Z1 running Android KitKat
2.
- Root (Instructions to Root KitKat Build 14.4.A.0.157 , Click Here)
- Root (Instructions to Root Lollipop Build 14.5.A.0.270 or 14.5.A.0.242 , Click Here)
INSTRUCTIONS :-
1. Download this zip package - XZDualRecovery
2. Extract the zip file.
3. Enable USB debugging from Settings > Developer Options.
4. Enable Unknown sources from Settings > Security
5. Connect your phone to your Computer.
6. Click on install.bat ( CMD window will open , see below screenshot )
7. Now Press 1 and hit Enter , where it says Please choose install action. The installation will begin , you will be asked to grant Super User permissions in your mobile , Select Grant
HOW TO USE :-
1. Power Off your Phone.
2. Power On your Phone.
3. Press the Volume Down Button for TWRP and Volume Up Button for PhilZ Touch, when you see the Sony Logo and Green Notification Light
4. Also you will see an app named NDR Utils in the app drawer, you can use that to boot into recovery.
If you have any problems feel free to comment :)
Go to link download
Subscribe to:
Posts (Atom)